callmeageeth
Top 50 Contributor
callmeageeth's Stats
- Review Count377
- Helpfulness Votes1,300
- First ReviewJune 23, 2014
- Last ReviewJune 13, 2026
- Featured Reviews0
- Average Rating4.4
Reviews Comments
- Review Comment Count0
- Helpfulness Votes0
- First Review CommentNone
- Last Review CommentNone
- Featured Review Comments0
Questions
- Question Count0
- Helpfulness Votes0
- First QuestionNone
- Last QuestionNone
- Featured Questions0
- Answer Count25
- Helpfulness Votes50
- First AnswerOctober 20, 2014
- Last AnswerDecember 15, 2021
- Featured Answers0
- Best Answers7
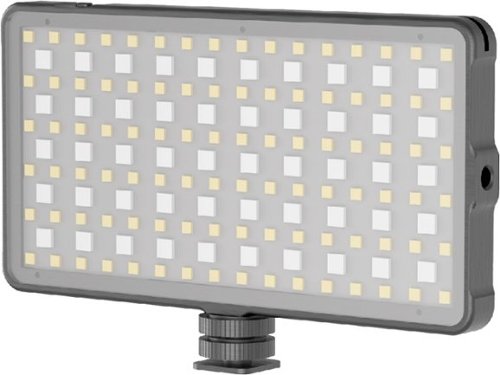
Digipower - RGB On Camera - Portable Video Light with Built-in 4000mAh Powerbank - 21 Lighting Effects, 3200K-5600K - LCD Screen - Black
Capture professional-grade pictures and videos with this Digipower RGB multimode LED light. A rechargeable battery offers up to 14 hours of use, while 24 brightness settings let you adjust the light to capture perfect shots. This Digipower RGB multimode LED light supports vertical and horizontal mounting for a customized setup.
High Quality and Versatile
Customer Rating

5.0
Posted by: callmeageeth
from Louisville, KY
on August 12, 2021
Images for this Review
(click to see full-size image)


I was expecting this light to be cheap and made of plastic. But I was completely wrong. The light itself is the size of a large phone (albeit, heavier), made of metal and extremely well built. It’s versatile in that it produces a broad range of lighting colors (vs. just a white light), brightness, and it can even charge your phone. Not to mention that it’s dead simple to use. If you are in the market for a light for video/photography (DSLR or phone) you should definitely consider this light.
IN THE BOX
You get the light itself, and a USB charging cable, as well as (I guess I’ll call it) an adapter that screws into the light so that you can mount it to the hot shoe in your DSLR.
You get the light itself, and a USB charging cable, as well as (I guess I’ll call it) an adapter that screws into the light so that you can mount it to the hot shoe in your DSLR.
EASE OF USE
It came charged up, (at least for me), but I plugged it in anyway. It took about 30 minutes to be completely charged. Turning it on is simple, there’s a hard switch on the top of it. When it’s on, the screen on the back is luminated which gives you a battery indicator, tells you how long it will last until the battery dies, and then it tells you the hue and brightness.
It came charged up, (at least for me), but I plugged it in anyway. It took about 30 minutes to be completely charged. Turning it on is simple, there’s a hard switch on the top of it. When it’s on, the screen on the back is luminated which gives you a battery indicator, tells you how long it will last until the battery dies, and then it tells you the hue and brightness.
I have to admit, the hue is presented in degrees, and as a camera novice, it didn’t mean much to me at first. But when you use the buttons on the right side of the light to adjust the hue, it changes the colors (as well as the percentage). For me, it ended up being trial and error. The light ranges from red, to yellow to green and more. I simply adjusted the settings to achieve the color that I felt best for what I was doing. And then obviously you can adjust the brightness, which is a plus and minus button immediately below the hue settings.
I make a lot of stop action movies at home with my kids (we are very much amateurs) and the light really came in handy. It’s portable, so you don’t have to keep it plugged in, and the different lights helped us create different vibes in our movies which we couldn’t do before. We’ve used it outside at night, and it worked great. It’s extremely bright.
MISC
The product description life says it can last 14 hours, but after I charged it up, it said it would last 2.5 hours. So I'm not sure what that's about. While I didn’t run the battery down in a straight 2.5 hours, I was able to charge it up, then use it at different times over the course of a week without issue. I don't know if the 14 hours rating is for the lowest brightness settings or what. I didn’t use it as an external battery pack, but I always appreciate flexibility in devices (I generally wouldn’t carry this light without a phone charger). And some people might use this light to record with videos on their phone, where this feature would be more handy.
The product description life says it can last 14 hours, but after I charged it up, it said it would last 2.5 hours. So I'm not sure what that's about. While I didn’t run the battery down in a straight 2.5 hours, I was able to charge it up, then use it at different times over the course of a week without issue. I don't know if the 14 hours rating is for the lowest brightness settings or what. I didn’t use it as an external battery pack, but I always appreciate flexibility in devices (I generally wouldn’t carry this light without a phone charger). And some people might use this light to record with videos on their phone, where this feature would be more handy.
You can adjust the light so it is horizontal or vertical. Meaning the adapter that attaches to your DSLR (or equivalent) can attach to the long spine or the shorter ends. I’m not sure why this matters, but I’m sure for some that know way more than me it might.
CONCLUSION
All in all, this is a well-built device with a lot of different color and brightness options that makes it extremely versatile.
All in all, this is a well-built device with a lot of different color and brightness options that makes it extremely versatile.
I would recommend this to a friend!
Mobile Submission: False
+1point
1out of 1found this review helpful.
Share this review:
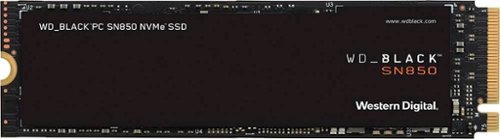
WD - BLACK SN850 500GB Internal Gaming SSD PCIe Gen 4 x4 NVMe
The future of gaming has arrived with the WD_BLACK~ SN850 NVMe~ SSD. Long load times are obsolete with PCIe~ Gen4 technology, reaching up to 7,000MB/s read speed and up to 4,100MB/s write speed. Spend more time playing and less time deleting, storing your latest and favorite games with 500GB capacity (not intended for NAS or server environments). This WD_Black internal SSD has a compact form factor and a PCIe Gen4 interface for compatibility with select PCs or laptops.
Terrific performance, worthy upgrade
Customer Rating
5.0
Posted by: callmeageeth
from Louisville, KY
on August 3, 2021
I feel like it’s pretty common knowledge at this point, but upgrading the hard drive in your computer is one of the easiest ways to improve performance. When moving from spinning HDDs to 2.5 inch SSDs you would see a marked improvement. Now, when moving from a 2.5 inch SSD to M.2 PCIe 4, there’s an even greater performance boost. If you can swing it (both financially and in terms of the computer you have), putting this Western Digital drive in your computer can offer tangible and noticeable improvements in your computer (especially for PC gaming). The load times for games and even processing video editing is an improvement over my “slower” (and smaller) M.2.
INSTALLATION
While I imagine most people who are shopping for this drive have replaced their hard drives before, I do want to at least mention the process for those that are new to PC upgrades and are looking to improve their computer’s performance.
While I imagine most people who are shopping for this drive have replaced their hard drives before, I do want to at least mention the process for those that are new to PC upgrades and are looking to improve their computer’s performance.
First, you need to check compatibility. Unfortunately, that’s very much dependent on your computer. Let’s assume this WD drive is compatible with your computer. Next, will you be replacing your existing hard drive or using it as a secondary drive? Assuming your PC has two M.2 slots (mine does) I would make this WD drive your main drive (the one with Windows on it) and use your existing one as a secondary drive.
If you have an open M.2 bay, the transfer process is relatively straightforward. But if you don’t, you’ll need some kind of USB device to plug your new WD drive into your computer’s USB port.
Either option you choose, you will need to download Western Digital’s Acronis software. It will allow you to mirror your bootable drive. Once it’s mirrored, all you do is put it in the computer and remove the old one.
PERFORMANCE
You can find more details about benchmarks and other data points about this drive’s performance on other sites. Based on real world performance, all I can say is that you won’t be disappointed. Whether it’s just booting up or loading a game the speeds are truly remarkable. I loaded Halo Master Chief Collection on my Acer Nitro 5 (which to be honest, was no slouch to begin with) and it loaded and I was off playing in no time.
You can find more details about benchmarks and other data points about this drive’s performance on other sites. Based on real world performance, all I can say is that you won’t be disappointed. Whether it’s just booting up or loading a game the speeds are truly remarkable. I loaded Halo Master Chief Collection on my Acer Nitro 5 (which to be honest, was no slouch to begin with) and it loaded and I was off playing in no time.
I edit family videos for fun, and I am able to render 4K movies in significantly less time than before. I can’t necessarily quantify it, but it’s noticeable, which is what matters to me.
Honestly on day-to-day tasks such as drafting Word documents, creating spreadsheets, video calls, surfing the web, I can see the difference in performance. It’s not night and day (from my older M.2) but it’s appreciable. And I’m certain if you were coming from a spinning hard drive or SSD 2.5 inch, it would be night and day (although I’m skeptical if your computer has a spinning HDD if it’s motherboard could support the faster speeds).
MISCELLANEOUS
One thing I wanted to mention is the WD Black dashboard program. I was unaware of it until I happened to stumble upon it. It wasn’t something that caught my attention in the packaging (assuming it says anything about it). But the WD Black Dashboard is a handy tool to check out the performance and health of your drive. It also monitors the temperature (which can be a big deal, as this drive can supposedly get pretty hot). It’s also where you can update the firmware (I didn’t know there was such a thing for HDDs, but when I first opened the program it said I needed to update the firmware in my brand new drive). It’s also where you can toggle the “gaming mode” on. This supposedly increases performance for gaming loads. It’s not a program you’ll be opening frequently, but it’s nice to periodically check on the status of your drive, namely the firmware, temperature and its health.
One thing I wanted to mention is the WD Black dashboard program. I was unaware of it until I happened to stumble upon it. It wasn’t something that caught my attention in the packaging (assuming it says anything about it). But the WD Black Dashboard is a handy tool to check out the performance and health of your drive. It also monitors the temperature (which can be a big deal, as this drive can supposedly get pretty hot). It’s also where you can update the firmware (I didn’t know there was such a thing for HDDs, but when I first opened the program it said I needed to update the firmware in my brand new drive). It’s also where you can toggle the “gaming mode” on. This supposedly increases performance for gaming loads. It’s not a program you’ll be opening frequently, but it’s nice to periodically check on the status of your drive, namely the firmware, temperature and its health.
PS5. As a PS5 owner, I have to mention that this drive is listed as being compatible for the PS5 (as an internal HDD). WITH THE CAVEAT that this model doesn’t have a heat sink. Sony tells you that you should only install a M.2 compatible drive into your PS5 with a heat sink, but you can buy an aftermarket heatsink for like 10 bucks and attach it. Just know that it is cleared to work with your PS5.
CONCLUSION
As a big fan of new tech, and someone who is pretty knowledgeable about PCs (even there are many more people out there with more expertise than I), the biggest endorsement I can give this drive is that it just works and the performance boost is noticeable. If you game, or any type of video editing or photo editing, things that demand a fast read-write speeds, you will benefit from the new generation of M.2 drives.
As a big fan of new tech, and someone who is pretty knowledgeable about PCs (even there are many more people out there with more expertise than I), the biggest endorsement I can give this drive is that it just works and the performance boost is noticeable. If you game, or any type of video editing or photo editing, things that demand a fast read-write speeds, you will benefit from the new generation of M.2 drives.
I would recommend this to a friend!
Mobile Submission: False
0points
0out of 0found this review helpful.
Share this review:
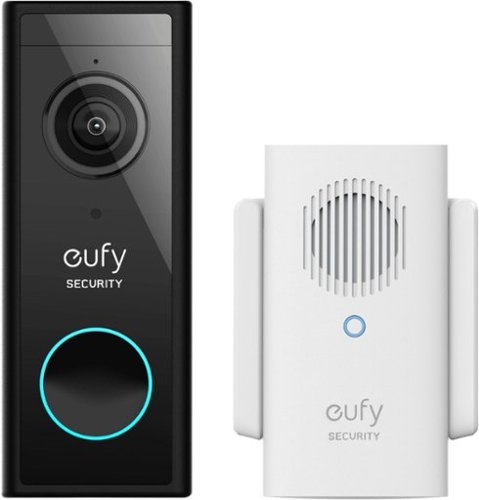
eufy Smart Wi-Fi 2k Video Doorbell with Chime is a battery powered (or wired- you choose) video doorbell that is the perfect protection for your home. With no monthly fee, enjoy 2K resolution so that you can see who is at your door, clearly. Talk to them via the 2-way mic, and be alerted when a human is at the door instead of the neighborhood dog. IP65 Weatherproof Ensures the Video Doorbell camera continues to operate in extreme temperatures from minus 4~F to 122~ F (minus 20~C to 50~C). Installation is easy. No need to mess around with complicated wiring, self-installation in minutes. Wireless Video Doorbell camera will also work with old chimes.
Terrific Value
Customer Rating
5.0
Posted by: callmeageeth
from Louisville, KY
on July 27, 2021
Images for this Review
(click to see full-size image)


Who says good security cameras have to be expensive? The market is flooded with home security cameras/lights, etc. Most are either really pricey (Arlo) or require a subscription service (Simplisafe). For most people, I’d like to think there is a middle area where you don’t necessarily want a monitoring service, but don’t want to pay out of the ear for security cameras. In comes Eufy. Eufy is an Anker brand, who is mostly known for its charging cables and adapters (which are great). So it’s a company you can trust. With all that being said, I found the Eufy camera to be pretty impressive and worthy of your attention.
IN THE BOX
You get the doorbell camera, Wi-Fi chime that plugs into an outlet, wires (in case your house already has wiring), charging cable (micro-USB), two mounting brackets (one can put the doorbell at a 15 degree angle), some security stickers and mounting hardware. You also get a microSD card which is already installed in the chime itself.
You get the doorbell camera, Wi-Fi chime that plugs into an outlet, wires (in case your house already has wiring), charging cable (micro-USB), two mounting brackets (one can put the doorbell at a 15 degree angle), some security stickers and mounting hardware. You also get a microSD card which is already installed in the chime itself.
SETUP
I judge security systems, or really any home networking or smart home device, by their ease of setup and integration into your existing system. If this is your first smart home device, then you’re golden. And even if you have a house full of Alexa or Google Speakers, you’ll be just ok, as the doorbell integrates well with both (I use Google Home).
I judge security systems, or really any home networking or smart home device, by their ease of setup and integration into your existing system. If this is your first smart home device, then you’re golden. And even if you have a house full of Alexa or Google Speakers, you’ll be just ok, as the doorbell integrates well with both (I use Google Home).
The instructions are well thought out, both in print and the app. It took me all of 10 minutes to be up and running. The only snag was naming the chime, that failed. I eventually “cancelled” the setup process and kept the device’s name.
So the first step is downloading the app, and signing in. Then you can follow the prompts. You plug in and connect your chime. It gives you recommendations on where to place it in your house. It’s relatively small but does stick out from the wall a couple of inches. After that’s connected (which only requires you to take a picture of the QR code), you then connect the doorbell. Then the app walks you through mounting, asking you a few questions about your front porch and suggesting where to place it for maximum motion detection. You get a nice sticker that you can use to attach to your wall and lets you easily figure out where to drill your holes for the mount.
Now your setup could be a little more involved if you use wiring, which my house didn’t have, so I used the battery. Using the battery did require me to charge the doorbell first. I very much appreciate the built in rechargeable battery vs. wasting double A batteries. Charging really doesn’t take long.
But once you connect the two devices to your app, attach the mount to the wall, the doorbell just snaps in. It’s really secure and the only way to take it off the wall is to use a small metal pin (one is included in the box). Of course someone could steal it, but if your device is charged you’ll catch them in the act. I don’t think there’s much to worry about there.
REAL WORLD USE
So in addition to ease of setup and use, it also matters how well it works. I think the Eufy doorbell works great. Great footage and the motion detection is accurate. If someone walks within about 15 feet of your doorbell, it will detect motion and an alert will be sent to your phone. It’s default setting is to record 60 seconds of the event (although it can be adjusted). You can watch it live at any time.
So in addition to ease of setup and use, it also matters how well it works. I think the Eufy doorbell works great. Great footage and the motion detection is accurate. If someone walks within about 15 feet of your doorbell, it will detect motion and an alert will be sent to your phone. It’s default setting is to record 60 seconds of the event (although it can be adjusted). You can watch it live at any time.
It will also sent an alert to your phone when someone rings the doorbell (as well as the chime ringing) so you know someone is at the door. You might ask, why would I need that if it detects motion? But if your phone isn’t nearby to alert you to the motion or ring, you can hear it inside the house.
The Eufy is billed as 2K, but it doesn’t really stream 2K to your phone. Sure, the image is really sharp (more than you really need) but the 2K footage comes into play when you look at it on the computer from the microSD card. And your computer monitor might not be 2K, but the high resolution will allow you to zoom in without losing much detail.
MISCELLANEOUS
The Eufy doorbell has a lot of settings within the app to customize how it works based on your needs. For example, you can turn the volume of both the doorbell and the chime up or down. You can snooze the doorbell’s motion detector if you’re kids are playing in the front yard. You can set it not to detect motion if you’re home and only alert you when the doorbell rings. The app is relatively intuitive, there’s a lot of choices within the menus but they make sense, so it’s easy to navigate. You can set it up within Google Home (through the Google Home app), you can even send video to any smart home devices with screens. So it’s really flexible.
The Eufy doorbell has a lot of settings within the app to customize how it works based on your needs. For example, you can turn the volume of both the doorbell and the chime up or down. You can snooze the doorbell’s motion detector if you’re kids are playing in the front yard. You can set it not to detect motion if you’re home and only alert you when the doorbell rings. The app is relatively intuitive, there’s a lot of choices within the menus but they make sense, so it’s easy to navigate. You can set it up within Google Home (through the Google Home app), you can even send video to any smart home devices with screens. So it’s really flexible.
The only minor downside, is the saving of the footage. You are stuck with the microSD card capacity, which is both a good and bad thing. It’s good because you don’t have to pay any service fees to store it in the cloud. It’s bad because your history is what it is. Generally, if you have reason to check the video you would pop out your card shortly after the event and it will be there. But you won’t be able, to go back in your entire history because the event might have been written over because the card ran out of space. In my opinion, having the option to have the footage secured in your house, in the chime, it’s much better than worrying about the cloud.
Battery life is rated for 6 months, but that depends on the settings. So if you want to maximize security and record 60 seconds of an event when it detects motion, and say it’s detecting motion on a busy street, your battery life might be shorter. But again, this is customizable; there are options within the app to optimize battery life. It’s easy to recharge, but I do worry about the small pin that you use to take it off the mount. It’s easy to lose. Especially when you only have to worry about using it every few months. You could probably find a needle or something else that might do the trick (think the small pin that releases sim cards in phones), but I can see that being a hassle if you misplace it.
CONCLUSION
Eufy has built a reasonably priced doorbell camera that works remarkably well. Not to mention it’s extremely customizable to fit your needs.
Eufy has built a reasonably priced doorbell camera that works remarkably well. Not to mention it’s extremely customizable to fit your needs.
I would recommend this to a friend!
Mobile Submission: False
+23points
23out of 23found this review helpful.
Share this review:
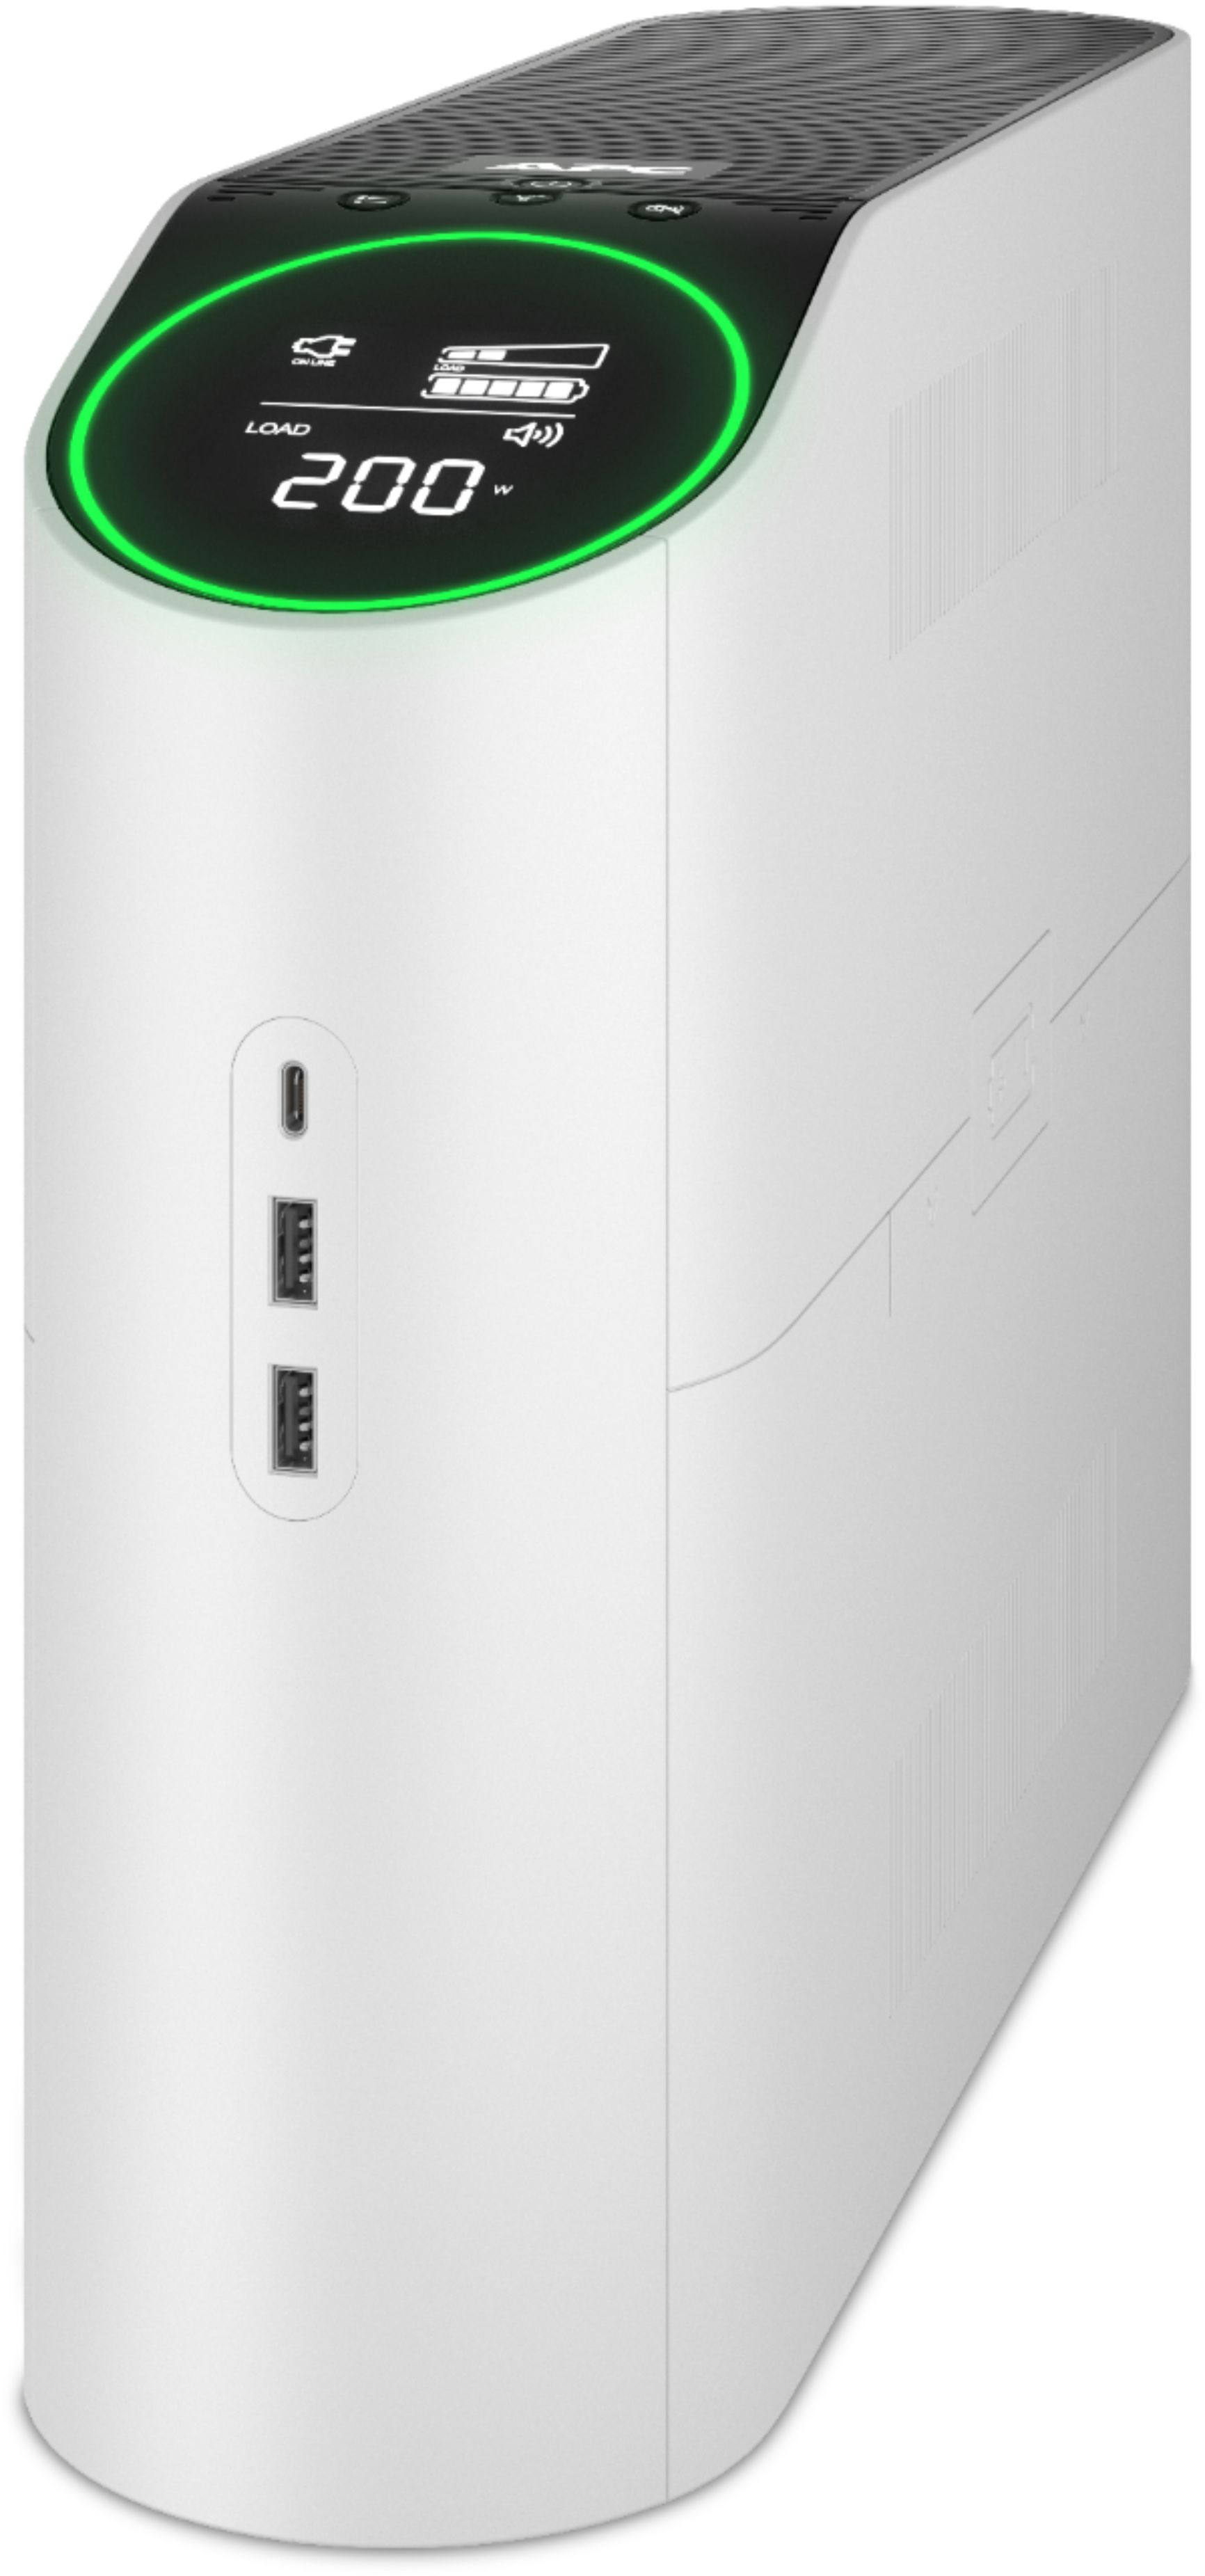
APC - Back-UPS Gaming 1500VA - 10 Outlet/3-USB Battery Back-up and Surge Protector - Arctic White
A gaming uninterruptible power supply (UPS) is a battery backup for your PC and console. APC Back-UPS~ Pro Gaming keeps you protected, connected, and in the game.
Expensive for limited use, but works very well
Customer Rating

4.0
Posted by: callmeageeth
from Louisville, KY
on July 24, 2021
Images for this Review
(click to see full-size image)


Battery backup aps
I don't want to say that this is a must-have, but it's a good thing to have battery backup if you suffer somewhat frequent power surges like I do. This is billed as a device that will allow you to keep gaming even if the power goes out, but for me if the power is out for an extended period of time I have bigger issues than simply staying online and playing video games.
However, as I said my house seems to suffer frequent power surges which can harm my consoles specifically my PS5. And as you probably know, when the power goes out when your PS5 or PS4 is on and you have extended storage there's always a risk that it will be damaged and it has to rebuild itself after powering back on. So for me, I think this APS gaming battery backup system is a nice addition to have so I don't have to necessarily worry about corrupt data on my hard drives. It works great, but it does have some shortcomings.
For anyone that's not familiar with APS battery backup systems, which are commonly used for computers and servers, they are essentially a fancy surge protector with a built-in battery. They usually have only a select number of outlets available to run off the battery. From my perspective, they aren't really designed to run computers for long periods of time but to give you the opportunity to safely shut down your computer if the power does in fact go out.
IN THE BOX
The first thing you'll notice that this box is extremely heavy. Contained inside is a gigantic device that really looks like a game console. It's extremely heavy and has a power cord built into it. You'll also find a USB data cable that I haven't quite figured out what to do with.
The first thing you'll notice that this box is extremely heavy. Contained inside is a gigantic device that really looks like a game console. It's extremely heavy and has a power cord built into it. You'll also find a USB data cable that I haven't quite figured out what to do with.
SET UP
Getting up and running is pretty simple. Just like any surge protector. You plug in the device into the wall and you plug all of your equipment into the back of the unit. Although I will add that before you use it you do have to plug in one of the power cables to the battery. You have to slide off the side of the device, which is easy to do, then you simply slide the red cable into the battery pack and put the case back together.
Getting up and running is pretty simple. Just like any surge protector. You plug in the device into the wall and you plug all of your equipment into the back of the unit. Although I will add that before you use it you do have to plug in one of the power cables to the battery. You have to slide off the side of the device, which is easy to do, then you simply slide the red cable into the battery pack and put the case back together.
As I said previously, not all of the outlets on the back of the device will be powered by battery in the event The power goes out, those outlets simply act as a surge protector. But I was pleasantly surprised to see how many outlets that can be powered by the battery. There are 10 total outlets which is more than most common search protectors and six of them are connected to the battery while four are simply standard surge protected outlets.
As you could imagine, anything you want to be running on battery power should the power go out should be plugged in one of the six outlets. This device is designed to plug in your router, TV, and game console so that you can stay connected and continue playing games if the power goes out.
SHORTCOMINGS
While my power has yet to go out since I've owned it, and I haven't tested the length of the battery time when the power's out, it's rated for x hours. But again if your power is going to be out for a while you might have other issues than just gaming like your refrigerator. So to me that's not really a big selling point, but I could see it being one for others.
While my power has yet to go out since I've owned it, and I haven't tested the length of the battery time when the power's out, it's rated for x hours. But again if your power is going to be out for a while you might have other issues than just gaming like your refrigerator. So to me that's not really a big selling point, but I could see it being one for others.
The main shortcomings of this device are pretty obvious when you simply look at it. It's pretty darn big, imagine an Xbox 360 but even bigger and a lot heavier. So you have to find space in your setup for this device to sit. And it can only be positioned vertically, not horizontally. So space in your entertainment setup could be one issue. For me, that wasn't much of an issue as I had plenty of cabinets based to hide it but what I did have issues with and this is common with virtually all surge protectors, is the fact that all of the outlets are really close together. If all home entertainment devices had standard three-prong plugs it would not be an issue, but as we all know some devices have large power bricks. For example I use Phillips lighting around my TV and that has a large adapter that takes up two spaces. I also have my router, which also has an extremely wide power adapter. So plugging in those two devices essentially take up four outlets in and of themselves. Of course you can always get small outlet extenders which luckily I have a few, but it's something that you might have to deal with.
DESIGN
I just want to highlight some of the thoughtful design aspects of this device which may not sway anybody who's considering buying it, but I think it does speak to the level of detail that was put into its design. Number one, it has some pretty cool lights and a LCD screen telling you about its status. You can hit a button to cycle the colors of the lights which is cool, and give it a futuristic look. I also really appreciate the lighting on the back of the device where the outlets are. There's a light on the back that illuminates just enough, the location of the plugs so you can see when you're plugging things in should, like me, you place The device in a cabinet or other dark space. This isn't a huge deal as you will probably only plug things in once and be done, but it's a nice little touch. You can cycle through on the display and see the voltage, watts, how much is left in the battery, which is nice but I have to admit that I don't always know what that means. I know what wattage and volts are generally speaking, but It doesn't mean anything to me in the context of having my devices plugged into it.
I just want to highlight some of the thoughtful design aspects of this device which may not sway anybody who's considering buying it, but I think it does speak to the level of detail that was put into its design. Number one, it has some pretty cool lights and a LCD screen telling you about its status. You can hit a button to cycle the colors of the lights which is cool, and give it a futuristic look. I also really appreciate the lighting on the back of the device where the outlets are. There's a light on the back that illuminates just enough, the location of the plugs so you can see when you're plugging things in should, like me, you place The device in a cabinet or other dark space. This isn't a huge deal as you will probably only plug things in once and be done, but it's a nice little touch. You can cycle through on the display and see the voltage, watts, how much is left in the battery, which is nice but I have to admit that I don't always know what that means. I know what wattage and volts are generally speaking, but It doesn't mean anything to me in the context of having my devices plugged into it.
CONCLUSION
If you're someone with frequent power surges where your power might go out for just a few brief moments, or if you're someone who is concerned about your electronics being damaged by power surges, or if you are a person that just wants to be prepared for all circumstances and be able to game when the power goes out, this is something that's definitely worth considering. But for the average person who isn't concerned about those types of issues, it's a pretty pricey surge protector. Not to mention that you will at some point have to replace the battery, and while I don't know how expensive that is, I imagine it's not cheap.
If you're someone with frequent power surges where your power might go out for just a few brief moments, or if you're someone who is concerned about your electronics being damaged by power surges, or if you are a person that just wants to be prepared for all circumstances and be able to game when the power goes out, this is something that's definitely worth considering. But for the average person who isn't concerned about those types of issues, it's a pretty pricey surge protector. Not to mention that you will at some point have to replace the battery, and while I don't know how expensive that is, I imagine it's not cheap.
I would recommend this to a friend!
Mobile Submission: True
0points
0out of 0found this review helpful.
Share this review:

Tweezerman - Baby Nail Clipper & File Set - Green/Grey
Shorten, shape, and smooth baby nails with Tweezerman's Baby Nail Clipper and Nail File Set. Designed with safety in mind, this nail clipper and file are gentle on tiny fingers and toes.
Easy to use; but pricier than alternatives
Customer Rating
4.0
Posted by: callmeageeth
from Louisville, KY
on June 22, 2021
Images for this Review
(click to see full-size image)


Tweezerman is (I think) a relatively new company specializing in high end manicuring devices, notably, tweezers. (and other items). But they have recently made a baby manicure set that is worth trying if you have little ones.
If you’ve ever cut a baby/toddler’s nails, you know it can be a harrowing process. Kids won’t sit still, they have tiny fingers and toes that require precision, and heaven forbid if you hit skin, they scream. And don’t get me started on cheap clippers. Baby’s nails are extremely thin and if you don’t have a good sharp clipper, it can make the process more cumbersome.
Bottomline is that baby manicuring is something that is important and doesn’t get enough attention. The Tweezerman clippers are something you didn’t know you needed. The baby clippers are large and sturdy and frankly, well put together. The top hinge when in use doesn’t swivel to the side, and it’s large enough to fit comfortably in your hand. The blades are sharp and make precise cuts. There’s also little overlap in the blades. What I mean by that, traditional clippers can go underneath the nail and if you’re not careful can push on that sensitive part of the skin under a kiddo’s nails. The Tweezerman version has plastic protecting the blade from going underneath the blade. What’s that mean? It ensures you won’t be jamming the bottom of the clipper blade too far underneath the kiddo’s nail. This works both ways, longer nails of say, a 5 year old, might require an extra snip, but it’s worth the trade off because my boys no longer complain that “it hurts” when I clip their nails.
And the file is thick and sturdy and really helps eliminate the jagged edges of baby nails (which can get surprisingly sharp).I didn’t used to file my kids’ nails, as clipping them was torturous enough for me and my kids, but filing them down smooth to remove sharp edges is painless and something I wish I did sooner.
Bottomline is that it’s a good purchase. It’s a little pricey, sure, but they work extremely well.
I would recommend this to a friend!
Mobile Submission: False
0points
0out of 0found this review helpful.
Share this review:

Google - Pixel Buds A-Series True Wireless In-Ear Headphones - Olive
Pixel Buds A-Series bring you rich, high-quality sound for a lot less than you~d expect. Their beamforming mics help make calls crystal clear.*** The flush-to-ear design is stylish, and the stabilizer arc keeps them in place so you can wear them even during the sweatiest workout.**
A must buy for Pixel Phone Owners
Customer Rating
5.0
Posted by: callmeageeth
from Louisville, KY
on June 22, 2021
Images for this Review
(click to see full-size image)


I own a Pixel 4XL and the Pixel Buds A Series are my new favorite earbuds. You can find better sounding earbuds with active noise canceling (Sony) but the price point, built in Google Assistant, and ease of use/pairing makes this a must have for Pixel Owners.
IN THE BOX
It’s a tiny box, you get the charging case with two ear buds, three sizes of tips (the medium size are already on the ear buds) and a USB-C to USB-A cable. Note that the case does not have wireless charging.
It’s a tiny box, you get the charging case with two ear buds, three sizes of tips (the medium size are already on the ear buds) and a USB-C to USB-A cable. Note that the case does not have wireless charging.
DESIGN
I just want to briefly mention the design, both of the case and the ear buds themselves. The case is made of plastic that has some grip to it. Meaning it doesn’t feel “slippery.” The case is pretty small, about the size of a Tic Tac container. The ear buds themselves are pretty small, with a small rubber hook that doesn’t come off that I personally like because it helps them stay secure in my ears. I found the Pixel Buds to be comfortable to wear for hours at a time.
I just want to briefly mention the design, both of the case and the ear buds themselves. The case is made of plastic that has some grip to it. Meaning it doesn’t feel “slippery.” The case is pretty small, about the size of a Tic Tac container. The ear buds themselves are pretty small, with a small rubber hook that doesn’t come off that I personally like because it helps them stay secure in my ears. I found the Pixel Buds to be comfortable to wear for hours at a time.
EASE OF USE
Bluetooth has been around so long, I feel pretty comfortable pairing anything with my phone/computer. That said, pairing the Pixel Buds A Series was incredibly easy (I’ve never used Airpods, but I’m confident it’s a similar process). Just having taken the earbuds out of the box, I simply flipped open the top lid, pulled out the ear buds, and almost immediately I got a notification on my Pixel to pair my headphones. It was that easy.
Bluetooth has been around so long, I feel pretty comfortable pairing anything with my phone/computer. That said, pairing the Pixel Buds A Series was incredibly easy (I’ve never used Airpods, but I’m confident it’s a similar process). Just having taken the earbuds out of the box, I simply flipped open the top lid, pulled out the ear buds, and almost immediately I got a notification on my Pixel to pair my headphones. It was that easy.
Even better than that, they pair instantaneously every time you take them out of the case. I’ve had other earbuds that sometimes pair immediately when I take them out of the case, other times I have to cycle Bluetooth on/off and sometimes even re-pair them. Not with the Pixel Buds. They simply work every time.
FEATURES
I mentioned earlier that the case doesn’t have wireless charging like last year’s Pixel Buds model. To me, that is not a big deal. The surface of the Pixel Buds have touch sensitive controls. Much has been made that you can’t control the volume, you can only tap it to stop tracks, double-tap to advance a track and three taps to go back. I’ve always found it hard to use touch controls on earbuds, they just aren’t always responsive. While you can’t control the volume from the Pixel Buds themselves, I found the controls to pause, advance tracks, etc. to be extremely responsive. I’ll take limited functionality (which can be difficult to memorize and use if it’s too complicated) for having features that work every time.
I mentioned earlier that the case doesn’t have wireless charging like last year’s Pixel Buds model. To me, that is not a big deal. The surface of the Pixel Buds have touch sensitive controls. Much has been made that you can’t control the volume, you can only tap it to stop tracks, double-tap to advance a track and three taps to go back. I’ve always found it hard to use touch controls on earbuds, they just aren’t always responsive. While you can’t control the volume from the Pixel Buds themselves, I found the controls to pause, advance tracks, etc. to be extremely responsive. I’ll take limited functionality (which can be difficult to memorize and use if it’s too complicated) for having features that work every time.
Google Assistant is also extremely responsive and frankly, I dig it a lot. I don’t always use it, but when you say “Hey, Google” with the Pixel Buds on, it activates the assistant and you can ask Google to do anything you would ask a Google Nest or your phone (i.e. ask for the news, weather, control lights, play a song, etc.). This is extremely helpful when you’re doing yard work or some other activity that makes accessing your phone difficult.
When you take an earbud out, say someone walks up to you and starts talking, the music just pauses. Then, when you put it back in, the music automatically resumes. This worked for me each and every time.
Battery life is also on par with what you’d expect. 5 hours on a full charge, with the ability to charge the earbuds in the case 4-5 more times. Honestly, I’ve never used them 5 hours straight, so I can’t say they actually make it that far, but I think you’d be hard pressed to wear them on a full charge and complain they didn’t last long enough.
They also have some water resistance. I went running with them and they came out no worse for the wear. And even better, they didn’t fall out or even come loose. I was never concerned that they would fall out.
I just want to mention that I heard the older model Pixel Buds suffered from audio connection issues. Meaning they would cut out. I didn’t own those so I can’t validate those concerns, but in the time I’ve owned the Pixel Buds A Series, they’ve yet to drop out even once. Although I admittedly kept my phone in my pocket when I used it; I’ve never walked away from my phone to see how they would work in that scenario.
SOUND QUALITY
Last but certainly not least, the sound quality. These Pixel Buds don’t have deep bass, but they make up for it with sound accuracy and clarity. I listen to podcasts, audiobooks and all types of music. I found the quality to be pretty solid. The only drawback is that the Pixel Buds let in a lot of noise. So if you’re walking on a sidewalk near a busy road, you’re going to hear background noise (which isn’t necessarily a bad thing). When there’s a lot of ambient noise, I found the music to be a little muted. But all-in-all, the sound quality is pretty darn good.
Last but certainly not least, the sound quality. These Pixel Buds don’t have deep bass, but they make up for it with sound accuracy and clarity. I listen to podcasts, audiobooks and all types of music. I found the quality to be pretty solid. The only drawback is that the Pixel Buds let in a lot of noise. So if you’re walking on a sidewalk near a busy road, you’re going to hear background noise (which isn’t necessarily a bad thing). When there’s a lot of ambient noise, I found the music to be a little muted. But all-in-all, the sound quality is pretty darn good.
CONCLUSION
These are must haves for Pixel phone owners and deserve serious consideration for Android users. I can’t say the same for Apple iPhones, but when you combine the sound quality, price, built in Google Assistant, you have a great value. And like I’ve mentioned before, at least speaking from a Pixel phone owner’s perspective, they just simply work, and that means a lot.
These are must haves for Pixel phone owners and deserve serious consideration for Android users. I can’t say the same for Apple iPhones, but when you combine the sound quality, price, built in Google Assistant, you have a great value. And like I’ve mentioned before, at least speaking from a Pixel phone owner’s perspective, they just simply work, and that means a lot.
I would recommend this to a friend!
Mobile Submission: False
+11points
17out of 23found this review helpful.
Share this review:

ASUS - ROG 13.4" Touchscreen Gaming Laptop - AMD Ryzen 9 - 16GB Memory - NVIDIA GeForce RTX 3050 Ti V4G Graphics - 1TB SSD
ASUS ROG Gaming Laptop. Enjoy everyday gaming with this ASUS notebook PC. The AMD Ryzen 9 processor and 16GB of RAM let you run graphics-heavy games smoothly, while the potent NVIDIA RTX 3050 Ti V4G graphics produce high-quality visuals on the 13.4-inch WUXGA Touchscreen display. This ASUS notebook PC has 1TD SSD that shortens load times and offers ample storage.
Nearly perfect ultra portable
Customer Rating
5.0
Posted by: callmeageeth
from Louisville, KY
on June 15, 2021
Images for this Review
(click to see full-size image)


I’m a traveling professional who likes to play video games. I’m a little late to the PC gaming scene, but I’ve been enjoying it after investing in a several year old Alienware desktop and several year old Acer Nitro 5. It goes without saying that gaming laptops can’t replace desktop, but man, for me, someone who travels a lot with a laptop, this ASUS simply can’t be beat for the money. I can’t comment on all gaming laptops and compare one to another, but if you are in the market, ASUS demands your attention.
I’ve owned an older Alienware desktop, and have an Acer Nitro 5 for travel. This new Asus is now my go to. The Nitro is nice, but the NVIDIA GTX card was outdated (relatively speaking). And, it was pretty thick (not unbearably though). I haven’t tried the Razer Blade 13 inch, but I’d have to imagine the ASUS is the functional equivalent. Plus, the ASUS gives you the 360 degree hinge (which I’ll admit, isn’t a huge deal to me). The only downside is the limited number of USB ports, but it at least has a full size HDMI 2.1 port.
IN THE BOX
Not much. The laptop and USB charger. Some models I’ve heard come with a stylus and a sleeve, not this one. I’m okay without the stylus, but I’d like a sleeve. But no big deal.
Not much. The laptop and USB charger. Some models I’ve heard come with a stylus and a sleeve, not this one. I’m okay without the stylus, but I’d like a sleeve. But no big deal.
SPECS
I won’t go over the specs in detail, Best Buy’s website is better for that. But know that it has two GPUs, an iGPU (AMD Ryzen integrated) for low power consumption. Obviously the RTX 3050 kicks in when you’re gaming, the iGPU integrated graphics kicks in when doing basic computing tasks. The screen is also full HD with 120 hz. While I’m a guy who always wants the highest resolution, 1080p on a 13 inch screen is more than sufficient. And the high refresh rate on the screen makes everything silky smooth, not just games.
I won’t go over the specs in detail, Best Buy’s website is better for that. But know that it has two GPUs, an iGPU (AMD Ryzen integrated) for low power consumption. Obviously the RTX 3050 kicks in when you’re gaming, the iGPU integrated graphics kicks in when doing basic computing tasks. The screen is also full HD with 120 hz. While I’m a guy who always wants the highest resolution, 1080p on a 13 inch screen is more than sufficient. And the high refresh rate on the screen makes everything silky smooth, not just games.
GAMING
As a casual PC gamer (meaning I don’t build my own PCs, and don’t do my own upgrades) who plays a broad range of games and generally lets the computer tell me what the best graphics settings are, I found the ASUS to handle everything I could throw at it. I played Cyberpunk 2077, Far Cry 5, and NBA 2K21, with a splash of Anno 1800. I let the computer pick the default graphics settings and I was pleasantly surprised. When gaming I used a Logitech gaming mouse and an Xbox controller (for NBA 2K).
As a casual PC gamer (meaning I don’t build my own PCs, and don’t do my own upgrades) who plays a broad range of games and generally lets the computer tell me what the best graphics settings are, I found the ASUS to handle everything I could throw at it. I played Cyberpunk 2077, Far Cry 5, and NBA 2K21, with a splash of Anno 1800. I let the computer pick the default graphics settings and I was pleasantly surprised. When gaming I used a Logitech gaming mouse and an Xbox controller (for NBA 2K).
I thought the RTX looked great, as good, or almost as good as the new generation of consoles. Of course, you’re playing on a smaller screen, but in having such a small laptop, that’s a tradeoff I’m willing to take. Not to mention the HDMI 2.1 port. I plugged in my Dell 27 inch gaming PC and I was able to run most games at QHD resolution on higher settings (with the higher refresh rate) and was, again, pleasantly surprised at the quality. I thought there would be some sacrifices and I’m sure there are when compared to a dedicated desktop PC with desktop grade graphics card but for the most part, the RTX card in the ASUS is all you need in most cases. The higher refresh rate is something you don’t know you need until you see it. It truly makes a huge difference in all games, not just competitive FPS. I really enjoyed playing Cyberpunk on this laptop and thought the game looked better than my several year old Alienware.
GENERAL LAPTOP USE
I dabble in video editing, mostly home movies of my kids captured on drones and GoPros. I found the ASUS to handle that well. It didn’t slow down much, if at all, when editing 4K videos. Of course, it’s not as quick as a desktop and I much prefer editing on a larger screen, nonetheless it’s more than capable of handling those types of tasks.
I dabble in video editing, mostly home movies of my kids captured on drones and GoPros. I found the ASUS to handle that well. It didn’t slow down much, if at all, when editing 4K videos. Of course, it’s not as quick as a desktop and I much prefer editing on a larger screen, nonetheless it’s more than capable of handling those types of tasks.
In terms of normal day-to-day computing, obviously this machine can handle it without problems. From web browsing, to video chat, to creating Excel spreadsheets and Word documents, it does great. And I can say the 16:10 ratio is particularly nice in having windows side-by-side. It’s not much more screen real estate, but at 13 inches, every little bit counts.
I found the battery life to be superb. I went nearly a week of general computer use without having to charge it. Obviously, gaming will knock the battery life down considerably.
KEYBOARD
You can’t really discuss a laptop without mentioning the keyboard. I type on a computer for work everyday, so the typing experience is a big deal to me. I prefer my mechanical keyboard, but you obviously don’t have the luxury of having a separate keyboard when traveling. In any event, this keyboard is pleasant to type on. It’s got plenty of travel and has a nice “clicky” sound/feeling that is satisfying to use (and not too loud to bother others. It doesn’t replace my mechanical keyboard on my desktop but it’s great for a laptop.
You can’t really discuss a laptop without mentioning the keyboard. I type on a computer for work everyday, so the typing experience is a big deal to me. I prefer my mechanical keyboard, but you obviously don’t have the luxury of having a separate keyboard when traveling. In any event, this keyboard is pleasant to type on. It’s got plenty of travel and has a nice “clicky” sound/feeling that is satisfying to use (and not too loud to bother others. It doesn’t replace my mechanical keyboard on my desktop but it’s great for a laptop.
QUIRKS
I would be remiss to not mention some of the little quirks of this machine, or drawbacks. But they’re not really drawbacks per se, some are just limitations of any 13 inch thin laptop. The first is the fingerprint reader. I found it abysmal. I set it up when I started my computer but it recognizes my fingerprint maybe 10 percent of the time. I don’t even use it anymore. It’s on the power button, which I don’t mind, but it’s so unresponsive I wonder why it’s even there.
I would be remiss to not mention some of the little quirks of this machine, or drawbacks. But they’re not really drawbacks per se, some are just limitations of any 13 inch thin laptop. The first is the fingerprint reader. I found it abysmal. I set it up when I started my computer but it recognizes my fingerprint maybe 10 percent of the time. I don’t even use it anymore. It’s on the power button, which I don’t mind, but it’s so unresponsive I wonder why it’s even there.
Ports. I know this is a small gaming laptop, but there are only 3 ports. HDMI, USB-C and your standard USB-A. There is a spot for ASUS’ proprietary docking cable, which is suited for the base model of this laptop (so you can plug in the RTX card to an external graphics unit). But for this particular model it ends up taking space that could have been used for an additional USB port. Obviously there’s little utility in plugging in another laptop RTX card in the external port when one is built in. But I digress. The biggest issue with the lack of ports is that you need the USB-C to charge it. So when you’re gaming, there goes one of the USB ports.
I need to mention that this is a 360 laptop so the screen flips all the way around. Like I said, that’s cool and I guess it’s nice to have, but I rarely use that feature. I do very much appreciate the touch screen as I generally use it when scrolling through documents/web pages. And it’s extremely responsive. Had this come with a stylus, I might have found myself doodling on it, but without that, I find it’s use as a tablet extremely limited (mostly due to limitations in Windows itself.)
CONCLUSION
All-in-all, this is my new favorite computer and easily replaces my 15 inch Acer Nitro. Not only because of the better GPU, but the size, build quality, and frankly all around package, is much more useful to me. From gaming, to work, this computer can handle it all. Like I said, if you are in the market for a small laptop, that travels well AND can handle most PC games on higher settings, this is one to seriously consider. Thus far I’ve found very little to not like.
All-in-all, this is my new favorite computer and easily replaces my 15 inch Acer Nitro. Not only because of the better GPU, but the size, build quality, and frankly all around package, is much more useful to me. From gaming, to work, this computer can handle it all. Like I said, if you are in the market for a small laptop, that travels well AND can handle most PC games on higher settings, this is one to seriously consider. Thus far I’ve found very little to not like.
I would recommend this to a friend!
Mobile Submission: False
0points
8out of 16found this review helpful.
Share this review:

JLab - JBuddies Studio Pro Over-Ear Headphones - Black
Great for older kids with a large, over-ear design, the JBuddies Pro offer the ultimate focus for home or school. With all day comfort and a volume regulator to keep young ears safe, these headphones are perfect for sensitve and growing kids ears.
Great kid headphones with volume limiter
Customer Rating
5.0
Posted by: callmeageeth
from Louisville, KY
on June 2, 2021
Images for this Review
(click to see full-size image)


These are great little headphones that are made for kids. They sound pretty good to me, although they don’t fit on my head, and my kid doesn’t complain and frankly, thinks they’re awesome. They’re at a great price point too, and make long car rides more bearable than having a tablet/game system blasting noise into the car on a long drive. I wish the audio cable was a bit longer, it’s surprisingly short, but admittedly, it hasn’t stopped by kid from being able to use them.
These are no frills kids headphones. They don’t have noise cancelling, but they do have a mic built in with a convenient mute button. My kid doesn’t use them to chat yet, but they’re nice to have in the event he needs it. But what is important is what’s built inside the ear cup. Don’t tell your kids, but there’s a volume limiter switch that limits how loud the volume is, which is perfect for young ears. Lord knows I listened to music too loud as a kid, and as a parent, it’s nice to see this feature built into the headphones. It’s set at a certain decibel range, but you can switch it to let in a little more volume if you’re in a loud environment.
In terms of build quality, they’re all plastic, so I’m not sure how long they’ll last, but I have to say, for $25 I’m impressed with the quality. They’ve already been dropped a few times and they’re no worse off.
They do fold up, but with ear cups, it doesn’t really save too much space. I wish there was a little travel bag for them but again, a soft bag won’t necessarily prevent any damage when the headphones are being carried in a kids bag with who knows what.
Bottomline, these are solid headphones for kids at a great price, with volume limiter that can give parents peace of mind that their kids’ hearing is protected from loud decibels of competing headphones.
I would recommend this to a friend!
Mobile Submission: False
+1point
1out of 1found this review helpful.
Share this review:

Circadian Optics - Lumine Light Therapy Lamp - Gray
Circadian Optics is a maker of bright light therapy lamps that mimic daylight. Our designer lamps allow you to get the light you need, right at your desk. Symmetrical and minimalist, Lumine~s versatile design fits as well in a home as it does in an office. It~s perfectly square top-to-bottom light panel and integrated stand create a bold, modern aesthetic.
Great way to simulate daylight in dark rooms
Customer Rating
4.0
Posted by: callmeageeth
from Louisville, KY
on June 1, 2021
Images for this Review
(click to see full-size image)


This lamp can be useful, but you need to understand what it does and doesn’t do. It’s not a “smart lamp” that wakes you up with light, but is a manual light that you use to help “wake you up” after waking up. Think of it as another cup of coffee in the morning.
IN THE BOX
Pretty simple, the light which is approximately 8x9 inches and 1.5 inches thick, a power cord, and a small bracket that inserts into the back and acts as the stand.
Pretty simple, the light which is approximately 8x9 inches and 1.5 inches thick, a power cord, and a small bracket that inserts into the back and acts as the stand.
SETTING UP
While it may not be “smart” it is easy to use and operate. I did have some difficulties fitting the stand into the back of it, there’s not much wiggle room, and I felt like it would break. It seemingly comes out (for storage/transport) but I’m hesitant to take it back out for fear of breaking it.
While it may not be “smart” it is easy to use and operate. I did have some difficulties fitting the stand into the back of it, there’s not much wiggle room, and I felt like it would break. It seemingly comes out (for storage/transport) but I’m hesitant to take it back out for fear of breaking it.
You simply plug the power cord into the wall and the back of the light, and voila, you’re done.
EASE OF USE
Again, a recurring theme is that this product is dead simple to use. There’s one power button in the front. It looks like it “clicks” in and depresses, but it feels mostly touch sensitive. Nonetheless, it’s extremely responsive. It cycles through 4 settings, bright, less bright, relatively dim, and off. That’s it.
Again, a recurring theme is that this product is dead simple to use. There’s one power button in the front. It looks like it “clicks” in and depresses, but it feels mostly touch sensitive. Nonetheless, it’s extremely responsive. It cycles through 4 settings, bright, less bright, relatively dim, and off. That’s it.
In terms of using it, the instructions say not to stare directly at it (which is nearly impossible, it’s pretty bright) and to keep it 10-18 inches away from your face, directed off to the side.
BENEFITS
I want to pause and mention the instruction booklet. My take, and I may not be entirely correct, is that this light is meant to help wake you up and/or keep you up. The instructions say to use it in the morning for 30 or so minutes at a time (it suggests you start with a less bright setting in the beginning). You’re also directed not to use it 4 hours before bedtime. I haven’t tested if I’m able to fall asleep if I use it 4 hours before bedtime.
I want to pause and mention the instruction booklet. My take, and I may not be entirely correct, is that this light is meant to help wake you up and/or keep you up. The instructions say to use it in the morning for 30 or so minutes at a time (it suggests you start with a less bright setting in the beginning). You’re also directed not to use it 4 hours before bedtime. I haven’t tested if I’m able to fall asleep if I use it 4 hours before bedtime.
MY IMPRESSIONS
This device is extremely hard to evaluate, because while the idea seems practical and logical, it feels like pseudo-science; the idea that light therapy helps you wake up and sleep better. Again, it makes sense. But I have no real way to empirically prove their claims. What I can say is that I use it at my office when I get there in the morning, and after lunch when I feel like I’m ready for a nap. I can’t really say one way or the other if using the lamp for light therapy in the morning helps me sleep, but I can certainly say that it helps keep me awake. Imagine being drowsy in the morning, maybe a bad night’s sleep, I turn the light on off to the side of my desk and I feel more awake. It’s a weird thing to describe other than I’m not yawning. That’s not to say I’m hyper like caffeine, but I do feel rejuvenated. Maybe it’s “light therapy”, maybe it’s just having a somewhat annoying bright light shining near your face.
This device is extremely hard to evaluate, because while the idea seems practical and logical, it feels like pseudo-science; the idea that light therapy helps you wake up and sleep better. Again, it makes sense. But I have no real way to empirically prove their claims. What I can say is that I use it at my office when I get there in the morning, and after lunch when I feel like I’m ready for a nap. I can’t really say one way or the other if using the lamp for light therapy in the morning helps me sleep, but I can certainly say that it helps keep me awake. Imagine being drowsy in the morning, maybe a bad night’s sleep, I turn the light on off to the side of my desk and I feel more awake. It’s a weird thing to describe other than I’m not yawning. That’s not to say I’m hyper like caffeine, but I do feel rejuvenated. Maybe it’s “light therapy”, maybe it’s just having a somewhat annoying bright light shining near your face.
Whether you believe in light therapy or not, I can say that I use it everyday, and it helps me stay awake. I’m not going to say it makes me smarter or more focused, but it does help rejuvenate, especially after a bad night’s sleep.
CONCLUSION
If you live or work in a dark space, or just lacking in natural light, I would give this light a shot. It certainly “brightens” the room (pun intended) but it does a decent job at mimicking natural sunlight. It creates some interesting commentary from my work colleagues (as they walk by my office with this extremely bright light pointing towards me) but I do genuinely find some utility in using it. And, it looks like an attractive frame when off (an attractive frame with no picture) so it’s not entirely an eyesore when it’s off.
If you live or work in a dark space, or just lacking in natural light, I would give this light a shot. It certainly “brightens” the room (pun intended) but it does a decent job at mimicking natural sunlight. It creates some interesting commentary from my work colleagues (as they walk by my office with this extremely bright light pointing towards me) but I do genuinely find some utility in using it. And, it looks like an attractive frame when off (an attractive frame with no picture) so it’s not entirely an eyesore when it’s off.
I would recommend this to a friend!
Mobile Submission: False
0points
0out of 0found this review helpful.
Share this review:
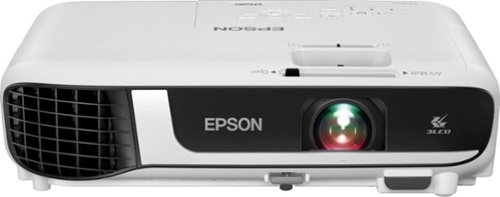
Epson - EX5280 3LCD XGA Projector with Built-in Speaker - White
Impress your audience and own the room with the ultra bright EX5280 projector, offering 3,800 lumens of color and white brightness to deliver crisp, detailed presentations, spreadsheets and videos ~ even in well-lit spaces. From home offices to video conference rooms, this sleek, compact projector makes it easy to display captivating, big-screen images in nearly any location, using advanced 3-chip 3LCD technology and stunning XGA resolution. Perfect for creating dynamic, engaging presentations, the EX5280 allows for easy Zoom video conferencing, accepts 4K content and conveniently connects to streaming devices, such as Fire TV, Apple TV~, Roku, and Chromecast~, through the HDMI~ port so you can easily share a variety of rich content, including movies, TV shows and more.
Great image quality and imaging flexibility
Customer Rating
5.0
Posted by: callmeageeth
from Louisville, KY
on May 14, 2021
Images for this Review
(click to see full-size image)

This is a capable all around projector, and perfect for business presentations. Even in less than optimal conditions. You can use this, obviously, to watch TV, etc. and it would work just fine, but it’s more geared for work/school presentations and the like. I say this because of the limited ports (which aren’t particularly conducive to home theater setups and lack of “smart” TV functionality.
IN THE BOX
It’s pretty barebones. You get the projector, power cord, remote and 2 double AA batteries. I wish it came with an HDMI cable, but I expect most people have some hanging around the house/office. It also includes a convenient carrying bag, but it’s softshell, so don’t plan on throwing it around or placing heavy things on top of it.
It’s pretty barebones. You get the projector, power cord, remote and 2 double AA batteries. I wish it came with an HDMI cable, but I expect most people have some hanging around the house/office. It also includes a convenient carrying bag, but it’s softshell, so don’t plan on throwing it around or placing heavy things on top of it.
The projector isn’t super tiny, but it’s much smaller than older projectors. I wouldn’t call this travel size, since they make projectors the size of soda cans, but it’s certainly small and light enough to the point where it’s not a burden to take with you when you need it.
PROJECTOR PORTS
There aren’t many ports in the back of the projector. And to my surprise, it seems geared to cover old and new technology. It has an old school VGA port, composite cables, and HDMI port. It also has a USB-B input, which I guess is for connecting a computer, but I don’t really know. It has a USB-A port, which I’m guessing allows you to play files directly from a thumb drive. But honestly I didn’t test it. HDMI is really all I need, but having VGA is nice, if I ever run into an issue and need it (which is still unlikely).
There aren’t many ports in the back of the projector. And to my surprise, it seems geared to cover old and new technology. It has an old school VGA port, composite cables, and HDMI port. It also has a USB-B input, which I guess is for connecting a computer, but I don’t really know. It has a USB-A port, which I’m guessing allows you to play files directly from a thumb drive. But honestly I didn’t test it. HDMI is really all I need, but having VGA is nice, if I ever run into an issue and need it (which is still unlikely).
IMAGE QUALITY
I must say, the brightness of the projector is pretty spectacular. Our office has an open conference room with lots of windows. Our old projector required us to close the shades and turn off all the lights. The Epson projector is so bright we didn’t have to close the shades or turn off the lights. While turning off lights and closing shades is generally an option, it’s really nice to have the flexibility of being able to project something in the middle of the day, in bright conditions. Obviously, the image looks better in the dark, but this is seemingly as bright as an LCD TV.
I must say, the brightness of the projector is pretty spectacular. Our office has an open conference room with lots of windows. Our old projector required us to close the shades and turn off all the lights. The Epson projector is so bright we didn’t have to close the shades or turn off the lights. While turning off lights and closing shades is generally an option, it’s really nice to have the flexibility of being able to project something in the middle of the day, in bright conditions. Obviously, the image looks better in the dark, but this is seemingly as bright as an LCD TV.
The image quality itself is high def, so the image quality looks good, but make no mistake, this is no 4K image quality. Which frankly is fine, since what I use this for is PowerPoint presentations. Which is why I said you may not want to purchase this projector as a “home theater” projector.
While not image related, I’ll go ahead and mention the built-in speaker. This projector has a built-in speaker, which is useful in a pinch, but the audio quality is teeny. It’s better than most laptops’ speakers, but it will not replace a quality Bluetooth or dedicated speaker when playing audio.
FEATURES
Like I mentioned previously, one of the boons of this projector is its flexibility. What I mean by that is, flexibility in the types of rooms where you can use it. I’m guessing other projectors have it, but you can adjust the keystone of the image depending on the limitations of the room where you are using the projector. Say you are giving a presentation in a room where you’ve never been before; say the space is crowded or you don’t really have an option to place the projector directly in front of the screen. You can use the slider on top of the projector near the zoom and focus rings to angle the screen to the side. So, imagine placing the projector at an angle (not directly in front of a screen), you can slide the slider to compensate. So in effect, you can have the projector to the side of the screen and still have an image that looks like the projector is directly in front of the screen. Same goes for the vertical keystone. Say the table where you place the projector is lower than the screen and you don’t have anything to raise the height of the projector. You can use hte buttons on top of the projector to angle the picture up or down. Again, imagine the projector being lower than your screen. You can adjust the picture on the fly so the image is directly square (vs. the bottom corners being wider than the top).
Like I mentioned previously, one of the boons of this projector is its flexibility. What I mean by that is, flexibility in the types of rooms where you can use it. I’m guessing other projectors have it, but you can adjust the keystone of the image depending on the limitations of the room where you are using the projector. Say you are giving a presentation in a room where you’ve never been before; say the space is crowded or you don’t really have an option to place the projector directly in front of the screen. You can use the slider on top of the projector near the zoom and focus rings to angle the screen to the side. So, imagine placing the projector at an angle (not directly in front of a screen), you can slide the slider to compensate. So in effect, you can have the projector to the side of the screen and still have an image that looks like the projector is directly in front of the screen. Same goes for the vertical keystone. Say the table where you place the projector is lower than the screen and you don’t have anything to raise the height of the projector. You can use hte buttons on top of the projector to angle the picture up or down. Again, imagine the projector being lower than your screen. You can adjust the picture on the fly so the image is directly square (vs. the bottom corners being wider than the top).
Another BIG thing to add is the “zoom” feature. IF you’ve ever used a projector before, the farther away it is from the screen, the bigger the picture. The closer you move it to the screen the smaller the screen gets. Sometimes you don’t have enough space in your room to get it just right. You can use the zoom ring next to the autofocus to “widen” or “tighten” the image. I don’t know the specs of the “throw” capabilities, but the range is enough that you should be good. We presented in a smallish room and were able to widen the image to fill the screen.
The remote also has some nifty features that you can’t downplay. No there’s no buttons to flip through your presentation, but say you want to blow up some text that isn’t quite as big as you hoped when making your powerpoint. You can digitally zoom in on the screen and use the arrows on the remote to move the zoomed in portion to where you want it to be. It can feel a little clunky if you’re trying to put on a smooth presentation to impress people, but being able to zoom in on portions of a presentation to highlight something is a nice thing to have. It also has the ability to mute the screen, basically making everything black. This is perfect as it allows you to get your presentation ready, then you hit the mute button which kind of turns off the screen, but upon reactivation, you’re ready to go. In other words, you don’t have to wait for the projector to warm up or anything like that.
You can even split the screen if you have two inputs. This is one of those “cool” features, without much practical use. But it’s there. You can plug in a computer using the HDMI port and the VGA port and have the screens side-by-side.
CONCLUSION
This projector is pretty no frills, it does exactly what it does, pretty darn well. The image quality is bright enough for well lit rooms, and the keystone options and throw distances give you plenty of flexibility when using it in unfamiliar rooms. I highly recommend it for anyone who gives frequent presentations, whether in your own office or someone else’s.
This projector is pretty no frills, it does exactly what it does, pretty darn well. The image quality is bright enough for well lit rooms, and the keystone options and throw distances give you plenty of flexibility when using it in unfamiliar rooms. I highly recommend it for anyone who gives frequent presentations, whether in your own office or someone else’s.
I would recommend this to a friend!
Mobile Submission: False
+1point
1out of 1found this review helpful.
Share this review:
callmeageeth's Questions
callmeageeth has not submitted any questions.
GoPro - Karma Quadcopter with HERO5 Black - Black/White
Take aerial shots with this GoPro Karma drone. Its Karma Stabilizer lets the included HERO5 Black action camera capture shake-free videos, while the Karma Grip provides reliable stabilization for handheld and mounted filming. The game-style controller with an integrated touch display makes Karma easy and fun to fly.Fly Responsibly:Before takeoff, update all software and firmware, and read the instructions thoroughly.See the FAA website for registration requirements and information about flying a drone safely: https://www.faa.gov/uas/getting_started/. Additional state or local requirements may apply. Check your local jurisdiction. The following websites may help you make informed decisions about flying your drone: www.knowbeforeyoufly.org and www.modelaircraft.org.
Just curious what the flight time experience has been like. Says 20 minutes with no payload; however, is the camera considered "payload"? Is it 20 minutes WITH the camera? Also, how close to 20 minutes is the "actual" flight time?
Given that the camera is required to fly I wouldn't think that the camera is considered payload. I've never tried to fly with any payload mostly because I haven't needed to and it doesn't seem equipped to hold anything (you would have to use some ingenuity to attach something to it). I can speak as to how long it flies without any payload but obviously with the camera. And in my use, it's been between 18-19 minutes of flight time. The very first time I flew it, it landed itself due to low battery around the 18 minutes mark, even though on the handheld controller, the screen said there was 2 minutes of flight time left. I haven't flown it enough while taking video/stills to determine how much that drains the battery. Hope that helps.
9 years, 3 months ago
by
Posted by:
callmeageeth

Sony - PlayStation VR Launch Bundle
Sony PlayStation VR Launch Bundle:Immerse yourself in a virtual-reality gaming world with this Sony PlayStation VR bundle. Experience body-responsive gaming with the two PlayStation Move motion controllers. The built-in camera lets you take clear photos, and the stereo headphones provide rich sound. Challenge your gaming ability with the VR Worlds game included with this Sony PlayStation VR bundle.
Is the camera of this bundle the latest one? The ps4 camera? Or the ps3 camera?
Yes, the bundle comes with the newest model camera. The packaging and promotions for the PSVR actually show the older model (which as I understand, will still work). This camera is completely different than the PS3 version.
9 years, 7 months ago
by
Posted by:
callmeageeth
Google - Pixel 4G LTE with 32GB Memory Cell Phone (Verizon)
Bring the power of Google directly to your fingertips with the Google Pixel. A large 32GB of storage keep data secure, while unlimited cloud storage transfers data as needed, and it's completely automatic. The large 5-inch screen is protected by Corning Gorilla Glass 4 to ensure the Google Pixel remains scratch-free.
It is an unlocked phone, so I assume it is compatible with SIM card from other countries - is that correct?
I can't confirrm that it will work sims from other countries (depends on bandwidths) but I can absolutely confirm that putting a T-Mobile sim into this phone will work. Sorry couldn't give you a better answer!
9 years, 7 months ago
by
Posted by:
callmeageeth
GoPro - Dual Battery Charger - Black
Charge 2 GoPro lithium-ion batteries simultaneously with this GoPro AHBBP-301 charger that reliably draws power from select USB chargers, USB-enabled computers or GoPro wall or vehicle chargers (not included), so you can keep your camera ready for use.
Does this have the cable to connect charger to computer? Is there a cord that connects camera directly to computer or wall charger for charging? I think we lost ours.
It comes with a mini-USB cable which you can plug into your computer (I wouldn't recommend because of slow charging) and a wall charger. The same mini-USB cable plugs directly into the camera itself
9 years, 9 months ago
by
Posted by:
callmeageeth
SANDISK - Ultra PLUS 128GB microSDXC UHS-I Memory Card
Expand the storage of your compatible device with this SanDisk Ultra PLUS microSDXC memory card that features a 128GB capacity to hold your photos and videos and a Class 10 rating to ensure speedy data transfer. The rugged design resists damage.
compatibility
I have a Dell Venue 8 Pro.Would this work with it for storage?also is it compatible with android devices?...thank you
Double check your specific Android device. Most newer devices accept it, I believe this card was intended for Android devices, but again, I know some devices only accept up to 64 GB card
11 years, 8 months ago
by
Posted by:
callmeageeth
from
Louisville, KY