ITJim's stats
- Review count119
- Helpfulness votes1,493
- First reviewNovember 23, 2013
- Last reviewApril 30, 2024
- Featured reviews0
- Average rating4.3
Reviews comments
- Review comment count0
- Helpfulness votes0
- First review commentNone
- Last review commentNone
- Featured review comments0
Questions
- Question count0
- Helpfulness votes0
- First questionNone
- Last questionNone
- Featured questions0
- Answer count18
- Helpfulness votes30
- First answerNovember 23, 2013
- Last answerMay 22, 2021
- Featured answers0
- Best answers3
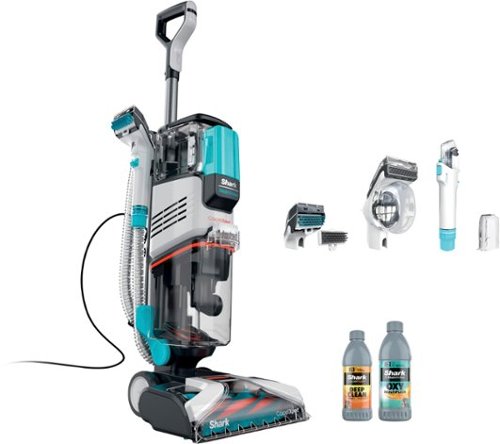
Shark CarpetXpert with Stainstriker, 2-in-1 deep carpet cleaner and handheld spot & stain eliminator, combines Shark's powerful suction & PowerSpray high pressure spray to deliver the best tough stain elimination**and the best deep carpet cleaning among full-sized deep carpet cleaners‡. Two unique chemicals mix and activate on contact in the built-in tool to deliver 20X more stain-striking power*. ‡Based on ASTM F2828 vs. full-sized carpet cleaners above 14 lbs. **Based on TM110, vs. extractor market, using included stain cleaner and best-performing accessory. *vs. Shark Deep Clean Pro Formula.
Customer Rating

5
A real asset to keeping my carpets clean
on September 24, 2023
Posted by: ITJim
The Shark CarpetXpert Upright carpet cleaner did a fantastic of cleaning my carpets. My home has several carpets. I have two pets and a family. Weekly vacuuming is the minimum required to keep the surface dirt under control in my home. However, stains from spilled drinks, animal matter, and dirty wet feet build up over time. There are some things we just do not have control over. Or so I thought until I gave the Shark CarpetXpert a try.
My cat left me a lovely pile of vomit on one of my carpets that very day I unpacked the CarpetXpert. How nice of her. I cleaned up the surface dirt with paper towels and a quick vacuum. I noticed that the entire carpet had stains from spilled liquids, foot traffic, and soda can rings. The CarpetXpert made quick work of all the stains and even stored some of the original brightness to the carpet. I have included before and after photos of the carpet in question. I also included a photo of the water tank wastewater and the mess left inside the nozzle so you all get a sense of what the CarpetXpert extracted from the carpet. Warning. It is gross. The carpet measures 8 feet by 10 feet. It took me about 30 minutes to clean and about 3 to 4 hours to fully dry.
Setup:
Read all the directions before setup and first use. The instructions are printed on a single, double sided sheet of glossy paper. That’s it. Read them twice and then twice again before operating the unit. The Shark CarpetXpert Upright is more sophisticated than a regular Shark vacuum. Like Shark vacuums, the CarpetXpert shares the same quick connect and quick release technology for all the parts. The big difference is the addition of detergent tanks, a water tank, a wastewater tank, floats, and the different uses for the hose and adapter heads. There are also online videos for additional help and instruction.
The Shark ships with two bottles of cleaner: 12 oz. Deep Clean Pro and 16 oz. OXY Multiplier. There is just enough in the 12 oz. bottle to fill the Stain Striker tank. There will be some left over in the bottle. Also, this bottle has a weird aluminum seal with a fabric center. I have no idea why. There is no obvious reason for the sophisticated seal. Nor any obvious use with the CarpetXpert. The Deep Clean Pro goes undiluted into the StainStriker Tank. The OXY Multiplier is diluted with water in the CarpetXpert Tank. Both cleaners are used together to deeply clean a carpet. There is no hard rule stating a carpet must be deep cleaned. However, I chose the deep cleaning route for my carpets.
Use:
The CarpetXpert gets very heavy when cleaner and water are added. There is a handle/shelf hidden under the hose that should be used to move it around. Pushing the CarpetXpert back and forth does require some force. Unlike a vacuum, moving the unit forward dispenses cleaner and water onto the rug. Pulling the unit back extracts the water, cleaner, and loosened dirt. The added resistance inherent with the CarpetXpert forced me to slow down my cleaning and focus on smaller sections.
The dirty water tank filled quicker than I expected. There is a float in the tank that will rise as dirty water fills the tank. The float closes a door at the top of the tank which cuts off the flow of air to the rest of the unit. Be sure to have a drain filter in your sink before emptying the dirty water tank. Otherwise, you will be pouring bits of hair, rug fibers, dirt, grass, pet matter, and other large debris down your drain. This could lead to future plumbing issues.
Cleaning was easy and hard at the same time. The brush and brush cover are filthy after use. The brush cover and the roller are removable. The nozzle housing also requires cleaning. Guess what does not come off for cleaning. The nozzle housing. I have not found a safe way to fully clean out the nozzle housing. I stuck it under the faucet in my bathtub. Regardless, follow the cleaning instructions after each use. Otherwise, bacteria and mold could build up in the system and generate odors.
Finally, the carpet will be wet and there will most likely be water on the floor around the perimeter of the carpet. I used the Quick Dry mode on the unit to reduce drying time. I do not know the impact of allowing the rug to simply air dry. What I saw was more dirty water being pulled into the dirty water tank. I think I made the right call.
Results:
The results are first class. My basement has a specific sour smell that I simply could not find the source of. It turns out that part of my problem was the carpets. Dirty feet, dirty shoes, cat yack, food, drink, and other contaminants have all contributed to my carpet biome. Cleaning the carpets have vastly reduced the sour smell and most likely impacted my unwanted carpet’s biome.
What not to do:
If you have a “Dry Clean Only” carpet or a wool carpet then do not use the CarpetXpert. I had a cat accident on my wool carpet that I chose to use the Pet Tool to clean. This attaches directly to the hose and has its own small wastewater tank. The cat accident was cleaned but I also pulled out a lot of rug fibers that proved difficult to clean out of the Pet Tool. In the end, it was not worth the effort. It also convinced me not to use the CarpetXpert on the whole carpet like I originally planned. Lesson here. When in doubt, use the hand tool on a very small are of your rug before attacking the entire rug.
Final thoughts:
Vacuuming alone is not enough to keep a carpet clean. The surface dirt can be kept under control. I had no idea how much dirt was ground into the carpet until I did a deep cleaning with the CarpetXpert. Now that I know, I will make deep cleaning with the CarpetXpert a regular part of a cleaning regimen. I am thinking once a quarter will. Maybe more frequent in high traffic areas. I was a little disappointed in how much the wastewater tank held before the float closes the air intake in the tank. However, dirty water can get very heavy, so I get it. I would have also liked to have seen a thicker user’s manual. Otherwise, I think this was a very good investment for me that will lead to healthier rug biomes and an overall healthier environment.
I would recommend this to a friend!


Share this review:
+3points
3of 3voted this as helpful.
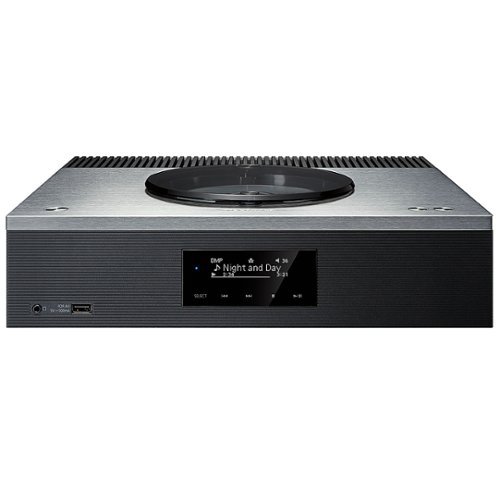
The SA-C600 Network CD Receiver showcases Technics’ legacy of renowned digital audio technology and flawless construction, eliminating noise and rendering a colorful, vibrant expression of sound space. This versatile receiver unit has a twin power supply circuit system for incredibly clear performance, Spacetune technology to automatically optimize the sound field, and incredible connectivity across wireless, digital, and analog channels.
Customer Rating

4
Good choice for a low power, small room system
on September 9, 2023
Posted by: ITJim
Initial Impressions:
The Technics SA-C600 is a nice little streaming stereo amplifier with CD player. The CD player is what ultimately convinced me to get the SA-C600. The unit itself is very handsome with its black body, brushed aluminum top, and smoked plastic CD door. The LCD screen is mostly black and white with a few colored icons here and there. The back of the unit has every input I could possibly want. The front panel has a single USB and stereo mini jack. Overall, the unit aesthetics are simple enough that it will fit into any modern-day décor. Sonically, the SA-C600 needed a good day to break in before it found its stride. Power wise, the SA-C600 is best suited for bookshelf speakers with an integrated subwoofer. Tower speakers are simply too much for the SA-C600 to drive reliably. Overall, I like the flexibility, the inclusion of a CD Player, the streaming options, and the integrated FM Tuner. This is a solid addition to my home office.
Setup:
The SA-C600 took about 5 minutes to setup from box to CD/FM Radio. Configuration and app setup took a bit longer. For some reason, Wi-Fi setup requires Google Home or Apple Home apps to configure. Once Wi-Fi is setup Google Home or Apple Home is no longer needed. Technics’ Audio Center is the app you want to load on your smartphone to take full control of the SA-C600. Everything can also be configured and controlled from the included remote. The top of the unit has three buttons for power and volume. There are dedicated CD player controls that illuminate on the front of the SA-C600 when the CD player is active. The illuminated touch controls are integrated into the mostly monochrome front facing LED screen.
For my setup, I have a pair of B&W 705 Signature bookshelf speakers and a MartinLogan 600X 10” subwoofer in a desktop stereo configuration on my office desk. I used a Panamax MR5100 for power protection. For inputs I used a toslink optical digital cable to connect to my gaming computer. I also connected an RCA to a mini stereo cable to the Line Input on the back of the SA-C600 as a hardwired connection to my iPhone. I also connected my iPhone via Airplay but wanted to hear the difference between the two inputs.
Next, I accessed the Setup menu via the included remote control and updated the SA-C600 firmware. This took about 20 minutes to complete. What did it fix? According to Technics, and I quote, “Improvement of Stability.” So, yeah.
The manual that ships with the SA-C600 is a bit pedestrian. It does illustrate how to access certain functions. It lacks explanations for the SA-C600’s configuration items and options. It also does not explain any of the individual input setup items or options. Neither the Technics’ Audio App nor Technics’ website provide any additional information. Technics’ website does not provide a longer, more detailed manual.
Sound:
SA-C600 is hot on the highs. It was vocals forward with a few tracks that was best illustrated by “Love Shack” by the B-52’s. Luckily, the SA-C600 has proper tone controls. Bass and Treble have a range from -10 to +10 and set to 0 for both out of the box. The tone controls are only accessible via the Setup menu or via the Technics’ app. For my B&W bookshelf speakers, -1 to -2 treble and +1 base works well for most music that I listen too. For FM radio, I set the tone controls to -10 bass and -1 treble. Keep in mind that the tone settings are persistent from input to input. If the SA-C600 loses power, then the tone controls need to be reset. The clock also resets. But the FM presents do not…
Space Tune is sound calibration presets. For example, your speakers will gain some boost on the low end if they are corner loaded. Which could make them sound boomy. The Space Tune has a corner preset calibration setting that will tone down the lows and boost the higher frequencies. There are four presets and five modes: Free, Corner, Shelf, Cabinet, and Custom. Customer allows one of the four presents assigned independently to each speaker. I found that Free sounded best on my setup.
The SA-C600 needs a good 12- to 24-hour break in period. I own eight different pairs of speakers. They sounded awful prior to this break-in period. I just left the SA-C600 playing unattended in a room. The goal was to break in the amplifier and not my ears. Once broken it, the unit sounded really good at low to moderate listening levels in my small office. I listen mostly to classical, jazz, vocalist, and talk radio during my workday. In addition to my office bookshelf system, I auditioned a pair of B&W 606 Anniversary bookshelves which also sounded good. Not as good as the 705 Signatures but good enough at the 606 price points.
Conversely, the SA-C600 sounds like trash on hungry tower speakers. I auditioned a pair of SVS Ultra Towers, SVS Prime Pinnacles, and a pair of B&W 702 s2 Towers. The SA-C600 simply does not have the power to drive these. These are highly capable speakers when integrated with the right gear. The SA-C600 is simply a poor match in this situation.
I included photos of two of my audition spaces. I did not include a photo of my permanent listening space for personal reasons.
Power handling:
Full power: 60 W + 60 W (1kHz, T.H.D. 1.0 %, 4Ω, 20kHz LPF) or FTC Output Power: 40W + 40W (1kHz, T.H.D. 1.0 %, 4Ω, 20kHz LPF). Source, technical specs from manufacture’s website. Measurements like these are useful but for all the wrong reasons. Are manufacturers still playing this game? Moving on…
Digital vs Line Input vs Line Input:
Digital content, such as Apple Music over Airplay, sounds great. I do not have subscriptions to Tidal, Amazon Music, Deezer. I did try Spotify. It sounded ok but Apple Music sounded better. I also test Apple Music over RCA connections on the Line Input.
The Line Input gain is very low compared with all the other inputs. If volume is set to 30 for streaming, then the Line Input must be set to 60 for the same audible output. Beware! The SA-C600 does not remember the last volume setting for any previous input. This means the volume must be decreased before swapping back to streaming, CD, radio, or another source. Otherwise, you will experience that super loud, thin, low fidelity noise I discussed earlier on. Hopefully Technics will address this in a future firmware update.
The SA-C600 will not make bad CD sound better. If anything, the SA-C600 will reveal their poor quality. Newer CDs, such as Lorenna McKennet’s, “The wind that shakes the barely”, sound fantastic. The vocals were full, and the music textured. Depending on the content, the sound reproduction could come off as crisp and sometimes overly clinical. I picked up on this quickly because I am used to a warmer sounding system. Not bad. Just different from what I am used to. Dialing in my tone controls and integrating my sub-woofer played a big role in balancing out the SA-C600 presentation.
Finally, fiber optic input from PC. I have nothing to complain about. I watched a movie, listened to Apple Music, watched some Youtube videos, and played a few games. The SA-C600 did not miss a beat, and everything sounded dialed in. I was perfectly happy with the results. If you also chose to connect a PC via Toslink to the SA-C600 then be sure to set the output resolution from Windows so you get the highest quality signal. The SA-C600 will display on the LCD screen what the input source is. By default, my Windows 11 machine’s output was 16-bit 48kz. I changed the highest available. You can find these settings under Windows Settings here: “System/Sound/All Sound Devices/Speakers.”
CD Player:
The CD player door swivels left or right. For best results, you will want to use a finger and thumb to slide the door open and closed. Do not press down on the recessed nob or force the door in any way. The door floats above the SA-C600 connecting to the chassis by a single left/right swinging hinge. The player is quiet. The disk can be heard spinning but only within six inches or less. Even then it is very quiet. I did not notice or hear any vibrations with the chassis or the CD door. The CD disk centered nicely and did not show any signs of wobbling during playback. There is an LED light that washes over the top of the disk while playing. The affect can be toggled through the SA-C600’s Setup menus.
Final thoughts:
The SA-C600 is a solid two or 2.1 channel Compact Network CD Receiver. My recommendation is to pair the SA-C600 with a solid pair of bookshelf speakers and a subwoofer. The SA-C600 lacks the chops for power hungry towers. The flexibility of the SA-C600 is great. It meets all my needs and then some. The reason I went with the SA-C600 was for the integrated CD player. It saves valuable office space and reconnects me with my CD collection. The chassis is handsome, has good cooling, and the controls are easy to use. The sound quality at low to medium volume in a small room is fantastic after a 12- to 24-hour break in period. There are some issues that Technics need to address through firmware. Overall, I am happy with the SA-C600 and look forward to years of enjoyment.
I would recommend this to a friend!


Share this review:
0points
0of 0voted this as helpful.
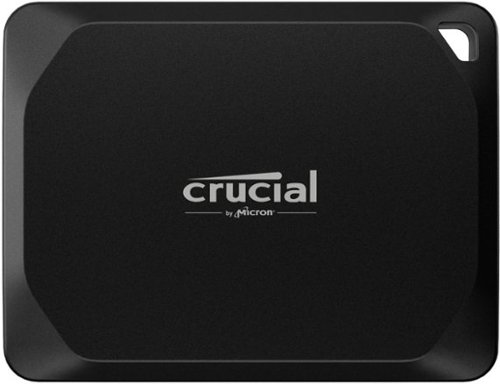
Elevate your video editing experience with the Crucial X10 Pro SSD: the portable drive that packs a palm-sized punch. With sequential read and write speeds up to 2,100/2,000MB/s and 2TB of space, your X10 Pro can connect directly to your laptop or workstation via a convenient USB-C cable. Blaze through your multi-cam timeline and even edit, trim, and render directly from the drive. The Crucial X10 Pro works with Windows, Mac, Android devices, and more. Featuring Micron TLC NAND plus water and dust resistance (IP55), the Crucial X10 Pro is the perfect partner in the studio or in the field, giving you the raw performance, lasting durability, and generous capacity you need.
Posted by: ITJim
The Crucial X10 Pro by Micron is durable, fast, and takes up less room in my pocket than my car keys. The X10 Pro is IP55 Certified meaning that pocket lint, dirty bags, and rain showers should not pose a threat to the normal operations of the drive. Which is good. I carried mine around all day in a linty pocket and even banged it against a table a few times to see what would happen. The drive worked perfectly every time. Transfer speeds are fast but dependent on what I was working on, the speed of my USB port, or the method by which I was transferring data. I was able to run 15-to-20-minute videos from the drive, including randomly moving the player slider bar around, without any hiccups or buffering. Overall, this is a fast, durable, and dependable drive.
Speed:
Let’s get straight to speed. I benchmarked the drive using Crystal Disk Mark. I used the Anime edition simply because it looks better. I used a 2023 Alienware laptop that, as stated by Dell, has three USB 3.2 Gen 1 drives. The transfer speed should top out at 625MB/s. The benchmark achieved 2140MB/s sequential read and 1790MB/s sequential writes. Random reads and writes were significantly lower than this. I included screenshots of the benchmark run as well as a benchmark of my internal NVMe drive for reference.
Next, I copied a 100GB folder with 22 video files from the local drive to the X10 Pro. From my C: drive to the X10 Pro I hit an average of 397 MB/s. From the X10 Pro to my C: drive I saw 348MB/s. I ran the transfer a few times, both ways, and got the same or similar numbers. See included screenshot. Enabling encryption slowed things down to 350 MB/s download from the X10 Pro and 280MB/s on the upload to the X10 Pro. This is a little disappointing but not unexpected. Encryption tends to add overhead to drive operations.
Performance:
As mentioned before, playing and navigating running videos was seamless and without any kind of lag, artifacts, or buffering issues. I loaded up Corel Paintshop Pro and went to work editing photos directly on the drive. Loading, editing, saving, and manipulation of the files was fast and did not interrupt my workflow. I switched the drive to my MS Surface tablet where I could use my touch screen and stylus as an art tablet. Connecting to the Surface was simple and seamless. And just like with my gaming laptop, my experience on the Surface was lag free, no buffering issues, and bouncing between projects was seamless. The only oddity was I had the little X10 Pro dangling from the side of my surface by its 9-inch USB cable when working with the Surface on my lap or when I kicked out the foot for desktop mode.
Heat. The drive remains cool under most operations. Under heavy load, such as encrypting the whole drive, the X10 Pro did get warm but never hot. The drive quickly cooled down once the operation was complete.
Flexibility:
The durability of the unit makes this an ideal choice for travel. The outer shell is metal, inflexible, and will survive a fall if you should drop it. The IP55 Certification guarantees that a certain amount of dust, dirt, and water will not penetrate the X10 Pro’s shell up to a certain threshold as defined by the IP55 standard. IP55 certification also signifies the drive will survive bumps, bruises, scratches, and some impacts. The drive is solid state which means impacts will not damage your data. So, if you want to dangle this from your key chain using the conveniently included eye hole, your data will most likely be fine. Finally, the bottom of the drive is rubberized to reduce the possibility of the drive slipping off the table or a slightly inclined surface.
The drive ships with a 1.8 TB exFAT partition. The drive sports 256 AES HW + PP hardware-based encryption. The drive supports BitLocker and Apple’s MacOS Firevault. Unfortunately, BitLocker is only available on Windows 10/11 Pro. I was able to enable BitLocker, setup a password, backup the security key to my Windows account, and encrypt the drive without any issues. Crucial will be releasing a password utility in September 2023 that will allow password setting without the need for BitLocker. However, I do not know how this impacts data encryption on the drive. I guess we will have to wait and see.
Finally, the drive can be re-partitioned and reformatted using NTFS or whatever Apple uses. NFTS will give you greater control of file security and management over exFAT.
The X10 Pro ships with a 9-inch USB C cable. This will limit placement when using the drive. This will not be an issue with a laptop since the USB ports can be measured in half inches from the table or desk surface. A desktop tower case will present special challenges due to where the USB ports are usually located. For my tower, I had enough cable to easily reach the USB C port while the X10 Pro rested on the top of the tower case.
Management Software:
Crucial makes an application named Crucial Storage Executive available on their website. As of this writing, version 9.04 does not recognize the X10 Pro. No idea why. I tried on three different computers and none of them would recognize the X10 Pro. This is disappointing because this is the only way, that I could find, to enable special drive features or perform firmware updates. Storage Executive will also monitor drive temperature.
Crucial does provide Arconis True Image available from their support page. This will allow you to format the drive, change partitions sizes, and clone the drive from an existing drive. If you are replacing a drive then Arconis is a great way to quickly clone the drive.
Final thoughts:
The X10 Pro is tough, fast, and flexible. It will survive my backpack and a rainstorm. Password protection and Encryption support are welcome features in an age where data protection is a necessity. The drive is fast enough to stream videos and support photo editing. The only downsides are Crucial’s own software compatibility and the lack of a USB C to A converter in the shipping box. Crucial will sell you the adapter if you really need it. Overall, this is a fantastic little drive.
I would recommend this to a friend!


Share this review:
+1point
1of 1voted this as helpful.
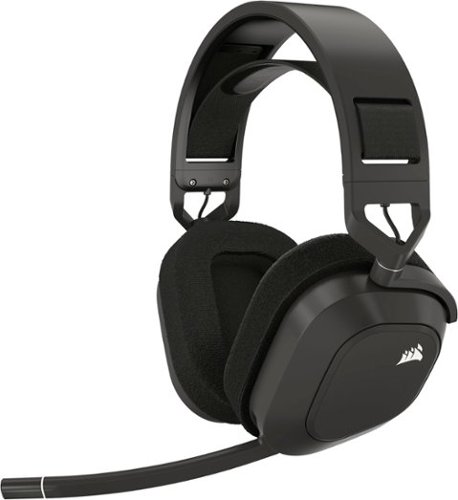
Enhance your audio with the CORSAIR HS80 MAX multiplatform gaming headset. Enjoy true audio immersion via high-fidelity 2.4GHz wireless, and activate Dolby Atmos on PC to place yourself in the middle of the game with detailed, three-dimensional sound cues. The HS80 MAX includes Bluetooth support to connect to a myriad of devices. A high-performing omni-directional microphone boasts exceptional dynamic range, so you can have a clear, commanding presence on the battlefield. Listen up to 65 hours on a single charge in cushioned comfort thanks to plush memory foam ear pads and a stress-free floating headband. Sonarworks SoundID Technology personalizes your headset’s sound to match your unique hearing profile, so you can forge your own legacy with the HS80 MAX.
Customer Rating
4
Solid headset w/fantastic Atmos integration
on August 19, 2023
Posted by: ITJim
The Corsair HS80 Max is a solid mid-tier gaming headset with excellent Dolby Atmos integration. Sonically, the HS80s sound fantastic for a gaming headset which handily competes with my more expensive musical wireless headphones. The headset is a combination of high-quality metal parts and premium plastic parts. The ear cups covers are woven fabric over memory foam. The ear holes are spacious for my ears and deep enough that my ears do not touch the drivers. The RGB is confined to the Corsair logo on both ear cups. The boom mic flips out of the way and will auto activate dependent on the up/down position. There is an LED band just below the mic to indicate Mute (red) and Active, (white). The head band leverages Velcro straps for adjustments. And the ear cups swivel allowing them to be turned inwards on your collar when wearing the headset around your neck. iCUE is packed with features that really take this headset to that next level allowing you to leverage Dolby Atmos, Nvidia Broadcast, and other sonic features unique to Corsair. Overall, if you are looking for an all-around solid gaming headset with fantastic Dolby Atmos implementation then I encourage you to audition these.
Sonic performance:
Gaming headsets, in general, get the job done if your only use case is gaming. Few gaming headsets I have owned have the chops to compete with dedicated musical headsets when it comes maximizing the sonic enjoyment of cut scenes, intro music, or even some of the more nuanced audio cues that developers put into games to add ambiance and emotion. The HS80 Max does a wonderful job of delivering both heartiest base notes to the long, nuanced decay of a piano string. I started my HS80 Max journey with classical piano. Strange, right? If headphones, or a speaker, struggles with piano then go look for another speaker. The classical pieces I auditioned on the HS80 Max were expansive, expressive, dynamic, and the decay time for singular piano notes was impressive. Corsair did a good job designing a well-behaved and balanced speaker. Why is this important? Let’s consider Halo Infinite’s cinematic cut scenes. Sonically, the cutscenes are Hollywood blockbuster movie quality. The in-game music is cinema quality. Now imagine a 5.1 surround sound system on your head. Now imagine adding Dolby Atmos positional sound processing to not only the cut scenes but to the game world at large without losing any fidelity. And trust me, with all that’s going on, the headset has enough headroom to hit those large explosions. In my opinion, Corsair nailed it here.
Let’s get specific about Dolby Atmos for a minute. First, you must download the Dolby Access app from the Microsoft Store. Then, you must explicitly set spatial sound to Dolby Atmos. See included screenshot. The Dolby Access Atmos demo videos were impressive and did an excellent job of demonstrating how well the HS80’s integrate with Atmos. One game in particular embraced Dolby Atmos unlike any other. Forza Horizon 5. My first real experience with Atmos was driving through an in-game thunderstorm. Thunder and rain were literally all around me. Sonically, it was not as realistic as actually being in a thunderstorm. But the virtual space was well controlled and convincing.
Next, I ran a 20-lap race whose virtual space included a grandstand and cheering fans all around the track. The grandstand had a speaker system that played the in-game music for that track on an infinite loop. The music approached my right ear as I approached the grandstand. The music was at its loudest as I drove by the grandstand and predominantly in my right ear. Then finally fading away, a bit, as I drove away. It never fully faded away simply because it was part of the race’s background sound. Same thing with the cheering fans. The sounds got louder as I approached them and diminished into obscurity as I drove past them and away. And, like the grandstand speaker system, the crowd noise panned around the virtual sonic field relative to my position on the track. Simply put, this is the best I have heard positional audio with any gaming headset I own.
Overall, I am impressed with the sonic prowess of the HS80 Max.
Comfort:
Comfort is a bit of a miss for me. First, the ear cups, though made of memory foam, are a bit stiff or my liking. For me, they put too much pressure above my ears and close enough to my jaw joint that it bothers my TMJ. This limits my usage to about two hours before I need to take a break. The fabric cover is soft, comfortable, and should offer increased durability over foe leather covers. If Corsair offered a plusher foe leather alternative, then I would snatch those up in a heartbeat.
Second, the HS80 comes in at .717 lbs. My typical go to headset comes in at .55 lbs. The extra weight is noticeable for me. It does contribute to my two-hour wear limit.
The head band is adjustable but is not telescoping. The underside of the headband has two Velcro strips where the adjustable strap connects to the headband.
The quick start guide, located on Corsairs Support site, does not provide any guidance on how the headband works. The ends of the adjustable strap are attached to the underside of the headband. There is a little metal tab that will allow you to pull the strap away from the Velcro. Once adjusted correctly, the strap did a good job of keeping the headband in place. It is not the most accurate or efficient system I have seen but it gets the job done.
iCUE:
The HS80 Max is not an RGB powerhouse. That’s a good thing in my opinion. Not all gaming gear needs a robust RGB light show.
If you are familiar with iCUE then you will be pleased to know that you can customize the HS80 Max to all your gaming profiles. I think this is most important for those instances where you are leveraging custom EQ settings for different genres of games or entertainment such as movies and music. This is also where you can integrate Nvidia Broadcast. I did not test Nvidia Broadcast because I did not need any of the AI powered tools that Nvidia provides. My friends on Discord reported that my voice was broadcast quality during our gaming sessions. That’s good enough for me. As a side note, the mic boom is flexible.
In addition to the custom EQ settings, iCUE includes SoundID Personalization. Essentially, this is a five-minute hearing test for each ear to determine the optimum EQ for each earcup. This is an interactive test leveraging test tones at different frequencies. The test will provide a graph showing how each ear responded to the test tones. Rejoice if you tested with perfect hearing. Unfortunately, I discovered that my hearing sensitivity is below 15khz. Boo.
The good news is that this mode creates a custom EQ for each ear to maximize sound quality for each ear. Essentially, this is room correction applied directly to your ears as opposed to applying it to your room. The downside is that you cannot combine any of these technologies. You can use present EQ or customer EQ, SoundID, or Dolby Atmos but not in combination with each other. Again, this is not necessarily a bad thing. It just is.
Finally, I would like to see an adjustable default volume slider in iCUE for this headset. My headset defaults to 100% volume in with every application across three separate computers. I had to go into Windows Sound and turn every program down to 2 on their individual volume sliders just so I had some volume headroom. Otherwise, I’m blasting myself out of my earcups. This is not necessarily a con because there is a workaround. It just means that I have to mindful and pro-actively adjust windows volume as I add new games and applications to the system.
What I did not like:
The multi-function button could have been designed with some sound damping. The MFB is used to pause video or music. However, the click sounds cheap, loud, and echoes in the earcup.
Second, I would like control to dim the microphone light. When in the upright position, the light is right next to my eye. When down, the white light is just inside my peripheral vision which creates some glare off my cheek and my glasses. I would like to see an option in iCUE that allows me to dim and disable the lights.
Third, instructions. I understand that printed manuals are an added cost that could be better spent on improving the product. And it reduces material from the waste stream. However, Corsair could have included a QR code in the box that points to a quick setup guide, user’s manual, or even an FAQ. iCUE could also be updated to include links to product documentation. During setup, I spent more time than I should have on basic activities that the Quick Start guide covers in detail.
Final thoughts:
Sonically, the HS80 Max is fantastic. Comfort, for me, was a bit of an issue. Overall, the HS80 Max is a solid headset, has a great feature set, and iCUE integrated features elevate the experience to that next level. A 10-point Equalizer, preset EQs, and SoundID add a level of flexibility that higher priced gaming and dedicated wireless musical headsets lack. The implementation of Dolby Atmos on the HS80s alone is reason enough for me to recommend these headphones. The cons I listed are mostly subjective. There are a few items I hope Corsair addresses through iCUE. Overall, I think the HS80 Max is a rock-solid mid-level gaming headset that will provide any gamer with an exceptional sonic experience.
I would recommend this to a friend!


Share this review:
+3points
3of 3voted this as helpful.
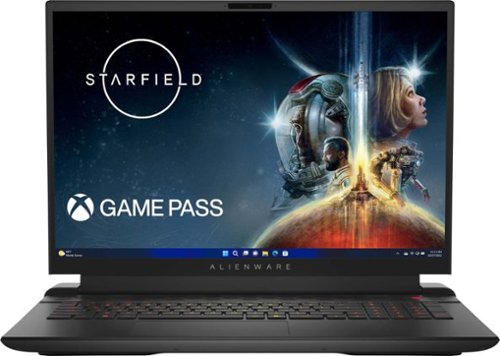
Alienware m18 Gaming Laptop - Play like a boss with a high-powered, 18-inch gaming laptop that features advanced Alienware Cryo-techcooling, 7000 Series AMD Ryzen 9 processors and NVIDIA GeForce RTX 40 Series graphics.
Customer Rating
4
Eating performance for breakfast!
on August 1, 2023
Posted by: ITJim
Initial impressions:
The Alienware m18 is massive. The m18 is truly a desktop replacement with its 17 7/8 inches diagonal viewable area and full-size keyboard. The outside of the m18 is metal, very well beveled along the inner edges for comfort, and feels durable and substantial in the hand. The screen has some flex but is not flimsy by any stretch. The tension on the cover hinge is heavy but very smooth throughout its arc. The m18 shares the same design DNA as its smaller cousins like the m15 and m17 laptops with the honeycomb intake vents at the top of the keyboard and the bottom of the case. This is a massive intake for the four fans that exhaust out the back and the sides of the m18. Finishing off the back is the unique Dell/Alienware gaming laptop heat sink/exhaust boot. I call it a boot. The AlienFX keys are comfortable, easy to type and game on, and have the kind of quality RGB lighting that I have come to expect from a premium keyboard design. Gaming is glorious with the 1920 x 1200 480hz screen. And, for its size, and number of fans, this is not the loudest gaming laptop I have ever used.
Benchmark:
I performed a single benchmark for you benchmark junkies out there. Time Spy v1.2 DX12 score of 12,380. According to 3D Mark’s website, the m18, stock, is 68% better than all scored systems. This beats out the average High-End 2020 gaming PC’s score of 11,085. Go m18!
Games:
For testing: Forza Horizon 5, Star Wars Squadrons, Apex Legends, Middle Earth: Shadow of War, Supreme Commander 2, Mechwarrior Online (MWO), and Wing Commander III. I used MSI afterburner to track CPU, GPU, and FPS.
Forza Horizon 5 was the most feature rich and graphically intensive game I had time to test. Settings were set to Ultra, DLSS on, Frame Generation On, and Raytracing On. Probably the most intense particle and lighting heavy scene I could find was driving my vehicle through a shallow river. This scene was full of water reflections, splashy water and foam, spray droplets everywhere, and light refracting through those water droplets. It looked a lot better live than the included screenshot shows. FPS was in the 80’s while in the water. Otherwise, FPS fluctuated between 80 and 120. Very smooth and charming.
Star Wars Squadrons is by far the star of the FPS show. 200 FPS or greater sustained at full graphical fidelity. However, this game does not sport any “special” Nvidia features like Ray Tracing and DLSS. This was brute force rasterization performance. Bonus, the fans were relatively quiet.
Apex Legends ran smoothly at high graphics settings. High settings is as high as the game will allow with only 8GB of VRAM. The game told me so in the settings screen. FPS bounced between 170 and 250. The game ran smoothly without any glitches or FPS drops. This is without DLSS because Apex Legends does not support DLSS.
Middle Earth: Shadows of War ran buttery smooth. I was able to maintain between 100 and 130 FPS consistently regardless of how many orcs or special effects were flying around the screen. Graphical settings were set to Ultra in most cases. I probably could have gotten away upping everything to Ultra. I think I could have gone full Ultra Saiyan but there was no need. The game already looked fantastic.
Supreme Commander 2: I included this game simply because this is a single threaded monster that used to take my older computers to their knees due to the enormity of active military units it had to keep track of. I set up a customer game with 7 AI players, hid in a corner, and let them build and beat the heck out of each other. The Ryzen CPU handled itself beautifully with thousands of units in play. FPS bounced between 40 and 60. Believe it or not, this is normal. More importantly, the m18 did not show any strain as moved around the map, zoomed in and out of combat, clicked on individual units, and commanded my armies. Zero issues.
Mechwarrior Online: This has been my go-to game for well on a decade now. MWO is an old Unreal Engine 3, DX9/11 game that was never fully optimized. Which is why this game can be tough to drive even on today’s hardware. I cranked up all the graphics settings to max. FPS remained consistently over 100 for every map. Typical behavior for this game is for the FPS to take a hit on city maps or when other players enter the field of view. The m18 powered threw everything like a champ.
I will admit that I was a bit disappointed with the external monitor performance.
Wing Commander III (Just because). Still has that glorious 1990’s “We Build Worlds” magic. Not a problem for you nostalgia junkies.
Things to know:
The m18 has an issue with sudden FPS drops. Randomly, the FPS will go from 100 to 30 for a second or two and then return to 100. This impacted all games except Apex Legends. ??? Alienware and Nvidia need to investigate. Most likely this is a driver or resource conflict issue. I did not see any evidence of the CPU or GPU throttling in the MSI Afterburner overlay. It is random with no obvious cause that I can detect.
The CPU runs hot. At 30% overall utilization the CPU bouncing between 90- and 100-degrees C. I even saw it go over 100 a few times. Turning on performance mode will kick the CPU temps down below 100 and sometimes below 90 depending on the content. This laptop is not a lazy, hot summer day of gaming kind of laptop. Nor is it all that suitable for your lap. Find a table!
AWCC still has bugs and room to grow. I set up a few lighting profiles. Sometimes AWCC gets everything right. And sometimes it gets really confused cycling through different profiles and sometimes going nuts repeatedly re-loading the same profile over and over again. Also, building lighting profiles needs a human usability pass. It is still confusing and feels half baked. Profiles cannot be edited without redoing the whole profile. And what I’ll call “layers” can be created within a color profile but not deleted? Why not? Everyone does a better job than Alienware on this front. Just copy what someone else is doing.
1440 Gaming: I only tested Mechwarrior online on my Alienware AW3423DWF 34-Inch QD-OLED 1440 monitor via Display Port. 3440 x 1440 is a lot of pixels to drive and the m18 really felt some strain here. I had to drop most settings to low or medium just to maintain 60 FPS. I was really expecting better than this since I already had been able to squeeze better performance out of lesser systems. I will admit that I did not spend a lot of time tuning the system for 1440 and probably won’t. The m18 is just too big to allow me to operate both the m18 and the AW3423DWF on the same desktop.
To improve airflow, I recommend lifting the back of the laptop slightly. I use inexpensive furniture coasters on the corners to lift the back of the laptop about an inch. It makes a huge difference for cooling and noise.
Keyboard and lighting:
The AlienFX keyboard is one of the best gaming laptop keyboards I have used. The keys are large, well spaced, have an audible click but not loud enough to wake the kids, RGB lighting is fantastic, short travel, shallow actuation distance, instantaneous return, and each key is gently concave for comfort and accuracy. I could play and type on this keyboard all day long without any issues. Unless you need the hyper responsiveness that the MX will give you then I think the AlienFX keyboard is a fantastic choice.
Screen: At 15 ¼ w X 9 ½ H X 17 7/8 diagonal the screen is equivalent to an 18” monitor. I realize that the measurement is just shy of a full 18” which makes it 18” class in marketing world vernacular. It has an excellent brightness range from dim to max brightness. It is colorful. During gaming, I did not experience any ghosting, screen tearing, or artifacts other than the unusual FPS disruptions I outlined above. Overall, the monitor provided a great gaming experience.
Wireless:
The m18 ships with Wi-Fi 6e wireless. I was able to maintain 600 Mbps download rates from Steam and Microsoft over a 1 Gbps internet connection. Performance is subject to several factors. I had one download that peaked at 100 Mbps. While viewing Netflix movies and during some heavy gaming on Comms I did experience some break up in transmission. Now, that could have been the laptop, the wireless signal experiencing interference, or my provider. Regardless, it happened enough that felt I needed to mention it.
Bluetooth is rock solid. I connect a pair of noise canceling Sony headphones for gaming and movie watching. No issues with syncing or usage. Everything sounded as it should.
In Closing:
This is a desktop replacement for any gamer looking for a “portable” solution or a gaming rig in another room. This could also act as an entry-level workstation option. The CPU does run hot but the m18 has crazy cooling power. The fans will get noisy under load but nowhere near the leaf blower level of small Alienware laptops. The keyboard is fantastic. Great high refresh screen. I think if Alienware can address a few issue then this will be a true flagship system.
I would recommend this to a friend!


Share this review:
+3points
3of 3voted this as helpful.
The powerful and compact Zenbook 14" OLED is just 0.66” slim and 3.48lbs light, with a breathtaking new design that’s timelessly elegant yet totally modern. Perfect visual experience from the 14.5” 16:10 2.8K OLED HDR NanoEdge, up to 550-nit screen which is PANTONE Validated with 100% DCI-P3 color gamut. The Intel EVO platform with 13th Gen Intel Core i5 Processor, Intel Iris Xe graphics, 8GB RAM and 512GB PCIe 4.0 SSD deliver superb performance, and there’s a long-lasting 90 Wh battery and latest Wifi-6E built-in. For extraordinary audio experience, there’s a Dolby Atmos sound system powered by a smart amplifier with Harman/Kardon certified.
Customer Rating
4
Compact package loaded with Modern Technology
on June 18, 2023
Posted by: ITJim
The Asus Zenbook is a compact, mobile laptop that is light weight and attractive. The OLED screen is bright, vivid, and rich. The membrane keyboard is easy to type on, non-fatiguing, and the keys are well sized and spaced for a laptop this size. The system runs quietly. Fan noise was only noticeable during the most intense tasks. The ports are well positioned at the back of the case on either side of the keyboard. And the sound system is clear at all volume levels. This Zenbook packs enough value to make it a great choice for schoolwork, word processing, spreadsheets, social media, and streaming.
OLED Screen:
The OLED screen is bright and super responsive at 120hz refresh. YouTube Videos at high resolution are crisp and clear. Netflix is clear but with the normal artifacts in bright colored scenes that I see with all Netflix streaming on all my computers. Colors pop. And action scenes play without stutter or any smearing. The screen’s brightness is more than adequate to make video and images pop.
Web surfing, office applications, and other similar operations look good but with a few caveats. First, this monitor suffers from color fringing along the top and bottom edges of static content. It is most noticeable on pages with a lot of text such as MS Word. I have word setup for Dark Mode which means the background page is dark grey and the text is white. To top edges of letters have a red fringe and the bottoms have a green fringe. I have included two photos that illustrate this. The fringing effect takes otherwise very clean and crisp text and makes it slightly blurry. I hope Asus releases a driver or firmware update soon that address this issue.
Second, peak brightness is just too bright for anything other than video or photos in my opinion. This is not necessarily a con. For me, 40% brightness was the right balance between brightness and usability with my office apps, web surfing, and social media. I did not find any independent controls to adjust brightness and contrast. So, for now, the screen is either bright or it is not.
Blacks at 40% brightness are true black. As you increase the brightness, blacks tend to lean more towards dark grey than black. Lowering the brightness below 40% and the whites suffer. Just keep that in mind before cranking up the brightness for dark scenes in your videos. There are several options in the MyAsus app to address screen behavior such as Blue Light, Vivid, Movie, and different HDR modes. Not every mode is designed to be good at reproducing all content. Be sure to play around with these so you can find what works best for you.
Ports and expandability:
Both USB-C ports are Thunderbolt. The power brick that ships with the Zenbook connects via USB-C. Either port can be connected to a monitor that also accepts Thunderbolt. I had this Zenbook rocking a 34” Alienware QD-OLED monitor without any issues. Better yet, the Intel Iris GPU was able to handle both the 34” Alienware monitor while also operating the 14.5” OLED of the Zenbook. That is like having three monitors running at the same time. Not too shabby.
The remaining ports are HDMI, Stereo mini-jack, and a single USB-A port. There is no RJ-45 port. The Zenbook relies on Bluetooth and Wi-Fi 6E to expand its connectivity options. Wi-Fi 6E wireless network adapter connected to my Asus ROG router without any trouble at all. The connection remained fast and strong for all my Windows Updates and application downloads. I also did not experience any dropouts as I moved around my home. Bluetooth found my wireless headphones and SVS Soundbase within seconds. Connecting was quick and easy. Like Wi-Fi 6E, the Bluetooth connection remained strong and stable.
Sound:
The Harmon/Kardon sound system is very good. Better yet, Dolby Atmos is available for any sound system you want to connect this laptop to. And you do not need to purchase an additional license from Dolby. The MyAsus app allows access to many preset sound modes, Dolby Atmos settings, and the ability to create your own EQ presets. I like the flexibility because not all content is created equal. And different speakers and sound systems also have different limitations that EQ can compensate for.
The built-in speakers are clear at all volume levels. However, before you crank the volume know that the entire keyboard surface resonates with the speakers. The higher the volume, the more the keyboard surface resonates. This includes the palm rest and the touch pad. This is not necessarily bad. For you sound purist out there…you probably already have audiophile quality headphones and an external DAC for critical listening. For non-critical listening such as lectures, news, YouTube content, and other content the internal speakers will do a good job.
Touch Pad:
The touch pad is large for a laptop this size. It is very smooth and easy to use. Asus integrated a number pad into the touch pad. There is a number pad icon in the upper-right hand corner of the touch pad that will reveal a lighted number pad through the touch pad surface. There is a second icon in the upper-left hand corner that controls brightness and is used to activate the calculator app. The calculator app function needs some work and is not very reliable. Everything else works without issue. The best part is you can use the number pad for any application including MS Word, Excel, or a financial application.
Camera:
The camera supports Windows Hello. This allows you to sign in with your face. For video, I tested the camera with Windows 11 Camera app. The video quality is only 1080p and will not win any awards anytime soon. The MyAsus app has settings that allow for different AI filters to be applied. The camera with zero AI filters worked well. The video was quick, clear, and responsive. In contrast, the AI filters penalized video frame rates and video quality. Frame rates dropped and image quality became blocky and unfocused. The only AI mode that did not incur a performance penalty was the AI Head Tracker. This mode did a good job of keeping my head center frame as I moved my head from side to side.
Additional items:
The Zenbook ships with 8GB of memory that is shared with Intel’s integrated GPU, Iris XE graphics. The laptop at idle will consume 5 to 7GB of memory. Memory management seems to do a good job of keeping things under control. I was able to run both the internal and external monitors with multiple web pages, a Netflix video running in its own window, and multiple office documents open at the same time. At no time did I suffer slow opening windows, drawing issues opening or switching between windows or tabs, or any video stuttering. Overall, pretty good.
Games I downloaded from my Xbox Game Pass did not run very well if they ran at all. I would not recommend this laptop for gaming.
The case’s hard edges are sharper than they need to be. This makes the laptop sit harshly in the hand when carrying it. This is most noticeable when typing or mousing with the laptop on my lap. The laptop will not cause injury. It would have been nice if Asus smoothed out the corners with future Zenbook offerings.
MyAsus App:
This is part bloatware and part master laptop control center. However, Asus does give you the choice whether to install certain applications. Which is nice because there was nothing for me to uninstall.
It is worth taking the time to scroll through all the options and features the MyAsus app provides. This is where Camera, OLED Care, OLED features, Sound, AI, and other unique features of the Zenbook can be controlled. If you have other Asus products in your home or office networks then they can all be connected through this app. For example, MyAsus app connected with my Asus ROG router and provided me with some limited network controls. There are offers in this app to sync files via Drop Box, accept alerts and advertisements from Asus, and some options from some third-party applications. My advice: take 20 minutes and play with the options. Some I think are very useful such as the OLED options sections. You can also access the Dolby Atmos settings here and even configure the system to interface with a Dolby Atmos home theater. This would be excellent for someone who has a surround-sound-in-a-box solution or high-end sound bar with surround and height speaker capabilities.
Final Thoughts:
This is a very nice entry level ultra-light laptop that is rocking all the latest technologies and some nice innovations accessible via MyAsus app. The OLED screen is good but not perfect due to the color fringing. Hopefully Asus will address this in a future software update.
The external ports are very well positioned and out of the way. Heat management seems good. Keyboard and touchpad are comfortable to use and well-spaced and positioned. The Zenbook case seems durable enough to survive your average backpack. And the unit can handle all my web surfing habits and Office Applications. Overall, I expect to get years of solid use out of this laptop.
I would recommend this to a friend!


Share this review:
+28points
31of 34voted this as helpful.

Whether you love entertaining friends and family or just like to keep your favorite drinks chilled and ready to go, this 48 12-ounce can beverage cooler has the storage capacity to stock all your favorites. Its touch controls make it easy to keep drinks cool within a range of 34° F to 50° F. It has one removable shelf, letting you organize this cooler to your exact preference. If there’s a power outage, an automatic memory function restores the same settings. And automatic defrosting helps the cooler stay free of ice
Customer Rating

3
Great little mini-frig. Poor quality control.
on May 29, 2023
Posted by: ITJim
The Insignia 48 Can Beverage Cooler does a good job of keeping my drinks cold. The frig is attractive with its stainless steel and glass door and black body. The control panel is well placed. The target temperature is centered on the control panel and can be seen through the window. And there is an interior light that can be toggled from the control panel. The light cannot be set to auto on/off like kitchen frig. Overall, this is a nice little drink fridge but does have some quality control issues that I will discuss below.
Unpacking and setup:
Unpacking the frig was straight forward: cut the plastic straps, lift the top of the box, and extract the frig from the Styrofoam bottom. There is a sticky plastic film wrapped around the sides and top of the frig that is easily removed. The door is also securely taped shut. The unit ships fully assembled. The only adjustments that may require attention is leveling the frig using the single leveling foot and swapping the door from opening to the right to opening to the left.
The control panel is simple and easy to use. There is a standby button. Unfortunately, the manual does not define what Standby Mode is. Only that Standby mode can be turned on. Light button turns on the internal light. Pressing and holding both the Standby and Light buttons for 3 seconds will put the frig into Quick Cool mode. There is a small display that shows the target temperature in either F or C. The last two buttons are used to set the target temperature. Pressing both temperature buttons for three seconds will switch between Fahrenheit and Celsius.
On my unit, the power cable was jammed into the compressor compartment tangled with the copper pipes. In my opinion, this was a very poor decision and could lead to damage to the unit if the cord is not extracted with the utmost care.
Cooling:
The unit cools well. There was a lot of bubbling and churning in the cooling system when I first plugged the frig into the wall. This was mostly due to trapped gases in the cooling system being spread around the cooling system during shipping. It takes a few minutes for the system to sort itself out before it starts sounding like a normal refrigerator. The manual does cover this in the Troubleshooting section of the manual.
There are two cooling modes: Quick Cool and normal. Quick Cool can be used to rapidly cool a fresh load of room temperature bottles or during partial refills. Quick Cool is pre-programmed to run for 24 hours unless interrupted by the operator. I set my frig to 45 degrees target temperature. Quick Cool took less than 12 hours to cool off an initial load of 32 cans and six Gatorade bottles. Pressing the Standby and Light buttons simultaneously and holding for 3 seconds will turn off Quick Cool.
For greatest efficiency, you will want to keep about 4 to 6 inches clearance to either side of the frig. The left and right sides get hot as the frig dissipates waste heat. Good air circulation, plenty of clearance on all sides, away from heat sources, and out of direct sunlight are all good ways to make the frig as efficient as possible. I placed mine in my basement with six-inch clearance to either side and about four inches from the wall to the back of the frig. My basement is temperature, humidity controlled, and away from direct sunlight.
Loading:
The frig is easy enough to load. Insignia has a 12 ounce can loading scheme outlined in the manual that will get you to 48 cans. They use a combination of vertical and horizontal storage of your cans. I managed to fit 32 cans with six larger Gatorade bottles. But could have done better if I vertically loaded the top shelf. The shelf height can be adjusted. There are two positions molded into the case. The upper most position is really close to the cooling plate and did not seem to serve any purpose for me at that height. The default height did not allow for the Gatorade bottles to fit. So, I put the shelf on top of the first position molding. Which, coincidentally, works very well as another shelf height position.
The bottom row has two non-removable bars to prevent the frig contents from falling out. This is the reason I did not remove the top shelf to install my box wine box. First, the bars on the lower shelf got in the way. Second, I would have to remove the top shelf regardless of vertically or horizontally storage. And finally, I would not be able to use the spigot through the bottom shelf bars.
Poor Quality Control (why I gave this a three-star review):
First, the door can be positioned from the right side of the frig to the left. This is a good thing. Except, the holes in the sheet metal and the frame do not align. For one hole, the internal insulation overlaps the screw hole. This prevents me from repositioning the hinge from the right side of the frig to the left. Additionally, the sheet metal casing is bent and misaligned to allow the holes to line up.
Second, the bottom of the frig has one leveling foot, a nob on the bottom of the door hinge that doubles as a foot, and then a metal plate with the threaded end of multiple screws fully exposed. The metal plate can and will scratch hardwood floors, vinyl tiles, and counter tops. The exposed screws can cause injury. Third, Insignia did not provide any stick-on feet to address any of these issues. I provided my own felt stick on feet. See included photos.
Third, the cooling plate inside the frig is bent. There are two hooks along the inside roof that secure the cooling plate and stabilize it against the case. The left corner is bent and insecure. I attempted some gentle manipulation to resolve the issue and failed. I did not apply force because I did not want to risk cracking the plate and possibly releasing coolant into my room.
Fourth, the wire shelf is filthy. Originally, the shelf looked grimy and rusty. I used a damp cloth to clean the shelf. It now looks like a new shelf. In all fairness, the instruction manual does suggest cleaning the inside of the frig before use. Still, why does the wire shelf look like it’s been exposed to the elements prior to shipping. All you can really see from the included photo is a bit of discoloration.
And finally, I mentioned this earlier, why is the power cord jammed into the cavity of the frig for shipping. This would not be such a bid deal if the cord wasn’t entangled with the copper tubes. It took some manipulation and untangling to extract the power cord without disrupting the tubes. But if I had just grabbed and pulled then I could have caused some damage. There is plenty of space in the Styrofoam shipping container for the cable so there is no reason why the cord is shoved into the cavity.
Overall, any one of these items could be considered a minor issue. What I pointed out are not difficult or expensive things to fix. This does show poor quality control on Insignia's part when taken as a whole.
Conclusion:
Does the frig do a good job cooling my drinks? Yes, it does. It is quiet. Has a good feature set. I like the stainless steel and glass door. And the control panel is well placed and easy to use. I also feel that there are some quality control issues that Insignia needs to address before I am willing to give this frig my buy recommendation.
No, I would not recommend this to a friend.


Share this review:
+1point
1of 1voted this as helpful.
Get hands-on cleaning control and hands-off debris removal with the All-in-One Tower that keeps your LG stick vacuum clean, charged and ready to go—automatically. Two quick release batteries and Kompressor technology combine for uninterrupted cleaning power, with multiple tools for cleaning all kinds of surfaces, both high and low. Done for the day? Return the vac to the tower to recharge, store tools neatly out of sight and let Auto Empty clean out the dust bin for you. Your hands, floor and air stay clean and your CordZero vac is ready to go when you need it next.
Customer Rating
4
Lots of innovation and smart design
on May 26, 2023
Posted by: ITJim
Initial Impressions:
The LG CordZero Cordless Stick Vacuum with All-in-One tower is unique from other stick vacuums in several ways. First, the wand is telescopic. Second, the LG CordZero comes with two battery packs. Think electric drill type battery packs. Third, the inclusion of a multi-function, free standing tower. Fourth, disposable vacuum bags. fifth, dust cup auto clean. There is no longer a need for you to stand over the garbage pail and drop your flap! Not unless you want to. And Sixth, homework, uh, very thick User’s Guides. There are a lot of great things to like about the LG CordZero. There are also a few not so fun things that I will discuss under the “Not so Fun Things” section. Overall, I think this is a very solid product that is well designed and full of useful innovations.
Unpacking and Setup:
First, about 80% of the packing material is cardboard. The remainder is a combination of Styrofoam (for the Tower), Styrofoam bags, and a few plastic bags. The LG CordZero also ships with two large User’s Manuals that I recommend you read before using either the LG CordZero or the Tower, a few quick start guides, a warranty-ish kind of sheet, and a few other documents. The LG CordZero ships in a single box with three smaller boxes inside: one for the tower, one for the motor and telescoping wand, and one for the accessories.
Unpacking and setup took about an hour. I spent another hour looking through the manuals and quick setup guides. The LG CordZero is a bit more sophisticated than your regular, run of the mill stick vacuum. For example, the vacuum needs to be loaded into the tower, a bell indicates that the vacuum has been loaded properly so battery charging and dust cup cleaning can take place, and then removal lift first then extract. For my wife, the dust cup popped off the vacuum the first time she extracted the vacuum. More on the dust cup incident in the “Not so Fun Things” section. The Tower has indicator lights and touch settings that are only described in the manual. The good news is LG auto loaded the filters in the LG CordZero and in the tower. They also pre-loaded a dust bag in the Tower and provided two additional dust bags and an additional yellow filter.
The tower has a storage compartment on either side of the unit. All the accessories that ship with the LG CordZero have a hanger location. Which is nice considering most other stick vacuums include a bag that you fill and throw in your bottomless basement for safe keeping… One word of warning, the Tower is not easy to move. The sides are too smooth to get a good grip. To help, LG located carry handles on either side of the Tower hidden behind both doors. If you need to move the unit then open each door, grab the handles, and then lift to move. The tower has an attachable foot with stick on grip pads to add stability to the tower. LG also includes some wall anchors and nylon rope to secure the tower to the wall. This way, the tower is less likely to fall over. The tower is heavy, stable, but there is always the possibility that someone could knock it down and cause injury.
Finally, the two batteries for my unit arrived fully charged. Loading and unloading batteries into the stick vacuum and the tower are just as easy as loading and unloading the batteries in your wireless drill.
Cleaning Power:
The LG CordZero has three power modes. Wimpy (my term), Medium, and Turbo. I used the universal nozzle to clean my basement floor for my first cleaning. My basement is semi-finished having a combination of vinyl tiles, low pile rugs, concrete, and soft foam tiles. The floor space is about 1000 sq feet. I started with Wimpy power and quickly moved to medium power once I saw that wimpy power was doing a terrible job of cleaning up stray kitty litter around my cat box. I switched to Turbo power because medium power was having a difficult time picking up little bits of paper scattered around my wife’s craft area. Turbo did a fantastic job of picking up almost everything on the floor.
Overall, I was able to fill the dust cup with hair, dirt, kitty litter, and other loose debris. See photo. On turbo mode, I got about 10 to 15 minutes run time out of each battery. It took both batteries to clean my basement. The cement and vinyl tiles were the easiest surfaces to clean. The low pile rug was more of a challenge. More on that in the next section. The foam tiles were impossible using medium or turbo power. Switching to wimpy mode made the foam tiles vacuumable. And did a pretty good job on wimpy. The manual recommends one of the cleaning wands for a foam tile surface. Which I ignored.
The dirt collection is significant. One of the unique features of the LG CordZero’s dust cup is a lever that allows me to compress the dirt and hair captured into the dust cup to the bottom of the dust cup. This can extend the use time of the vacuum during longer, heavier cleaning sessions. It is also an important part of the tower’s cleaning cycle. Cleaning the dust cup, regardless of how it is cleaned, is made much easier with the inclusion of the lever.
Other features:
The included pet tool does a good job of removing pet hair. I have a Jersey Wooly rabbit which leaves fine, whisper thin hair everywhere he goes. He loves hanging out with me in my home office during the day and leaves a mess of white hair all over the rug and floor. I used the pet tool on the rug. See included before and after photo. The pet tool did a good job of cleaning up the pet hair but did a terrible job at everything else. I needed to use the universal nozzle to finish the rug cleaning job. I also found a wad of hair caught in the pet tool that I had to manually remove when I swapped out the nozzles. I also used the pet tool on my exercise mat which was also covered in rabbit hair. It did a good job. It is also small enough that I could get into the tight spaces around my exercise bike and along the walls.
The different nozzles that ship with the LG CordZero easily store inside of the Tower. However, there is no space in the tower to store extra filters or dust bags. It would have been a bonus if there was a small shelf in the tower for additional storage but not a deal breaker.
The telescoping wand is one of my favorite features. LG included a slider switch on the wand that depresses in the direction you want to expand or contract the wand. The switch and the telescoping movement is effortless. The telescoping wand also brings more flexibility from a usability perspective.
Some jobs require a three-foot wand. Some jobs, like tight cleaning spaces, can benefit from a wand half the length. For example, the telescoping wand allows me to work easier in the tight space behind my entertainment center. Normally, I bump up against my speakers, TV, photos, and subwoofers. A shorter stick length has an easier time allowing me into these tight spaces. Along this line, the motor is also much smaller and lighter than a plug-in stick vacuum. This also increases cleaning flexibility in tight spaces as mentioned above. I no longer need to worry about managing a cable while trying to not scratch my speakers or subs.
Some jobs require a three-foot wand. Some jobs, like tight cleaning spaces, can benefit from a wand half the length. For example, the telescoping wand allows me to work easier in the tight space behind my entertainment center. Normally, I bump up against my speakers, TV, photos, and subwoofers. A shorter stick length has an easier time allowing me into these tight spaces. Along this line, the motor is also much smaller and lighter than a plug-in stick vacuum. This also increases cleaning flexibility in tight spaces as mentioned above. I no longer need to worry about managing a cable while trying to not scratch my speakers or subs.
Finally, the other nozzle attachments are nothing special. The crevice tool and brush tool are like every other modern vacuum I have used. They can be used at the end of the wand or directly connected to the handle. They do a good job. The different vacuum power modes will obviously impact performance for each nozzle.
Not so Fun Things:
The dust cup came off the LG CordZero the first time my wife removed it from the tower. One of the two hinge pins holding the dust cup door to the dust cup fell into the dust bag located inside the Tower. The two coil springs that wrap around the hinge pins dropped to the floor. Re-attaching the door took a considerable amount of force. I needed a small vice to squeeze the dust cup enough to allow the pins to be reinstalled. See included photo. Since reassembly, I now need to manually close the dust cover every time I remove the vacuum from the tower. I have no idea if this is normal behavior because the door broke off the very first time it was removed from the tower.
The second not so fun thing is the mobility of the Universal Nozzle. As mentioned above, the vacuum does a good job. But the universal nozzle is very difficult to push across a rug of any thickness. My first rug was an extremely low pile rug. I was surprised by the overall resistance pushing the universal nozzle across the rug. A rug with a slightly thicker pile was higher resistance. I could still clean the rug, but it took additional force than a hardwood, tile, or concrete floor. And much more force than I must apply with other stick vacuums I have used. Ease of mobility on a rug also seems proportional to the vacuum power being applied. I think the LG CordZero will have an issue with any rug ticker than a low pile rug.
Final Thoughts:
The LG CordZero is feature rich and does require the review of LG’s provided manuals before you will be able to fully realize the benefits of this vacuum. There is a lot of intelligent design here including the dust cup auto cleaning, telescoping wand mechanism, and swappable batteries. The tower is sturdy, very useful, and refreshing after owning several stick vacuums with either a cheap wall hanging gimmick or no storage mechanism at all. There are additional nozzles available separately for the LG CordZero such as a mop nozzle, bedding nozzle, and flexible hose extension to name a few. Another feature I do not have room to address is the LG app which connects to the vacuum. The app reports on Cleaning mode, performs Smart Diagnostics, and issues Filter Alarms that will let me know when it is time to maintenance the filters. Overall, I think LGs direction is refreshing and adds a level of flexibility that is not readily available
I would recommend this to a friend!


Share this review:
0points
0of 0voted this as helpful.
This new generation of the home line-up has an even wider soundstage than its predecessor, re-engineered for a more immersive experience. This new generation has tweeters angled outwards and updated waveguides to deliver a consistently solid sound that is so wide it chases you around the room. Experience a balanced sound, with crisp, soaring treble and controlled, rumbling bass. Built-in Dynamic Loudness adjusts the tonal balance of the sound, ensuring your music sounds brilliant at every volume, while Placement Compensation corrects for any nearby reflective surfaces that may affect the sound. Marshall has taken its signature rock ’n’ roll home speaker line-up and given it a stripped-back look that makes a loud statement. Its iconic design knocks all other speakers off the shelf. Generation III is ready for the future of Bluetooth technology and has been built to deliver next-generation Bluetooth features the moment they are available. Over 55 years of sound knowledge is combined with future-proof technology to completely immerse you in your music.
Posted by: ITJim
Initial Impressions:
The Marshall Stanmore III has a clean and sophisticated look. I will never be embarrassed showing this off in any room. It is a very handsome piece. The speaker has a faux leather wrap, cloth grill, an intelligently lighted brushed copper and black control panel, and finished with the iconic Marshall signature scrawled across the front grill. The Stanmore III should be able to easily blend into any modern household décor. Setup is easy as one, two, three. Plug in, flip on the meaty power switch, and sync with your phone or other stream source. Done! Room placement is very important for the Stanmore III. Thankfully, Marshall took the time to include some EQ settings to assist with room boundary compensation. And finally, sound quality, in my opinion, is hit or miss depending on the content, physical location, and the overall volume level.
Room Position:
I will start off by stating that room position and your listening position have a lot to do with getting the best out of any speaker. This is especially true with this speaker. I tried two rooms and four positions. The best position for my Stanmore III was in the middle of my multi-purpose room, 5.5 inches off the wall, and on the top shelf of my bookcase. See included photo. The top shelf of the bookcase is also ear level with my sitting position in the room. Next, I used the Mashall App to adjust the speaker’s Placement Compensation. This is an EQ adjustment and not auto-room correction feature like you would find on a modern AVR. Placement Compensation corrects for two situations: 1) Is the speaker close to an edge, and 2) Is the speaker close to a wall? I set the speaker Placement Compensation to “Yes” for the first setting and “Yes, a wall” for the second. I then set the tone controls to Bass-1 and Treble-3. Volume was set to 4.
For me, this produced the best sound from the Stanmore III for this room.
Sound:
My sound source was my iPhone and my Apple Music subscription. I both streamed and used the RCA cable connection on the back for musical playback. I spent three days listening to content. Below are the highlights.
Music like electronica, metal, hard rock, anything recorded live, or anything with a lot of artificial sounds sounded muddy, muddled, and hallow on this speaker. Classical, Jazz, easy listening, and anything with vocals and acoustical instruments, content without a lot of processing, seemed to work out well.
For example, Metallica’s “Master of Puppets” sounds good at low volume. But who plays Metallica at low volumes? Turn up the volume, and the bass, and the wheels simply fly off this speaker. The speaker box rings like a bell. Meaning the box vibrates so much from the speaker output it overwhelms the music. Plus, the midrange takes a back seat to the bass reproduction. In my opinion, I think the woofer is being asked to do too much in this system. At least for something heavy and hard hitting like Metallica.
In stark contrast, “Closer to Fine”, by the Indigo Girls, sounds good on the Stanmore III. The acoustic guitars came through with authority and a level of clarity that really shows the Stanmore III’s midrange capabilities. At least when the bass isn’t overpowering the woofer. Amy Ray and Emily Saliers’ voices are clear, pitch perfect, and the system effortlessly responds to the dynamics of the singer’s voices as they weave in and out and around each other. It is almost like the Stanmore III was designed specifically for this type of music.
A high energy song, such as the B-52’s “Love Shack”, comes off as a complex mess that sounds terrible at anything above half volume. And even then, the true dynamics of the song feel subdued and hollow at lower levels. If there was ever a B-52 song that could get you to kick off your shoes and dance around the room then it is this song. Just not on the Stanmore.
Idena Menzel’s album, “Christmas: A Season of Love” sounds good on the Stanmore III. Bach’s Brandenburg Concerto, and the Jacques Loussiers Trio’s jazz arrangement of Bach’s “Fugue in G Minor” sound great once the Stanmore III is dialed in properly. Even the lonely piano notes at the beginning of George Winston’s “Colors/Dance” show an amazing decay that I did not expect to hear on a small system like this. But, a highly synthesized, big sound, such as Boston’s classic album “Third Stage” easily overwhelms this speaker and sounds terrible.
Everything else:
Control Panel: The manual controls on the top of the Stanmore III are beautiful and provide a luxurious experience. The power switch is meaty and satisfying to flip back and forth. The volume, bass, and treble control nobs are black plastic with copper textured caps which turn with little resistance. Each nob has 11, 0 – 10, red lighted notches that light as you dial up or dial down. The notches will also dim after a preset amount of time and then light up fully when you make a new adjustment. There is a single rocker switch for Back, Play/Pause, and Next. The switch looks good and is free floating. There is also a button that allows the Stanmore III to switch between Bluetooth, Aux, and RCA inputs. These two switches have the same build quality and presentation as the other nobs on the control panel. I am impressed with the level of sophistication Marshall put into the control panel experience.
Aux inputs: I connected my iPhone to the Aux ports using an RCA to Mini-stereo jack cable. The unit played without any issues. The input needs to be chosen from the control panel on the speaker. The Marshall app does not allow a soft switch between inputs via their app.
Tone controls: Treble and Bass tone controls can be set from the “Equalizer” page. Volume can also be set from the app but you have to enter another screen to manual adjust the volume. You can also use the manual volume controls of your source app or source device for Bluetooth playback.
Sleep mode: The speaker will go into sleep mode if left alone long enough. However, the speaker will also put the Bluetooth transmitter to sleep. The speaker’s physical control panel requires interaction before Bluetooth connectivity will be re-established.
Bass: This little guy will throw out the bass. Put on your favorite bass heavy piece, crank the bass nob to 11, and rock out! Put it up against a wall or in a corner to take advantage of boundary enforcement and you’ve got yourself a party. However, the speaker will ring like a bell with its own resonance which will degrade your listening experience.
Treble: Just like the base, the Stanmore III is capable of amazing treble. Whitney Houstin sounds outstanding on this speaker with the treble turned up.
Recycled materials: The packing material is almost 95% recyclable. I included photos of the packing material. The little desiccant packets are not. Otherwise, bravo Marshall! The Stanmore III is also 70% recycled material. This is huge from an environmentally friendly position.
Portability: This speaker is as portable as there are available wall outlets. There is no internal battery.
Final thoughts:
The Marshall Stanmore III is second to none in the looks and styling department. Marshall chose to spend its money on styling instead of gimmicks. And I think they made the right choice. The system is powerful. It will play music loud and with authoritative bass. Even at low volumes, the bass output of the Stanmore III can be satisfying. Is it good bass? In my opinion, it depends on the content and the volume level. At lower volumes I think it is good enough.
For sound quality, I think Classical, Jazz, and acoustic Singer/Song Writer type content sounded best to me. I also feel that this speaker shines at volume levels of 50% and less. Over 50% and this speaker has a very hard time controlling box resonance and speaker balance even with tone controls and Placement Compensation EQ presets.
Overall, I had a mixed experience with the Marshall Stanmore III. I can see this speaker working out well in a collage dorm room, a kitchen, or a small den providing background ambiance. But, if you are a head banger, then you will find plenty of bass here to rock to all night long. For me personally, I did not find the musicality of the Stanmore III to my liking.
No, I would not recommend this to a friend.


Share this review:
+3points
3of 3voted this as helpful.

With up to 3,000 PSI at 2.0 max GPM, the Greenworks GPW3001 pressure washer is the most powerful residential electric pressure washer available. With a powerful 14-amp TRUBRUSHLESS motor, axial cam pump, and hassle-free, push-button starts, you’ll get to work fast; just plug the 35-foot power cord into any typical exterior household outlet for quick starts with no priming, no choke, and no pull cord. This quiet-running, lightweight, compact, easy-to-store pressure washer features a rugged steel frame and wheel barrow design, thermal relief valve that purges hot water from the pump to cool it down during constant use, and intelligent PCBA technology that automatically senses which pressure washer nozzle is being used, and adjusts motor speeds to auto-adapt for more pressure and water flow for maximum cleaning power. With a 25-foot, non-marring, high-pressure hose, oversized one-gallon soap tank with built-in detergent system, and on-board accessory storage with 15-, 25- and 40-degree nozzles, turbo nozzle, and soap nozzle tips, it’s versatile, portable, and powerful.
Customer Rating
4
Does a great job cleaning with a few quirks
on April 12, 2023
Posted by: ITJim
The Greenworks - 3000 PSI Pro Electric Pressure Washer has plenty of power and flexibility to handle a number of jobs. My primary use for pressure washing is vinyl siding, walkways, concrete surfaces, my small deck, and my vehicles. The unit ships with five nozzles. Each nozzle provides a different amount of pressure and spray width. Unfortunately, the user’s guide will only tell me the angle of each nozzle and what job the nozzle was designed for. So, I cannot give you an exact PSI output rating for each nozzle. I’m assuming the full 3000 PSI is present but the nozzle width dampens that pressure so as not to overpower the project. What I can tell you is that the Turbo nozzle will provide the maximum pressure possible. More on that later. The pressure washer is easy to assemble, hoses are easy to connect, the motor is quiet for a compressor motor, and the unit is easy to move around and store.
Setup:
Setup took about half an hour. Unpacking the box was like unpacking a puzzle. The parts were well packed and protected. They just won’t go back into the box the way they came out. The main body ships as a single piece. The easiest way to unpack the main body is to open the bottom of the box and then lift the box up over the part.
Some assembly is required. See photos for a layout of all the parts. The only tool you will need is a Philips screwdriver. The handle slides into two pipes on the end of the Greenworks Pro Jetflow’s frame. There are two bolts and knobs that secure the handle. The deck that holds the five nozzles, hose, and gun connect to the handle via four screws. There are four threaded housings counter sunk into the handle. This gives the deck a solid, flat surface to mount to. It also allowed me to make a good tight fit. I prefer this much better than the normal through hole designs that tend to loosen over time or add additional rattle to the frame. There are two handles at the back of the frame that allow for the power cord to wrap around for easy storage. The handles attach to the frame using the same counter sunk threads as the deck. These two screws come with a washer and lock washer to unsure these screws don’t loosen up as the pressure washer vibrates.
First use:
First, read the directions from end to end. They are not long but they are important to the proper operation of this unit. It took me about 10 minutes to connect all the hoses, check for leaks, power it on, and clear the lines of air. I played around with the different nozzles until I found the one I wanted. The provided nozzles are 15º, 25º, 40º, Soap Soaker, and turbo. The degrees correspond with the measure of the cone or flat fan that the nozzle produces. The degree corresponds with the overall power output of the nozzle. For example, my very first project was my cement tile walkway. The cement tiles are one foot by one foot and make up a walkway that is three tiles wide by 20 tiles long. The path fills with debris and sand all winter long. I figured this would be a good place to start. I started with the 15º nozzle since this was rated for foliage and debris. Well, this turned the dirt to mud super-fast and threw mud through the air away from the water stream. Any lichen or moss that was on the tiles simply flew away. Any piles of mud or small rocks that had built up over the winter took a few passes to liquefy before flying away.
Did the Greenworks Pro Jetflow do a good job? Yes and no. It is late winter/early spring where I live. So the water tends to pool instead of being absorbed into the ground. The muddy water pooled and flowed back onto my nice clean tiles. Before that happened, the tiles did look nicer than they did before. It was still fun blowing dirt, pine needles, and moss around. I changed up my game and focused on a single tile that was away from the pooled water. I did manage to capture a before and after photo of one of the tiles spared the dirty water overrun. And yes, the tile went from dullish grey to it’s original color.
My second job was an 8-foot by 8-foot concrete slab that the previous owners used for a hot tub. Today, I use it as a small patio. I started with the 25º and then followed up with the 15º nozzles. The 25º nozzle did a good job of pushing away the loose debris. The 15º nozzle did a good job of blowing away the built up soil, grass, and plants along the edges. I had to turn to the Turbo nozzle to clean away the stains. The turbo removed 15 years of built-up stains. It looks almost new. I attached a photo of before and during to illustrate my point. The difference between clean and deep clean is stark. Also, be careful with the turbo if you are working along an edge. It will decimate any soil, lawn, or plants you have along your cleaning path.
My third project was my truck. I used the 45º nozzle with the truck. This removed any loose debris and dirt. The 45º nozzle does not produce enough pressure to remove the hard stuck on grime like dead bug goop and stuck on brake dust. There were issues with this project that I noted below under “Issues.”
My wife chose to spend the day pressure washing the front of the house. Unfortunately, I was not able to get any before and after images to share. I have white siding that turns shades of grey, black, and green over the winter months due to chimney smoke, car exhaust, and algae. My wife tells me she used the 15º nozzle for the siding to clean everything off. No cleaner was used. The manual does not list vinyl siding as safe for the 15º nozzle. It did a good job cleaning away the winter grime. Her next step is to add a cleaner to the reservoir and do another pass on the house next month when we will have consistent warmer days. I just hope she can use a wider nozzle while using a detergent.
Issues:
I chose to wash off my truck. I added a small amount of car soap to the reservoir and then filled the reservoir with water. This is where things got a bit wonky for me. First, the compressor seemed to have a very difficult time getting up to pressure or keeping pressure. The compressor would start at full power, the pitch would change indicating I had full pressure, I would pull the trigger for 10 seconds, and then the motor would go into some kind of idle mode. Idle mode got me maybe 1/3 normal pressure. Then it would suddenly kick back on. After about five minutes of this back and forth I was able to maintain full pressure for the remaining 20 minutes it took me to clean the truck. I did notice a small amount of water leaking from my garden hose around the nozzle. I wrapped it in silicon tape to stop the leak, but it did not immediately solve the problem. I do know that there was a lot of popping and hissing from the spray wand right before the power was regained. This may indicate air is getting into the system from somewhere else.
The next day, as noted above, my wife pressure washed our home’s vinyl siding. She had zero issues. So, I am unsure what happened the previous day.
Second issue. The garden hose connect is located just beneath the front handle. This makes it difficult to tighten and loosen the nut that secures the hose. A few times I scrapped my knuckles on the mixing assembly. The tight space also forces my twisting leverage around my wrist instead of allowing me to use my full arm. More than once I have had to use both hands to turn the nut. And even then, it was difficult to get the correct leverage. See included photo for a sense of what I am talking about.
Operations:
First, attaching the spray wand to the spray gun took more force than I expected. I had to brace the spray gun against the ground while attaching the spray wand and changing out nozzles. Be sure to turn off the pressure washer and lock the trigger safety before making any changes to the spray gun. Use the safety! It may save an eye or two.
Second, be sure the water is running and passing through the spray gun for about 30 seconds before turning on the motor. It is possible to damage the motor if run with air in the line. Allow the motor to build pressure for about five to ten seconds before pulling the trigger. I did experience some moments of power loose when pulling and releasing the trigger in quick succession. I did this when getting too close to an edge or when trying to be delicate. I waited for about 10 seconds for the motor to stabilize before starting up again. This time, I was able to pull the trigger multiple times in a row without losing power. In hindsight, this may be a symptom of air getting into the line somewhere along the way.
Powering the motor on and off was a snap. One button-press and the motor was running. About 5 seconds later the Greenworks Pro Jetflow was up to full pressure. I turned off the washer between nozzle change outs, moving between project locations, and anytime I left the unit unattended. My foreman, A.K.A, my wife, kept asking me questions and making comments while I was using the pressure washer. She had to raise her voice a little to be heard over the compressor but was easily heard.
There are two ways to store this pressure washer. It can be stored horizontally aligning with the wheels and the feet at the bottom of the frame. My small shed holds a full-size snow blower, lawn mower, a grill, propane tanks, and is used for seasonal storage. I do not have a lot of horizontal space left for much of anything. The Greenworks Pro Jetflow’s frame allows for vertical storage. Flip the unit on its front roll bar/handle and the unit will stand stable in a vertical position.
Overall, I am happy with the GreenWorks Pro Jetflow Pressure washer. I am concerned that air may be getting into the system and robbing me of performance. Since I cannot find an absolute culprit, at this time, I cannot give this a full four stars. If it was not for this one issue I would have award the Greenworks Pro Jetflow five stars.
I would recommend this to a friend!


Share this review:
+16points
16of 16voted this as helpful.
ITJim's Review Comments
ITJim has not submitted comments on any reviews.
ITJim's Questions
ITJim has not submitted any questions.
B&W PI5 true wire-free headphones are attractive, well-built, and they deliver a refined sound quality. Featuring Bluetooth 5.0 with Qualcomm aptX technology these earphones ensure reliable connectivity whether you are streaming from your smartphone, tablet or PC. Allows connection of up to two devices at the same time, however, only one device can be used to play or make a call at a time. Download the Bowers & Wilkins free headphone app, available for Apple and Android for further control of the sound and noise cancellation, right on your phone. The PI5 headphones feature the latest innovations in adaptive noise cancellation along with 4 built-in microphones that pick up ambient noise and cancel it with an equal, but opposite, audio signal and enhance the call quality. There are three levels of Adaptive Noise Cancellation – High, Low and Auto, that can be controlled either by the multi-functional button on the left earbud or via the app. Similarly, the touch-sensitive button on the right earbud allows you to enable voice assistance. The buttons also allows you to control playback and phone call functions with single (play/pause, answer call), double (skip forward, end call), or triple presses (skip backward). Another stand-out feature of these headphones is the intuitive detection sensors that put the earphones on standby or reconnect them depending upon whether they are removed or put back on. The PI5s come with a sturdy and attractive charging case for charging the earbuds when not in use. The case is equipped with two 350mAh rechargeable batteries. Each earbud has a rechargeable battery which provides up to 4 hours of wireless playback. Including the charging case, the PI5 can provide up to 12 hours of continuous playback.
Is there an App to set the equalizer?
With the 10th Gen Intel® Core™ i7 processors enabling up to 8-cores and 16-threads of multi-threaded performance, the latest generation of Alienware m17 goes beyond its predecessor. Featuring the new NVIDIA GeForce RTX 3070 with Ultimate performance for gamers and creators. Realistic ray-traced graphics and AI-accelerated DLSS. Our latest thermal technology, Advanced Alienware Cryo-Tech, is an engineering approach where an Alienware system’s gaming performance is never compromised by means of electrical and mechanical methods while maintaining system stability during the highest performance states.
Is this a per-key RGB keyboard or a 4 zone?
With the 10th Gen Intel® Core™ i7 processors enabling up to 8-cores and 16-threads of multi-threaded performance, the latest generation of Alienware m17 goes beyond its predecessor. Featuring the new NVIDIA GeForce RTX 3070 with Ultimate performance for gamers and creators. Realistic ray-traced graphics and AI-accelerated DLSS. Our latest thermal technology, Advanced Alienware Cryo-Tech, is an engineering approach where an Alienware system’s gaming performance is never compromised by means of electrical and mechanical methods while maintaining system stability during the highest performance states.
Is the display having G-Sync?
For the 300Hz screen:
From Alienware's site:
"15.6" FHD (1920 x 1080) 300Hz 3ms 300-nits 100% sRGB color gamut"
https://www.dell.com/en-us/shop/cty/pdp/spd/alienware-m15-r4-laptop?~ck=mn
I do not see any indication of G-Sync on/off in the nVidia driver settings.
From Alienware's site:
"15.6" FHD (1920 x 1080) 300Hz 3ms 300-nits 100% sRGB color gamut"
https://www.dell.com/en-us/shop/cty/pdp/spd/alienware-m15-r4-laptop?~ck=mn
I do not see any indication of G-Sync on/off in the nVidia driver settings.
3 years ago
by
ITJim
With the 10th Gen Intel® Core™ i7 processors enabling up to 8-cores and 16-threads of multi-threaded performance, the latest generation of Alienware m17 goes beyond its predecessor. Featuring the new NVIDIA GeForce RTX 3070 with Ultimate performance for gamers and creators. Realistic ray-traced graphics and AI-accelerated DLSS. Our latest thermal technology, Advanced Alienware Cryo-Tech, is an engineering approach where an Alienware system’s gaming performance is never compromised by means of electrical and mechanical methods while maintaining system stability during the highest performance states.
Is the ram upgradable?
From Alienware's user's guide:
Onboard system memory
NOTE: The memory is integrated to the system board and
cannot be upgraded after purchase.
You can find the user's guide on Alienware's support site.
Onboard system memory
NOTE: The memory is integrated to the system board and
cannot be upgraded after purchase.
You can find the user's guide on Alienware's support site.
3 years ago
by
ITJim
HP OMEN Gaming Laptop: A thin and light premium gaming experience in an elevated design so you can play everyday. With an AMD Ryzen 7 processor, NVIDIA GeForce GTX 1660 Ti graphics and cooled by OmenTempest Cooling, it makes you think how it all fits into such a tiny little package."
Can this output 144Hz over hdmi?
Yes it can. I am using the HP Omen X 25f over HDMI as an external monitor.
Just be sure to use a HDMI 2.0 or newer cable.
Just be sure to use a HDMI 2.0 or newer cable.

3 years, 9 months ago
by
ITJim
HP OMEN Gaming Laptop: A thin and light premium gaming experience in an elevated design so you can play everyday. With an AMD Ryzen 7 processor, NVIDIA GeForce GTX 1660 Ti graphics and cooled by OmenTempest Cooling, it makes you think how it all fits into such a tiny little package."
Does it have Gsync?
This is not a Gsync monitor. At least I cannot find any information online or in the system drivers that tell me otherwise.
You can connect the laptop to a Gsync monitor and take advantage of all the features of Gsync with that monitor.
You can connect the laptop to a Gsync monitor and take advantage of all the features of Gsync with that monitor.
3 years, 9 months ago
by
ITJim
HP OMEN Obelisk by HP Desktop: Play graphically intense games with this HP OMEN Obelisk desktop computer. You can easily store large amounts of media and other data on the 1TB hard drive and install games and programs on the 256GB SSD for fast access. This HP OMEN Obelisk desktop computer has 16GB of memory for multitasking effectively, and the Intel Core i7-9700 processor handles resource-intense programs efficiently.
How many cores are there in this pc
8 physical cores. This processor does not support 16-way multitasking.
4 years, 10 months ago
by
ITJim
HP OMEN Obelisk by HP Desktop: Play graphically intense games with this HP OMEN Obelisk desktop computer. You can easily store large amounts of media and other data on the 1TB hard drive and install games and programs on the 256GB SSD for fast access. This HP OMEN Obelisk desktop computer has 16GB of memory for multitasking effectively, and the Intel Core i7-9700 processor handles resource-intense programs efficiently.
Is there a gtx 1660ti installed or not? What size pwr supply?
It says in the name that it is a GTX 1660ti. I can confirm that the video card is exactly as described. It is the 6gb version of the card. The Power Supply is 500Watts.
4 years, 10 months ago
by
ITJim
HP OMEN Obelisk by HP Desktop: Play graphically intense games with this HP OMEN Obelisk desktop computer. You can easily store large amounts of media and other data on the 1TB hard drive and install games and programs on the 256GB SSD for fast access. This HP OMEN Obelisk desktop computer has 16GB of memory for multitasking effectively, and the Intel Core i7-9700 processor handles resource-intense programs efficiently.
Does this computer have a memory card reader built in?
HP OMEN Obelisk by HP Desktop: Play graphically intense games with this HP OMEN Obelisk desktop computer. You can easily store large amounts of media and other data on the 1TB hard drive and install games and programs on the 256GB SSD for fast access. This HP OMEN Obelisk desktop computer has 16GB of memory for multitasking effectively, and the Intel Core i7-9700 processor handles resource-intense programs efficiently.
What is the operating system for the pc, and does it come with a virus protection app
Windows 10 standard. It ships with 30 days of McAfee.
4 years, 10 months ago
by
ITJim