Orion's stats
- Review count131
- Helpfulness votes425
- First reviewMarch 18, 2014
- Last reviewApril 17, 2024
- Featured reviews0
- Average rating4.7
- Review comment count1
- Helpfulness votes0
- First review commentOctober 23, 2016
- Last review commentOctober 23, 2016
- Featured review comments0
Questions
- Question count0
- Helpfulness votes0
- First questionNone
- Last questionNone
- Featured questions0
- Answer count3
- Helpfulness votes2
- First answerFebruary 27, 2016
- Last answerJuly 25, 2017
- Featured answers0
- Best answers1

Meet the MVP of TVs! The award-winning U8 Series Mini-LED smart display from Hisense just got even better. This model is packed with lots of exciting features that dramatically improve the color, contrast and detail of every picture. Think: double the local dimming zones of our previous version, Up to Peak Brightness 3000, QLED Quantum Dot color technology, Dolby Vision HDR and Anti-Glare Low Reflection technology. Bring the sounds of the cinema directly to your living room with Dolby Atmos and a 50W 2.1.2 multi-channel audio system. We even equipped the U8 with a NEXTGEN TV ATSC 3.0 tuner and Wi-Fi 6E router compatibility, making it virtually future-proof. Plus, level up your gaming with 144Hz VRR panel, Dolby Vision Gaming and FreeSync Premium Pro.
Customer Rating

5
Bright gorgeous display, intuitive OS, great sound
on April 17, 2024
Posted by: Orion
I started using a Hisense television in our living room a couple years ago, and have been impressed with the design, functionality and quality ever since. It’s a great television that has performed perfectly for the past two years without any issues. When the new 55” U8N became available I knew it would be the perfect TV to replace my fifteen year old TV that I use in the bedroom.
The new Hisense was shipped to me using a third-party delivery service who called to schedule a drop-off time that was convenient for me. They were nice, arrived on time, and helped me to carry the box into my garage. The TV comes packed in a standard heavy cardboard box with molded styrofoam inserts to keep it protected during shipping. The total package weight was only about 55lbs, so I was able to carry it into my house and up my stairs by myself.
Unboxing the TV is easy and I was able to do it alone. Since I’m using the included stand I had to place the TV face down on a clean, soft and flat surface to attach the stand. I chose to use my bed, where I placed the large, foam enforced cardboard screen cover that came in the box, on my bed, and placed the TV onto that. I let the bottom couple of inches hang over the edge of the bed so that I could use the included screws to secure each base stand tightly. Once the stand was attached I set it up onto my dresser and proceeded to remove all of the cling-wrap from the edge, front and sides of the TV, which is always a satisfying process.
Getting the TV setup is almost effortless with Google, my preferred setup method. While you can also utilize the remote for TV setup, given my existing Google account and devices like Google TV and Google Home, it was only logical for me to opt for Google for this task as well. Set up only took a few minutes, and once complete, the TV is ready to customize with your favorite apps, screensaver, different user accounts, content preferences and more!
Once the TV is fully set up it’s ready to provide endless hours of content viewing. It’s always a good idea to familiarize yourself with the settings menu and tailor some of the available options, such as the apps you utilize, channels and inputs, accounts, services, as well as picture and sound settings, among others. This TV can do a lot without being overwhelming or confusing. Its menus and navigation are designed to be user-friendly and straightforward. Hisense did a great job making this TV a delight to use for anyone.
I’m not going to go on for too long about all of the tech packed into this television, it’s all listed in the product features and it all works amazingly well to bring you a high-quality display at a great price and a well-built TV that’s sure to last for many years. From the Mini-LED display with 4k resolution and a gaming ready 144Hz refresh rate to the QLED quantum dot color, Dolby Vision Atmos and more, it’s obvious that this TV is built to compete with the top brands on the market. Watching 4k content on this display is an eye-popping and immersive experience! Just pull up some 4K HDR high frame rate videos on YouTube, lean back, and immerse yourself as if you're truly there. From the majestic landscapes of Scotland to the bustling streets of NYC, from expansive starscapes to the depths of the ocean, this TV will transport you like never before. And if you are a gamer, get ready for the 144Hz Game Mode Pro experience on a 55” screen, you’re gonna love it! Products like this television are what elevate the Hisense brand to that top tier, earning them recognition from major franchises like the NBA! Hisense's status as the official television of the NBA is an impressive testament to their excellence, clearly demonstrated by products like the U8N.
Using the TV is an enjoyable experience, enhanced by the newly designed bluetooth remote, which is a vast improvement over the previous one that came with my 75” Hisense U8H a couple years ago. The new U8N remote is stylishly designed with a silver wood grain plastic on top and silver colored plastic on the backside. As soon as you pick up the remote, the buttons illuminate, providing excellent visibility even in low-light conditions. The remote has quick access buttons to some of your most used apps like YouTube, Prive Video, Netflix and more. There is also a Google assistant button that you can use for voice control and hands free control of the television. The remote has a nice flat back that allows you press buttons without needing to pick up the remote. One of your most frequently used buttons will be the Home button, which displays the Google TV “For You” tab, otherwise known as the home page.
In my opinion, the Google TV operating system is the best television OS I’ve ever used. The more you use it, the better it gets. The home page is constantly updating with new content chosen for you by Google and based on content you’ve already started watching and/or have shown interest in watching, along with top trending content suggestions. The home page starts with a banner displaying new and trending shows and movies. Next is a list of top-picks, TV shows and movies that Google thinks you would like from your currently installed apps and/or free apps. Just below the Top-Picks is the Apps section where you can choose from apps you have downloaded or modify your list. Further down on the home page you will find a Continue Watching section, where you can pick up where you left off watching from any app you have installed. It’s a super handy feature and I use it all the time. As you navigate towards the bottom of the home page you’ll find many more viewing recommendations based on the services you use and have installed, along with other new and trending content and genre based suggestions.
The next page is the Live tab where you can choose from 125 channels via Google TV, a free live tv service, or choose from an aggregate list of hundreds of other live channels available from free apps that you can install or are already installed. I think this is a great option for anyone who enjoys flipping through the channels and is looking for a free alternative to cable.
After the Live tab, the Apps tab is where you go to customize the apps you have installed on the TV and choose from hundreds of apps to install, using the Google search or the preselected categories to help you find something. You can choose from entertainment, music, tools, news, education, health & fitness apps and more.
The final page is the Library tab where you can see a list of content that you’ve purchased from any content providers that you have installed on the television. I don’t use this section too often, but it does have a watchlist section where I can add anything that I discover from TV, mobile or web, which is pretty cool and something I’ll have to start using.
Overall, the U8N is a very well built television with all the specs I’ll ever need. It gets super bright at peak 1500 nits and the Mini-LED pro creates a brighter image with greater contrast than traditional LED screens. Gaming on this TV is a treat with the 144Hz Game Mode Pro, AMD FreeSync and the Game Bar that lets you easily customize the gaming settings for a better experience. The built in 50w max, 5-speaker, 2.1.2 multi-channel surround sound, sounds really good. It actually sounds much better than some of the smaller soundbars on the market, eliminating the need to buy one. I’m once again impressed with the Hisense brand and I’m really happy that I got this TV. I highly recommend it to anyone in the market for a new, dependable television with impressive specs and an affordable price.
I would recommend this to a friend!

Share this review:
0points
0of 0voted this as helpful.
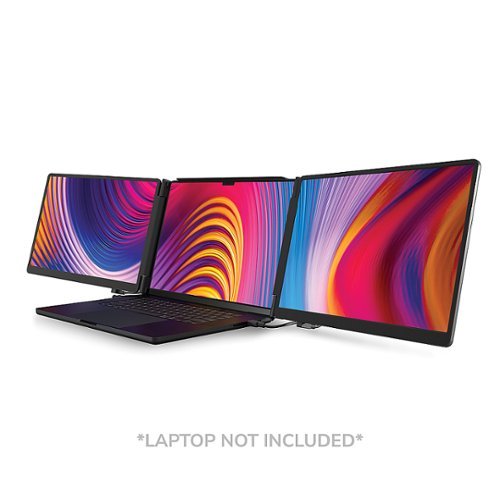
Make working on your laptop easier than ever. The Monduo 16-In. Pro Duo Display is a dynamic addition to your laptop setup, meticulously tailored to complement 16-in. laptops. Its seamless USB-C and HDMI connections instantly expand your workspace with 2 additional screens, enhancing your productivity and entertainment.
Customer Rating

3
Great for travels, saving space, working on the go
on April 4, 2024
Posted by: Orion
I’ve been using the new dual LED monitor setup from Monduo for a week now and I’m really impressed with the quality, performance and ease of use. Not only is it a really cool, eye-catching piece of technology, it’s a must have for anyone who works on the go using their laptop.
The Monduo monitor arrives very nicely packaged in a foam lined box that comes with everything you need to get started, including a quick start guide, four cables and a 90-degree charging adapter. Looking at all the cables can appear a little overwhelming at first, but you will only need to use two or three at a time, and once you realize how to set up your laptop, repeating the steps is quick and easy.
I’ve been able to successfully use this on two different laptops that I own. My Acer Swift Edge 16 and my Alienware m16 R2. The Monduo works for both laptops, however I do have to run the Monduo monitors at a lower refresh rate when using the Swift Edge. If I set them both to 120Hz, and use them both for streaming video or playing a game, my laptop's performance suffers. Running them both at 60Hz works perfectly well and is sufficient for most of my daily work. Another issue with the Swift Edge is that it uses one of the USB-C ports for power. So if I want to charge the laptop while using the Monduo, I have to connect one Monduo screen to the laptop with the included USB-C cable and the other screen using the included HDMI cable. I then have to connect the included USB-C power-only cable from the screen using the HDMI cable, to a power adapter that I already owned, since Monduo did not include a power adapter. It would be nice if power could pass through from one screen to the other so that I didn’t have to power the screen when it’s connected with an HDMI cable. Using the Mondue with my Alienware m16 is great! Both screens run at 144Hz with no noticeable performance lag. I also don’t have the issue of needing to connect one of the screens to the power cable if I need to charge the laptop, since the Alienware doesn't use USB-C to charge.
The Monduo QHD 144Hz LED display is bright with sharp images and rich colors. Although you can see the difference in color saturation, contrast and finish, it still looks really great next to the OLED display on my Acer and it pairs beautifully with the display on my Alienware. I do notice quite a bit of backlight bleed on the displays. Much more on the left screen, than the right. It’s not as noticeable when you are actively using them to work or view bright content, but it’s quite noticeable with a black screen.
The Quick Start guide instructs you to follow a QR code which takes you to the Monduo website where you can download the Monduo app and the latest drivers. Windows users do not need drivers, but the website still recommends the app for simple management of the Monduo displays. I downloaded the app and from what I could tell, it didn’t do much more than the touch controls on the front of the displays, which allow you to effectively manage each display. I also was unable to open the app the next day, so I uninstalled it and I likely won’t reinstall it again.
The design of these displays is efficient, portable and the unit seems quite durable. I wouldn’t be afraid to travel with this, as long as I put it in a laptop sleeve or something similar.. The displays are thin, the kickstand works well and I appreciate the easy-to-use touch sensitive controls on the front of each display. I would like it if Monduo innovated the hinges to include tilt and rotation, which would allow for a much more desirable viewing angle, when they are not fully extended, but for now, this will do. The further extended the displays, the better it looks, although this might not be as much of an issue if you are using a tilted laptop base.
Overall this is a really cool product for anyone who wants the ability to comfortably use three high-end displays on their lap, for a quick browsing session. Or for anyone who frequently needs to set up an impromptu workstation with three displays for some work or creativity. It’s also great for anyone who is short on space or outlets and doesn’t have the room for two full size monitors and an open laptop.
No, I would not recommend this to a friend.


Share this review:
0points
0of 0voted this as helpful.
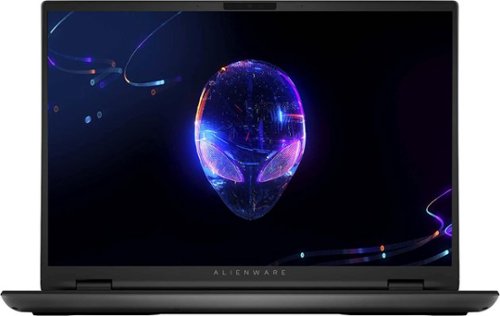
The new Alienware m16 R2 gaming laptop is designed to be 15% smaller than the previous generation, with more efficient airflow, making it ideal for gaming and more, wherever you go.
Posted by: Orion
My gaming experience just received a nice upgrade in the form of this new Alienware m16 R2 gaming laptop by Dell. This isn’t my first Alienware laptop, so based on my previous experience, I had high hopes when selecting it. After using it for about a week I can happily say that it has met and exceeded all of my expectations!
The laptop arrived in the Alienware retail box, wrapped in a heavy cardboard-paper shell for shipping. Although the box is thinner than other laptop boxes, Alienware does a great job fitting it in there just right, with the ideal padding, so that it arrives in perfect condition. The laptop comes with a charging cord and power adapter. There is also a paper with a QR code to scan which takes you to the Alienware M16 R2 product support page where you can find the owner’s manual, regulatory information, drivers and downloads, diagnostic tools and other documentation that you may want to review.
Getting the laptop set up is a breeze. I let it charge for an hour or so, and then I continued with the Microsoft setup and finally let it work on updates. After getting my Microsoft account set up I restarted the laptop and let it run it’s own firmware, BIOS and OS updates. The first time it ran, the operation failed, because I didn’t have the laptop plugged-in. I plugged it in, restarted it once again, and the update process started on its own. This took about 5-10 minutes to successfully complete. Once it was ready, I got to work installing some games and other apps, along with customizing the laptop just a bit so that it felt a little more familiar to me. I also registered the device with Alienware, for the warranty and support if needed.
As usual with Alienware, this new laptop comes preloaded with the Alienware Command Center program. With this app you can customize your performance settings, choosing between five preset modes that can maximize your battery, give you a balanced experience, overclock your laptop for maximum performance and fan speed, or other options. You can also create a custom setting to your ideal specifications, if you desire. With the Command Center you can create preset modes, for different games, that you can switch between quickly. You can customize the lighting, keybinds and other settings so that your laptop is fine-tuned to run each game specifically how you like that game to run. It's a cool feature and I recommend everyone to try it out.
I really like the design of this laptop. It has a quality feel and a good weight, while not being too heavy. The customizable RGB lighting on the keyboard, trackpad, and Alienware logos, is a fun and functional touch that takes this laptop’s wow factor to the next level. The keyboard feels nice when typing and performing various tasks.. The trackpad is smooth and solid with no rattles like some other trackpads I’ve used. Another great thing about the design is there is plenty of room on both sides of the trackpad to rest your hands while using the keyboard. I have large hands, so I’m used to working with them resting on the edge of a laptop, but that’s not the case with the M16. The 2560x1600 QHD display looks fantastic for daily usage, watching 4k movies, and of course, gaming. The gameplay at 240hz is smooth and fluid-like, unlike any other display I’ve used. I would like it if this display offered a bit more contrast, similar to an OLED with the deep dark blacks, and I wish it got brighter, but those are just a couple small complaints. To be honest, I’ll have it connected to a gaming monitor for most of its life. The speakers produce a nice rich sound quality that exceeds that of many other laptops that I’ve used. The battery life is sufficient and about normal for most laptops in this category, which is just about enough for 3-4 hours of gaming or about 5-6 hours of very light use. Speaking of the battery, the power adapter that comes with this laptop is on the smaller and more portable side of adapters, which is really nice considering these can be quite large sometimes.
Gaming on this laptop is a superior experience with the 240hz display, Intel Core 7 Ultra processor and the RTX 4070 graphics card. Even with just 16GB memory, all of my gaming demands were met at the highest levels available. I do wonder how long that will last, before I need to upgrade the memory, since I haven’t installed much of anything else on here yet, but for now, it’s getting the job done well!
I’m really happy with this laptop. It’s flashy, it’s solid and it’s checking all my boxes. If you feed it some more RAM, it will become a beast! I recommend this to anyone looking for a dependable, user friendly, quality build gaming laptop.
I would recommend this to a friend!


Share this review:
+3points
3of 3voted this as helpful.
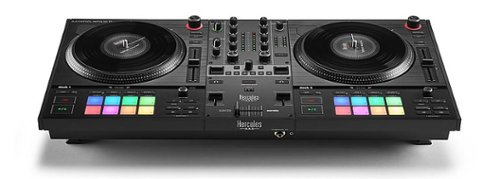
A modern take on a DJ controller that emphasizes the tactile feeling of vinyl turntables, the DJControl Inpulse T7 motorized DJ controller from Hercules is here to deliver old-school feel in the modern age! The dream of many aspiring DJs has long been rooted in the past, in the days of spinning vinyl records and creatively transitioning between tracks to add a little of the DJ’s own distinct flavor to the mix. Turntablism and vinyl are synonymous with those early days of Djing, and the innovators of the art used these tools to create a lasting image of DJs as taste-making, music-manipulating icons. Today’s modern DJs have taken to spinning on digital controllers with motorized jog wheels, vinyl discs, and slipmats that pay homage to the first DJs who paved the way for their modern success.
Customer Rating
5
A controller that can take me from Beginner to Pro
on December 24, 2023
Posted by: Orion
I’ll start my review with letting everyone know that I am completely new to mixing music and DJing. I’ve always had an ear for music and I’ve wondered if I would be any good at mixing and creating my own beats for quite a while now. I’ve always seen it as a huge investment, for something that will likely only be a hobby for me but when I saw the new T7 2-deck motorized DJ controller hit the market at such an attractive price point, I knew this was my chance to indulge my creative side and try out something new. I’m a child of the 80’s and for me mixing is and has always been about the feel and look of the vinyl and the ability to control a moving record when mixing. The Hercules DJ Control T7 gives me exactly what I want. Along with the feel of a moving record, the T7 offers beat matching aids which help beginners like me to learn the basics. You can control advanced performance features by using the performance pads along with a range of other effects.
The DJ Controller comes very well packaged in a large box with styrofoam inserts to keep it well protected during shipping. There are some included quick start setup sheets to help you get started, which doesn’t take too long once you get everything connected, downloaded, updated and running.
The platters on the T7 use a belt drive motor which, from what I’ve read, works well with a smaller platter and helps to keep the cost of the unit down. I’ve been very pleased with their performance and have no complaints. Although you do have the option to use any 7” vinyl or slipmat, Hercules does include a pair of each for you to use, and I think they work perfectly. They are super responsive to my touch and they feel really nice when using them with the included 7”slipmats. The slipmat works to give the vinyl a bit of a different feeling in relation to the platter by itself, offering a more smooth sensation when scratching.
The build design and layout of the T7 is excellent for its price point. It feels like it’s built from quality materials that will last for many years. It’s also fairly lightweight and portable. I really appreciate that they gave this thing retractable legs, which can help in a number of scenarios offering extra space below for cable management, a laptop stand placement, and varying the height of the controller a bit if needed. The feet have traction pads that grip the surface so that the table doesn’t slide around while you're using it. The T7 has a fully comprehensive custom FX section allowing you to adjust your music base, treble, pitch and so much much more. I’m still learning to use the FX section, but so far it’s working great and I couldn’t think of anything I would change. Another innovative feature is the ability to upgrade the fader section of this controller. I think this is a great option since somebody like me, a newbie, doesn’t need the most high end fader to start with, and the more affordable factory fader that comes installed is perfect for my needs. That being said, I love that I have the option to upgrade it as my talent also upgrades, with practice, I hope.
I’ve been using this with DJuced software, which is free, and although I still have a lot to learn, I think I’ve gotten a hang of the basics and I learn something new each time I use it. I love that Hercules provides the DJ Academy videos on YouTube and I highly recommend any other beginners like me to watch them all as you learn to use this new controller. There really is a lot to learn, but I’m confident that I can do it with the help of the DJ academy videos. The music that you use in the software can be played from locally stored files on your laptop or can be sourced from integrated streaming services.
I’m really pleased with the Hercules DJ Control Inpulse T7 and I’m having so much fun learning how to mix music and DJ. This is something I’ve always wanted to try and now, because of this innovative controller at an amazing price point, I’m finally able to try it out. And I love it! I highly recommend this DJ Controller to anyone who wants to try mixing music or who wants to become a DJ.
I would recommend this to a friend!
Share this review:
0points
0of 0voted this as helpful.
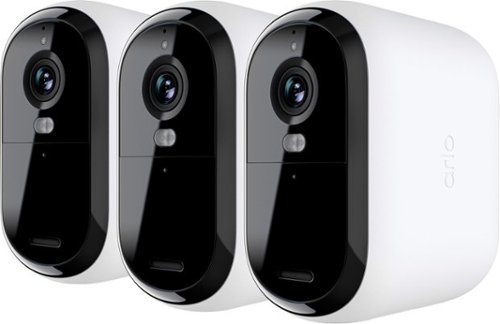
The Arlo Essential XL Outdoor Camera 2K Bundle is an $450 value if purchased separately at regular price.¹ For smart home security, the Essential Outdoor Camera provides crystal-clear 2K resolution and 4x battery life.² You can see license plates and eye color in detail with 12x zoom. You’ll get alerts and be able to watch live video right from your phone. Use the Integrated Spotlight Ward to ward off intruders or trigger the Integrated Siren automatically or manually from the Arlo Secure App. Even in low light you’ll be able to identify details with Color Night Vision. Or try the noise-canceling audio to hear and speak clearly with visitors. Setup is quick and easy and only takes minutes by connecting directly to Wi-Fi. You can install it with full confidence thanks to its rechargeable battery and weather-resistant design. An Arlo Secure plan trial is included. After trial, a paid plan is required to keep premium features like 30-day video cloud storage, People, Package, Vehicle Detection, 24/7 Emergency Response, and more.
Customer Rating
5
The Biggest Best Battery - Great Camera & Service
on November 30, 2023
Posted by: Orion
I’ve been a happy Arlo customer for over six years now, with a few Arlo cameras and lights scattered around the perimeter of my home. Over the years I’ve found Arlo to be a premium brand that provides high-end cameras, an easy to use app, and dependable home security services. It’s been about four years since I’ve added any new cameras to my setup so when I saw the new Arlo Essential XL camera, with its extra large battery life, I knew it was exactly the upgrade I’ve been needing for the high traffic areas around my house.
This set of three cameras comes securely packaged in a compact box with almost all cardboard packaging for easy recycling. Included in the box is a small 4 page set up guide to help you to get started. The first thing you’ll need to do is charge the batteries. They do come with a partial charge but due to shipping regulations they cannot be shipped while fully charged since they are so large. Arlo provides three USB-C to USB-C charging cables, but no charging cubes. For some people, this might be a let down, but I have plenty of USB-C charging cubes, power strips and wall outlets, so I’m fine without one. I’m not sure exactly how long it takes for the cameras to charge, I plugged mine in and forgot about them for more than a few hours, which brought them to a full charge with a blue light indicator.
Once the camera’s are charged the next step is to download the Arlo app if you are a new user or update the app if this is your first Gen 2 Arlo product, which was my situation. Updating the app did take a few minutes but it went smoothly without any issues. After the app is installed and/or updated you simply connect it to your Wi-Fi network and use it to add each of your new cameras, one by one. When you add the cameras the app will alert you to a firmware update which takes approximately 5 minutes to complete for each camera. After getting the camera connected, you find somewhere to mount it that has a good Wi-Fi connection, which can be tested through the app. I like the way these cameras attach to the mount, versus the magnetic mounts. These cameras screw onto the mount which can be rotated and pivoted to reach most angles. The mounts were easy to install, just a couple screws to attach the small circular mount plate to the wall and then slide the mount over the plate to attach the camera to the wall. It’s really simple and takes very little time.
I’ve been using these for well over a week now and the battery life is even better than I was expecting. I mounted two of them in high traffic areas at the front and back doors to my home, and they both have only lost about 5% of their battery life. While my old cameras would likely have already lost nearly 20% of their battery life. I do have extra batteries for my older cameras though, and an additional charger that allows me to have charged batteries ready for a quick swap out. You can’t do that with these, although you can attach a solar panel for a continuous charge. I use solar panels for my Arlo lights and they work very well. I imagine the same would be true if I buy a solar panel from the Arlo website for the Essential 2nd Gen cameras.
The live 2k video quality looks really great. It’s sharp, vibrant and the 2K resolution makes it easy to identify objects. You can zoom-in and pan the video from the app to see small objects or creatures and things or people that are further away. The spotlight is a great feature and it really makes a huge difference at night, allowing for full color night vision. It’s also great to illuminate the yard for my dogs when I let them go outside, or to illuminate the side walkway area of my home where the garbage is kept. You can customize the brightness, sensitivity, length of time it’s on, turn it off and on and more customization all through the app. Another great feature that works really well is the noise-canceling audio which allows you to use the camera as a 2-way audio device to speak to visitors and easily understand what they are saying by filtering out the extra noise and focusing on the voices. I’ve tried it with a package delivery person and found it to be quickly responsive and easy for both of us to understand each other.
As mentioned earlier, I’ve been an Arlo customer now for over six years. I’m not somebody who would continue to use a company for that long if I wasn’t happy with their products and service. I love trying new things and even though I have tested a few other wireless security camera brands, Arlo is the best in my opinion. They provide the best technology, quality equipment, an app packed with features and customizations and superior service through the Arlo Secure plan, which I highly recommend trying. Arlo camera’s work with Alexa or Google and can even work with IFTTT, if you know how to use it to maximize the potential of your Arlo security network.
I love these new cameras and I highly recommend them to anyone who wants a top of the line wireless security camera that holds a charge for a very long time. You’ll love the Arlo brand, the app and the functionality & features they provide to keep you and your family safe.
I would recommend this to a friend!

Share this review:
-2points
0of 2voted this as helpful.

Receive gorgeous close-up photos of your birds whenever they visit! Bird Buddy is an AI-powered camera feeder that attracts local birds, capturing intimate photos and videos while they feed. The user-friendly companion app notifies you of new visitors with photo postcards, identifies the species, and offers fun facts about that species to enrich your understanding of your feathered friends. Plus, the detachable solar roof harnesses the power of the sun for longer photoshoots with your wildlife.
Customer Rating

4
Feed, Identify, Learn, Collect, Share! Fun Feeder
on November 11, 2023
Posted by: Orion
I’ve enjoyed watching birds my whole life and one of the first things I did when I finally got my own home was to put a bird feeder outside of my kitchen window, so that I can watch the birds in the mornings and evenings. I’ve loved watching birds as far back as I can remember. My grandmother always had a few bird feeders and we would watch the birds together from time to time. I’m certainly no expert, and I’ve never taken the time to learn to identify anything beyond my local birds which are typically Finch’s, Bluebirds, Cardinals, Doves, and Woodpeckers. That being said, I do have a book that I occasionally use to identify anything new that visits my feeder.
I love when my hobbies are innovated with new technology, especially something as classic as bird watching, so when I saw this new Smart Bird Feeder with a Solar Roof by Bird Buddy, I knew I had to have it! At first glance this is just a bird feeder with a camera, which alone is really cool, but once you see all the neat features available in the app, you quickly realize that it's much more than that.
The Bird Buddy comes in fully recyclable packaging; arriving in a sturdy cardboard box with formed cardboard inserts to keep it stabilized and secured. Everything you need to get started is in the box, except for a pole, shepherds hook, or something else to hold Bird Buddy. This kit does include a metal hanger and a “Universal Mount”, but you’ll need a branch to hang it from, or the correct size pole for the, not-so-universal mount. I bought an adjustable bird feeder pole that screws into place, at my local department store, for a low price. I mounted this to my second story deck and the bird feeder hangs from it using the included metal hanger.
Included in the box is a three step quick start guide. The first thing it has you do is charge the camera module. The instructions say that a LED will blink red when charging, but it never did. This confused me at first, I tried multiple chargers and outlets and couldn’t get the light to appear so I thought it might be broken. I went ahead and left it plugged in for about an hour or so, hoping it was charging. The quick start guide instructs you to download the app, create an account and proceed with the app instructions, once the camera is finished charging, to complete setup. After I had the camera connected to the app, which took about three minutes, there was also a firmware update which took another five or so minutes to download and install. Once everything was connected I could see the battery level and noticed that it had only charged to about 87%, so I plugged the camera module in for a little while longer. This time the red light appeared, and blinked while charging. I think the firmware update corrected whatever issue was preventing the red light from appearing the first time I charged it.
Positioning the bird feeder is a little tricky when you live in a neighborhood setting. I don’t want to bother any neighbors by having the camera face their homes, so I’ve opted to have the camera face my home. This actually gives me a good view of the action on the bird feeder from my kitchen window, but unfortunately this puts the birds in the shadow of the feeder for a good part of the day, but I’m okay with that for now. Even in the shadows the photos and video quality come out well and are great to see when I get Postcards from the app.
Postcards are a group of photos and a video, taken by your Bird Buddy when birds visit. The app will send you a notification when a new Postcard is created and is ready to be reviewed. It’s not clear to me what exactly triggers a Postcard to be sent. I can tell you that it’s not every time a bird visits, because I’ve watched numerous birds visit my feeder that have not produced postcards. I think certain conditions have to be met for a postcard to be created, such as the length of the bird's visit, the bird's positioning relative to the camera’s view, and possibly other conditions, but I’m just guessing. There is an option to pay a monthly fee for the “Bird Buddy Pro” service, allowing you to receive more Postcards. This makes me believe Postcards are withheld and/or there is a Postcard limit for non-pro accounts. This brings other questions to mind such as; What if a rare bird visits and I’ve reached my Postcard limit with common birds, do I just miss out on that visit? If so, that’s a big disappointment. It should at least send a movement notification, without recording or taking photos. It would be nice if I was alerted to movement, every time I had a visitor, and I had the option to stream the visit live, rather than create a Postcard. And speaking of streaming live, you cannot do that if the bird feeder is actively collecting a Postcard. This is another feature that I don’t like. It won’t allow you to override Postcard collection and just go live. Also, there are many times where the app says that the Bird Buddy is collecting a Postcard, yet I look out the window and see no birds.
The overall design of the Bird Buddy bird feeder is very cute to look at but I wish they had put more thought into the perch design, to allow larger birds, and better photos, without needing to purchase an add-on perch at an additional cost. I’ve noticed that many birds like to sit on the side of the feeder, which isn’t in the view of the camera and doesn’t seem to activate the AI for Postcard collection. Honestly, I feel like the sides should be wide, like the front and the front should be narrow, like the sides. But that’s just my non bird expert, six day observation. As I mentioned earlier, there is a larger perch you can buy, but IMO that inexpensive piece of plastic should come free with all new purchases, since it improves and/or corrects a flaw to the original design. Filling the bird feeder with feed isn’t as clean of a process as filling my tube feeder. The Bird Buddy opening is small and a little awkward to pour food into. You have to tip it forward while filling it which causes some of the food to fall out of the front perch area. I store my bird food in a five gallon food safe container with a lid and I held the Bird Buddy over the bucket as I filled it to keep the spillage from going everywhere. The included seed scoop is a great help though and I’m glad they included that with the kit.
The solar panel rooftop came preinstalled to the bird feeder and connecting the wire to the camera module is very simple. Only about half of the days have been sunny, since I put up the feeder, but overall, I can tell that the solar panel roof works pretty well. My feeder is in a very active location, right next to another feeder that has been hung for over three years now, so it gets a lot of birds. The battery has lost about 20% since hanging the bird house six days ago. I could do a better job of positioning the solar panel to get more sunlight, but it seems to be working okay for now.
The Bird Buddy app really is the star of the show, driven by an A.I. capable of identifying any species of bird that will ever visit my feeder. I love the Postcards, I just wish I received more of them. I really love building my own collection of birds, that groups the photos and visitors by species so that I can quickly and easily see how many different types of birds have visited my home. The collection section of the Bird buddy app also provides more info about the species of bird in each photo. It’s quite educational and it includes a summary of traits, notes about the birds habits, favorite foods, size and weight, samples of bird songs and calls by that species, location maps to show where the species is found and more! There is even a count for each species, that tells you how many birds of that species have visited your feeder and have been collected. I also like that I can browse Bird Buddy feeders from around the world and connect to them to receive Postcards from far away! There is a really neat community of videos and photos shared by people just like me that shows the species, area it was taken and gives users the ability to react to each other's shared content.
I really like the Bird Buddy bird feeder and I’ve been enjoying receiving the Postcards with images of my favorite feathered friends when they visit. I love the educational features in the app and I enjoy being able to view feeders from all around the world. Bird Buddy gives you the opportunity to collect photos & videos while having the options to share them with the Bird Buddy community, download them or easily share them on your other social media pages via the Bird Buddy app. Being a newer product, there are areas for improvement, but I think all the benefits far outweigh my minor critiques. In my opinion this is a great gift for anyone who enjoys nature and can navigate a user-friendly app from their mobile device.
I would recommend this to a friend!


Share this review:
+2points
3of 4voted this as helpful.
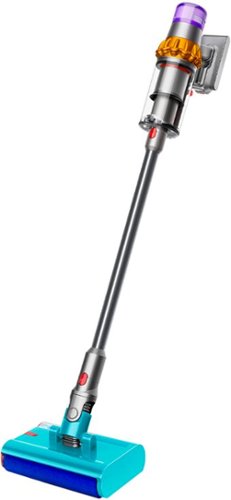
The Dyson V15s Detect Submarine is engineered with the power, intelligence, versatility, and run time to deep clean your whole home. Now with three cleaner heads for all-in-one cleaning. The Submarine cleaner head washes hard floors and removes wet and dry debris simultaneously. The Fluffy Optic cleaner head reveals invisible dust on hard floors. The de-tangling Digital Motorbar cleaner head deep cleans carpets and hard floors without tangles and adapts suction power to floor type.⁴ A piezo sensor intelligently optimizes power and run time based on the debris picked up, reporting it all on the LCD screen.⁴ The versatile cordless format transforms into a handheld vacuum with one click so you can clean up high, down low, and everywhere in between. Comes with a 2-year warranty and lifetime Dyson support.
Customer Rating
5
The most powerful vacuum I've ever used.
on October 29, 2023
Posted by: Orion
This new Dyson V15s Detect Submarine cordless vacuum is so much more than just a single purpose vacuum. With three separate powered heads, a powered “Hair Screw” tool, and additional cleaning tools, this new vacuum by Dyson is a multi-purpose four-in-one powerhouse. It can clean your house from the smudged hard floors to the cobwebs on the ceilings and everything in between, with power and efficiency.
This is the first Dyson vacuum I’ve ever used. I’ve owned many other brands and models of vacuums over the years, I just haven’t had the opportunity to experience a Dyson vacuum until now.
The vacuum arrived in the product box wrapped in a protective light cardboard outer sleeve-like box that was easily removed with a pull tab at the bottom corner. The product box is tightly packed using cardboard and paper to keep all the parts separated and held into place. I appreciate the way Dyson uses paper to protect the plastic parts from scuffing while shipping and in storage. I also like that all of the paper and cardboard packaging is easily recycled.
Along with the vacuum and all the accessories, included in the box is a Quick Start guide, a guide to mount the Wall Dok and some regulatory & safety information. There is also a sheet with a QR code and another QR code on the inner box lid with instructions to download the Dyson app for access to user manuals and warranty information. Both guides are pretty basic with pictures only. The Wall Dok mounting guide is sufficient but I feel like the Dyson Submarine quick start guide could use a little more information. The pictures are pretty easy to follow, but some included text would be appreciated. Also, the instructions are only for the Submarine wet roller head and nothing else. For any additional information on how to get this set up, along with daily usage tips, you need to visit the app or website, register the device and view the User Manual and/or watch the helpful videos. The instructional videos are great by the way.
The MyDyson app is basically a resource for learning about your new vacuum; getting set up, daily maintenance, instructional videos, links to shop for accessories and get help if needed. I have noticed some minor inconsistencies between the videos and the user guide for this unit. In one example, when learning how to clean the filter, the video on the website and app says to use cold tap water to wash the filter, however the user guide available on the MyDyson app says to wash the filter using warm tap water. In another example, the app shows a video on how to assemble a Grab and Go Dok, which was not included with this unit. What makes it more confusing is that the video starts and ends with a photo of the Wall Dok, while the video itself shows assembly of the Grab and Go Dok. Speaking of the Grab and Go Dok, it looks great, and I wish it was included with this vacuum. The Wall Dok works, okay, but I worry about it tearing away from my wall over time, with every grab and dock of the vacuum, since it’s mounted to the wall with two screws into drywall anchors. The Wall Dok does have two ports for cleaning tool storage, however you can only fit the smaller tools into these spots since the other heads and hair screw tool are all too large to fit against the wall. The Fluffy Optic head fits, but it looks a little odd hanging there, and I worry about more weight on the drywall anchors. I really wish this came with the Grab and Go Dok instead.
Charging the vacuum is really simple with a few options available. You can dock the vacuum onto the Wall Dok which is connected to the charging cable. Or you can dock the battery by itself to be charged. You can also plug the battery directly into the charging cable while it’s in the vacuum. The battery life can vary depending on the power mode you use and/or what heads you use to clean. It looks like I can get about an hour of battery life on Eco Mode and up to fifteen minutes when I choose Boost mode for maximum power. There is also an Auto/Med mode available that balances the suction power based on the particles and debris measured to maximize battery life and cleaning efficiency. While using Auto Mode I was able to vacuum my carpets and rugs, dust the floors and give them a quick wash, all with one charge, in my twenty one hundred square foot home.
Using this vacuum has instantly spoiled me with how powerful it is, the versatility of use, its innovative features, quality build, intelligent design and light weight. This is absolutely the most powerful vacuum I’ve ever used, even compared to corded vacuums. When using the Boost Mode the Digital Motorbar cleaner head grabs onto the carpet tight, almost too tight for some surfaces such as my dense wool blend rug in the dining room. When using Boost on that rug, the head becomes nearly unrollable because of how strong the suction becomes in that optional mode. That’s the best “problem” I’ve ever had with a vacuum! LOL Speaking of the Digital Motorbar detangling head, it really does de-tangle hair from the brush bar as you clean, so that you’re not left pulling hair and long fibers from the roller, as with other brands. I have two dogs, who shed a lot. One short hair and one long hair and this head has not gotten tangled or clumped with dog hair at all. That’s a HUGE win in my book, after having spent a lot of time pulling dog hair from other brand rollers in the past.
While the Digital Motorbar head works wonders with carpeting and rugs, the real magic begins when you trade it out for the Fluffy Optic cleaner head to work on your hard floors. The Fluffy Optic cleaner head is equipped with a very bright LED that illuminates the surface in front of the roller as you vacuum. When I first read about this feature, I thought it was a bit gimmicky, however, after experiencing it first hand, I love it, because it works amazingly well. I didn’t realize how much hair and dust I was missing with my other vacuum. With the bright green light I’m now able to easily see my path as I vacuum through the illuminated dust and hair, sucking up every last bit. I also now wait until the evening and/or I turn down my lights to vacuum, since the green light isn’t as useful in a bright light environment. But, even in this type of setting, it’s still great for seeing the dust under and behind furniture as you vacuum those areas. One concern I have about the bright green light is using it near pets who may be tempted to look directly into the light. I wonder if Dyson should include a warning about that and I personally would advise putting pets into another room if you have issues keeping them away from the roller head, as I do with my dog occasionally. She’s not afraid of vacuums, she just tries to play with them. The Fluffy Optic roller itself does a great job picking up everything it touches and leaving my floors nice and clean.
While the magic gets started with the Fluffy Optic roller, it really gets to work with the new Submarine wet roller head. This head is a super easy way to clean the daily muck from your hard floors, removing the smudges left behind from dirty feet and the drops of whatever somebody spilled on the floor as they were cooking dinner last night. It’s a good way to keep your floor clean without having to use harsh cleaners or chemicals, which is important to me. Best of all, it’s simple and easy to use. You just fill up the reservoir, attach the roller head and start cleaning. It does a great job of evenly coating the surface in water and scrubbing the dirt and stains away from the floor. Once finished, you disassemble the head, emptying the dirty water and remaining clean water, washing the head, parts and roller using your hands and soapy water. After everything is clean you need to set it all somewhere to dry for at least twenty four hours. I usually set my roller and or any filters I clean near a sunny window to have the added benefit of UV ray sanitization. The Dyson site recommends replacing your roller every six months. Currently, rollers are not sold on the Dyson site but hopefully they will be added in the next six months. I think this new Submarine wet roller head is a great added feature to the Dyson vacuum cleaner. It really takes the V15s to the next level, saving consumers the added cost of having to purchase a separate floor washing machine.
The included cleaning tools are pretty standard but do the job well. They can attach to the Wand Clip, where they will hang from the vacuum as you clean, or you can attach them to the Wall Dok for storage. The cleaning tools and heads are all easy to connect to the vacuum cleaner, wand, wand clip and Wall Dok with a simple click. And they hold into place firmly until released with the press of a button.
I love this new vacuum and I can’t believe I’ve waited so long to try a Dyson. If you are looking for a new dependable vacuum, that does more than just clean your carpets, and offers the best suction that money can buy, look no further than this Dyson V15s. You will be amazed by the powerful suction, entranced by the new green detection light and you’ll wonder how you ever lived without the new Submarine wet roller head.
I would recommend this to a friend!

Share this review:
+3points
3of 3voted this as helpful.
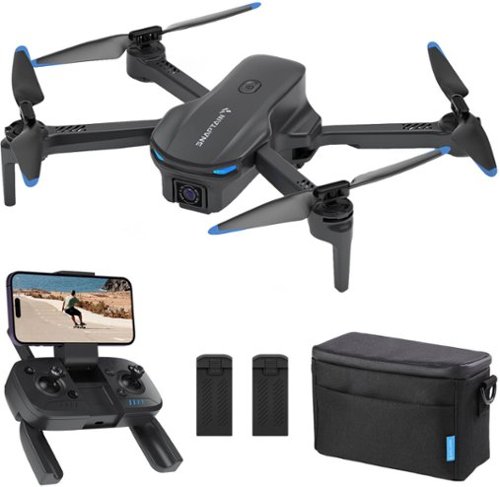
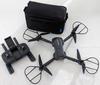
Introducing the Snaptain E20 2.7K QHD Camera Drone, a groundbreaking addition to the world of drones. Experience the future of aerial photography with its effortless and intelligent operation, featuring one-click take-off and one-click landing capabilities. With the E20, you'll unlock new horizons and capture stunning moments with its smooth FPV images. Elevate your drone flying experience with Snaptain's E20 – where simplicity meets innovation.
Customer Rating
4
Tough little drone, great for learning.
on October 28, 2023
Posted by: Orion
This is the first drone I’ve ever owned or have ever flown. I’ve been a gamer my whole life, and I’ve been curious to know how my hand-eye gaming coordination translates into the world of real life drone operation. I’ve been wanting to try flying them for quite a while now, and when I saw the new E20, a foldable entry level drone by Snaptrain, I figured this was a good place for me to start.
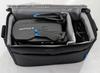
The drone arrives in a small box, just large enough to fit the padded carrying bag which has everything you need to get started inside. Snaptain included a little nine page fold out quick start guide along with a small thirty page user manual. The first steps in the quick start guide are to unpack the drone, unfold the arms and attach the propeller guards. Then you are instructed to remove the battery from the drone and get it charged with the included USB charging cable. I would suggest charging both batteries and the drone remote at this time, with any other USB cables you have available. After the batteries are charged you insert one into the drone and pop in a memory card to record HD videos and photos. Unfold the drone remote, mount your phone to the remote, and peel the protective film away from the drone's camera. To pair the remote to the drone you just press the power button on the drone for three seconds to turn it on, then you do the same for the drone remote. The remote will automatically pair with the drone. Once paired the quick start guide provides a QR code that can be scanned for a link to download the Snaptain FPV app. I did this while the battery was charging, so all I needed to do at this point was open the WiFi on my phone and connect to the Snaptain WiFi signal.
After completing the steps in the quick start guide, reading the user manual, and familiarizing myself with the remote control buttons I was ready for flight. The first couple days I had this, the weather wasn’t so great so I got to know it a bit while navigating at a low altitude around my backyard, over and around my house. I was worried about higher winds at higher altitudes and I didn’t want to risk losing my new drone to a strong wind, which can happen. Especially in a neighborhood setting, where I don’t know all of my neighbors and I wouldn’t want them to get upset if my drone landed in their yard. I was able to finally take it up much higher at a nearby park the other day, and I’m happy to report that I successfully returned my drone to myself without any issues.
Getting to know the controls is fairly intuitive, for somebody with a gaming background, in my opinion. The hard part for me is learning to watch the live video feed while navigating, versus wanting to watch the physical drone in the sky. I still haven’t found the right balance, but I’ll get there. I have crashed this quite a bit, without causing any serious damage to the drone, which is great! The bad part is that you have to reset the drone after every crash, which is annoying. But after doing that and reconnecting the WiFi, it takes right back off at the press of a button, without any issues. I noticed that the arms tend to get knocked back during a crash, which makes me think they should lock into place better, however, maybe that would cause more structural damage to the drone during a crash and they are meant to release on impact for a reason. I’ve tried flying this around my house, on windy days, to see how well it can handle “obstacle course” type settings. I do have high ceilings and some large rooms, but my navigation skills need some work because I keep hitting stuff! LOL Part of the issue is that the drone doesn’t really stay in one spot too well, it tends to drift just a bit, and a gentle nudge on the remote doesn’t always create the same velocity of movement on the drone. Also, when you rotate clockwise or counterclockwise the drone will drift out of place a bit. Same thing with raising or lowering the drone. These could be little flight nuances that I’ll eventually learn to counter with my flight controls, but I haven’t gotten there yet. Another issue I’ve noticed is that when the battery starts to get to the lower 30%, you begin to have flight issues. The drone will begin to drop in the sky periodically, losing altitude but regaining it soon afterward, sometimes getting to the point where it’s unflyable, even with 15% or so battery remaining. Which means that those last few minutes, of the stated max 18 minute flight time, are not reliable flight, in my opinion.
The video feed, along with the video and photo capture abilities on this drone are perfect for this level of drone and work really well. The camera is easy to control using the buttons on the remote and taking photos and video is really easy while flying. The video comes out looking great, giving you a first person view of your recorded journey.
I love that this drone came with the padded carry case, which fits the drone, remote and accessories, all so well. And I really like how easy it is to fold and unfold the drone when getting it set up or putting it away.
Even with my gaming experience, I’m no pro at this and it’s going to take quite a few flight hours for me to really get the hang of it, but practice makes perfect! Once I’ve successfully mastered this drone I’ll happily upgrade to a more advanced model from Snaptain.
I highly recommend this to anyone just starting out in the world of drone flight. I’ve had a lot of fun with it so far and not only am I having fun, I’m picking up a new skill that I’ll continue to master, in a world where drones become more popular every day.
I would recommend this to a friend!

Share this review:
+3points
3of 3voted this as helpful.
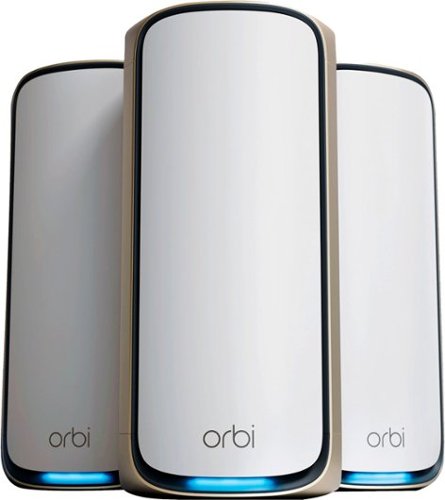
Orbi Wi-Fi 7 is in a class of its own, designed for a new era of entertainment, hybrid work, and smart home convenience. The Orbi 970 Series unlocks the power of Wi-Fi 7 with speeds up to 27Gbps, 2.4X faster than Wi-Fi 6. Exclusive, patented Quad-Band technology with Enhanced Dedicated Backhaul ensures Wi-Fi stays fast across all devices simultaneously. In addition, the Orbi 970 brings exceptional 360° Wi-Fi coverage across every corner of your home, regardless of the layout, from the front door to the back yard and the basement to the rooftop. It includes a 1-year subscription of NETGEAR Armor, all-in-one internet security protection.
Customer Rating
5
Fast, reliable and ahead of the curve.
on October 18, 2023
Posted by: Orion
The new Netgear Orbi Wifi 7 home mesh system has really taken my home internet to the next level with lightning fast WiFi that reaches every corner of my house, is protected by the Netgear Armor security shield and is controlled by a fully loaded user friendly app.
The system comes nicely packed in a heavy cardboard box with well designed cardboard inserts to ensure that everything is protected during shipping and easy to unpack upon arrival. Everything you need to get started is in the box, the main Orbi Router, two Orbi Satellite units, three total power adapters and one CAT6 ethernet cable. With all of that included, and with a heavy outer cardboard box, the box that this system arrives in is much heavier than I expected it to be. The Orbi router and satellites are an impressive size and look very well constructed with heavy and durable materials, adding to the overall weight of the system.
Setting the system up is really easy. Just scan the QR code on the included insert to get the Orbi app downloaded and installed. Connect the Orbi router to your modem and then use the Orbi app to install the firmware update which takes about 8 minutes or so. Once the router is set up the app walks you through setting up the satellites one-by-one. Once all units are plugged in and set up through the app it takes about 30 minutes for the system to optimize. One small downside to this system is the size of the power adapter box that plugs into the wall for each of the satellites and router. They are quite large, measuring approximately 2 ½ in x 2 ¾ in x 1 ¼ in, and they extend out from the wall quite a bit.
I live in a 2,100 sq ft split level home with about 20 - 30 connected devices to our network at any given time. Our connections include gaming systems, tv’s and other 4k and 8k streaming devices, laptops, mobile devices, home security cameras, smart home devices and more. Once I had the new network up and running, with all of my devices connected, I noticed an immediate improvement in overall performance. Websites load in a flash and there are no longer any buffering issues when I watch 4k movies or videos, while doing other things like surfing my phone or laptop. My home security camera alerts come in more quickly now too, with almost instant notifications when something triggers them. The new Orbi quad-band mesh system has given me the fastest, most reliable home wifi that I’ve ever experienced. And I can take it a step further by connecting some devices to the 2.5Gbps ethernet ports for an even more stellar internet speed and performance.
Even though there may not be any currently available wifi 7 devices, the next generation tech does still provide improved wireless dedicated backhaul throughput and I love knowing that I’m ready to go for when I do get a wifi 7 ready device.
The Orbi app used to control this system is fantastic. It gives you a ton of great options and features while being easy to navigate with intuitive menu options, easy to recognize icons and a user friendly layout. With the app you can manage connected devices, including the ability to block a device if it’s unfamiliar or is a threat. You can check the signal strength of your network, run tests, display the network status, check a traffic meter and log of your usage, set up a guest wi-fi network, parental controls and so much more.
The Orbi nodes, router and satellites are elegantly designed with rounded corners, smooth edges, and a nice modern look that blends into most home decor, even though they are a little on the large size.
I love that I’ve upgraded to the new Orbi WiFi 7 Quad-Band mesh system and I’ll never go back to a stand alone router again. I imagine I won’t be needing a new wifi system for many years, since I’m already ahead of the curb with this one. My home wifi has never been this fast and I’ve never seen so many options from a home wifi network app. If you have the money to buy a top of the line wifi system that will impress you with every feature, this is the system for you.
I would recommend this to a friend!
Share this review:
0points
0of 0voted this as helpful.
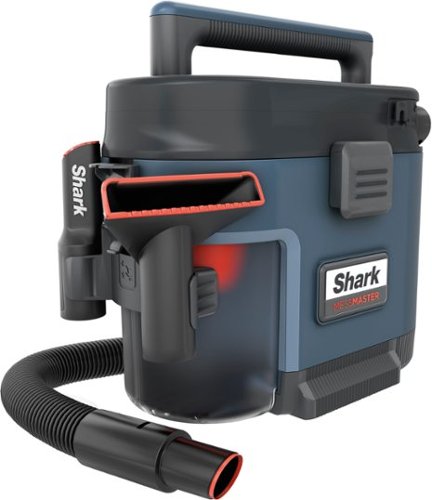
Meet the ultra-powerful, wet & dry MessMaster vacuum and mini Shop Vac. Powered by No Loss of Suction Technology, it handles life’s un-vacuumable messes, from DIY disasters to kid chaos. When you’re done, MessMaster can rinse itself, cleaning the dust bin with just a cup of water. You even have the option to line the dust bin with a plastic bag to keep the mess contained for easy disposal.
Customer Rating
5
Intelligently designed, powerful little Do-it-All.
on October 12, 2023
Posted by: Orion
Shark really keeps innovating every space they enter with every new product they release. This new MessMaster, a small, portable wet/dry vac that’s capable of cleaning itself, is the latest example of that innovation. You can add this to the quickly growing list of amazing Shark products to own around your home, office or business.
The MessMaster came very well packaged in easy to recycle cardboard and a few large plastic bags to keep dust off of the unit and parts. Unpacking everything was a breeze. To help you, Shark added an easy to follow, 6-step, Quick Start guide, printed onto the inner lid flap of the box. Getting started is just a matter of clicking some parts together. Attach the hose to the main unit, connect the accessory holder, decide if you want to use a bag or not, depending on the mess, and plug it in.
I’ve only had it a few weeks now, but I’ve been able to use it quite a bit and am really impressed with the job it performs. The suction is super strong and there is a range of tools included, each one designed for a different task, and they all work great. All of the included tools are dishwasher safe. The Squeegee tool really does a great job of gripping the surface while vacuuming up the fluid without pushing it around. The Crevice tool is the perfect size to reach tight nooks and crannies around the house that tend to gather dust and hairballs. The Carpet tool does a good job of grabbing the carpet, while allowing air to flow in and around the tool which makes it easier to push and pull over the carpet while you’re using it. As a tall person, I’m glad they included three extension wand sections so that I don’t have to bend over when cleaning up a mess on the floor. The instruction manual mentions two other tools that are not included, the Bare Floor tool and the Pet Multi-Tool. Both of those tools are for dry debris only and neither of them are dishwasher safe like the others. The vacuum is very lightweight and easily held while cleaning. The cord is more than long enough to reach from one outlet to the next and is the perfect length for moving around the garage and car while cleaning.
I love all of the innovative features Shark included with this new wet/dry vac. I really like being able to choose if I want to use a bag or not, depending on the mess. I also love that if I do want to use a bag, it can be any bag that fits, including the standard grocery sack, as long as it doesn’t have holes. Actually, I’d probably only use the grocery sack for dry debris, since they usually have small holes and aren't made for transporting liquid. However there are many other low cost options that can be used for wet vac messes. Another cool feature is being able to vacuum up water to flush the system and rinse the vacuum out, even after a dry mess. All you have to do is empty the dry debris from the Dust Cup, return the Dust Cup and vacuum up approximately 10 oz. of water to flush the system. From there you dump the water and repeat if needed. The innovation doesn’t stop there. Shark was sure to include a Hose Storage Hook, that allows you to wrap the hose around the lid and hook it into place for easy storage. Same thing with the power cord, just wrap it around the handle and clip into place using the head of the cord. The Accessory Holder gives you room to attach two of the cleaning tools and one tool can fit inside the dustbin. That leaves you with the three piece Extension Wand that can be stored near the main unit.
If you haven’t tried a Shark product yet, this is a great place to start. And if you have, you’re already familiar with the quality of this brand. I love everything about this new wet/dry vac from Shark and I highly recommend it to anyone needing a vacuum that can clean both wet and dry messes, is easily cleaned itself, is extremely versatile and portable.
I would recommend this to a friend!


Share this review:
+1point
1of 1voted this as helpful.
Orion's Review Comments
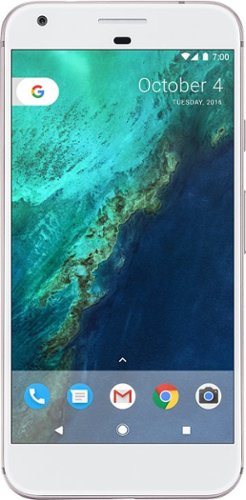
Add high-end performance to your everyday life with the Google Pixel XL. A quad-core processor, a 5.5-inch LED screen and 32GB of memory ensure this phone is able to handle daily life, and Corning Gorilla Glass 4 protects the screen. Easy cloud storage ensures you never run out of space on the Google Pixel XL.
Overall4 out of 5
4 out of 5Amazing Phone
By bzm3j81
from Detroit, MI
First and foremost, this phone is amazing. Performance and quality exceed my expectations from Google.
Pro’s:
- Build Quality
- Phone Performance
- Google Assist
- Unlimited photo storage
- Battery life
- Camera!
- Build Quality
- Phone Performance
- Google Assist
- Unlimited photo storage
- Battery life
- Camera!
Con’s:
- Cost
- Lack of some “flagship” features (i.e. IP67 rating, wireless charging, removable storage)
- Cost
- Lack of some “flagship” features (i.e. IP67 rating, wireless charging, removable storage)
Build quality: This phone is solid in your hand from the moment you pick it up. The aluminum body feels solid and the phone has enough weight behind it to sit comfortably in your hand. I was concerned about the glass portion of the back panel, as I cringed every time I put the phone down on a solid surface, but it has endured very well so far and beyond adding a little flair it helps to quickly identify the top from bottom of the phone as I bring it out of my pocket. The front screen is probably the best screen I have ever used on a smart phone, colors are vibrant, the blacks are deep, and I would put it up against any screen that Apple or Samsung produce. It would really be nice if this was IP 67 rated for water resistance and dust resistance.
Performance: The new Qualcomm 821 processor doesn’t seem leaps and bounds above the older 820 model, but there are times where it is noticeable. Transitions are smooth, scrolling is faster and more responsive, and the phone overall just seems more fluid. The finger print reader is very quick. The camera does load faster than my old phone, but isn’t instant.
Software: The new launcher is very smooth. Took a little bit of time to get used to the “pull up” for the app drawer, but it seems much more natural than the old app drawer button. The Google assistant is nice, but seems to be a slightly more powerful Google now… I expect this will get better over time, but right now seems to be a little basic. Verizon did a great job with the phone’s “bloatware”. I haven’t “noticed” the applications and it seems that they can be uninstalled if I want to. (good job guys). Everything seems to work really well, and the 3D touch is really nice for the applications it works with right now (mostly google apps) but as with most of the software, it will just get better with time.
Camera: This is hands down the best camera I have ever used on a phone. I was worried about the lack of OIS (optical image stabilization) but after seeing how well the EIS performs, it really isn’t a concern anymore. Photos look amazing, the stabilization is awesome, and the HDR+ mode is so fast, I do not even know it’s on. Combined with the unlimited Google photos storage, I really don’t mind the 32GB storage size. Low light photos are amazing and the autofocus is fast. Colors look amazing. I really can’t say enough about this thing. I do wish it had OIS to cover those situations where EIS struggles (lose some details in low light with HDR+ and shaky hands) but I do not think it’s needed overall.
Battery: bottom line, rock solid. I run my phones hard, and normally have to charge them in the car to and from work. (sometimes even at work). But no issues with this Pixel XL. The Qualcomm 821 processor combined with the OLED screen seem to have really helped battery life out. I am looking at 18 hours of life today alone and that’s with about 7 hours of screen time on.)
If you are in the market for a phone, and you have the money, this phone will not disappoint.
Orion
Columbia, MO
3D Touch?
October 23, 2016
I've read that it does not have a pressure sensitive screen, so no 3D touch. Not sure what your referring to, haptic touch?
0points
0of 0voted this comment as helpful.
Orion's Questions
Orion has not submitted any questions.
Orion's Answers
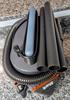
Grill and brown food to tasty perfection all-year-round with virtually no smoke thanks to the Philips Smoke-less Indoor BBQ Grill. Advanced infrared technology and special reflectors guide heat to the grid for delicious, evenly grilled food. The drip tray underneath remains cool so there is up to 80% less smoke and minimal splattering when cooking.
did it char like an outdoor grill? Thinking about getting this since we can no longer have outdoor grills in our complex.
No, it does not. The chicken I cooked took about 22 minutes and had no burned/chared areas at all. It's still a great grill, you just have to get used to the non open flame taste for some things.
6 years, 8 months ago
by
Orion

Showcase video adventures in Full HD with this 24.5-inch HP Omen gaming display. Its 144Hz refresh rate and 1 ms response time let you play fast-action games seamlessly, and it has HDMI, DisplayPort and USB 3.0 ports for versatile connectivity. This HP Omen gaming display has a built-in headphone hook for easy organization.
Is this a Freesync monitor? I keep getting conflicting information.
Yes, I have this monitor and can confirm it does have "Gaming - FreeSync" Viewing Mode.
6 years, 9 months ago
by
Orion

Samsung UBD-K8500 4K Ultra HD Smart Blu-ray Player: This HDR-compatible, 4K Ultra HD Blu-ray player offers 4x the resolution of a standard Blu-ray player. The built-in UHD upscaling technology enhances the picture quality from standard Blu-ray discs and DVDs, and built-in Wi-Fi allows you to stream 4K movies and shows from your favorite services.Learn more about 4K Ultra HD Blu-ray ›
When is this going to be available to order? Keeps on saying sold out online
I was able to snag one Open-Box online, and it was delivered the next day. I tried like 20 times and finally was able to get one. I just kept checking the site like every hour and adding it to my cart and trying to check out, lol. Persistence pays. :) The unit I received still had all the plastic wrap and my guess is that whoever owned it before me only had it to review it. Keep tyring!!
8 years, 1 month ago
by
Orion