Share Fredou's profile
Fredou
Fredou's stats
- Review count2
- Helpfulness votes77
- First reviewOctober 27, 2016
- Last reviewNovember 7, 2016
- Featured reviews0
- Average rating5
- Review comment count1
- Helpfulness votes0
- First review commentOctober 27, 2016
- Last review commentOctober 27, 2016
- Featured review comments0
Questions
- Question count0
- Helpfulness votes0
- First questionNone
- Last questionNone
- Featured questions0
- Answer count1
- Helpfulness votes4
- First answerOctober 27, 2016
- Last answerOctober 27, 2016
- Featured answers0
- Best answers0
Fredou's Reviews
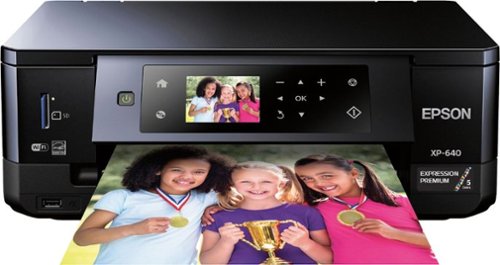
Make the most of your space with this Epson Expression inkjet printer. It lets you print, scan and copy, yet it takes up very little room thanks to its compact design, and it also includes a full-color screen. Enjoy printing speeds of up to 13 ppm in black or 10 ppm in color from this Epson Expression inkjet printer.
Customer Rating

5
Affordable all-in-one with stunning photo quality
on November 7, 2016
Posted by: Fredou
It has been more than 10 years since I left the inkjet printing world. There was many disadvantage in comparison with the laser printing. A decade later, I decided to give one more try with the new Epson all-in-one XP-640 printer. I must say that I’m very pleased with that printer as it’s the perfect home printing device. It can do high-quality photos, scan, copy and print in colour, even on printable CDs with the included tray.
First, let’s talk about the installation. I would say it’s not the most friendly setup process I had with a printer, but if you follow the “Start here” guide carefully, it will be pretty easy. I normally don’t read the quick starter guide when I’m buying products, but I’m glad I did with this printer and I can’t highly enough suggest you follow all the steps in the proper order. Setup process will take quite some time (at least 10 minutes) as it must do some alignments and other first-time stuff. However, you do it only once and then you will have a properly set printer that will give you excellent print quality every time. Please note that there is no USB cable included with this printer. This is not much of a problem as you can always configure the printer as a Wi-Fi printer, which is what I did. So no USB cable was needed for me. Not only I will be able to print with all my devices on the network, but also I don’t need to have the printer next to the computer. Great! I like that this printer has two trays. In the first cassette I have all my 4x6 glossy photo paper, and in the second one I have normal paper for printing. I wish it could have a bigger tray, but still, I do prefer two small trays, than a bigger one. It’s important that you specify on the printer which paper you are using after inserting the paper. Else, it might not print the best quality. This is what happened to me when I first tried to print a photo. It came out so dark, and I was wondering why. After I had set the proper paper setting that matched the glossy photo paper I was using, the photo printed out perfectly with the glossy look as it would be in a photo lab. Super! I never expected such stunning high-quality photo printing on an affordable inkjet printer. This printer does use some special ink that protect the photo against smudges, scratches and water. I gave a small test by dropping few water droplets on a photo, I carefully wiped it and the photo still looked good after it dried. Fantastic! However, this is only when using photo paper as water is still not the best friend of the basic plain inkjet paper. Talking about ink, this printer uses five individual cartridges, which is great as you can replace them separately.
What I like about this printer is that it can be used as both, a standalone unit and with a computer. While it can work on a computer without installing any drivers, you must install them if you want to fully enjoy the device. Not only it will install useful Epson applications for scanning, printing on CD and more, it will also install the printer presets for printing. These are perfect and very useful for printing quickly documents and photos. As a standalone device, it can do a lot of things. You can copy documents, photos, CDs covers, printing photos from USB/SD cards, as well as scanning and more. It can even scan directly to cloud services, such as Google Drive, One Drive, Dropbox and few others. However, you need to register an account on Epson Connect Service prior activating this feature. Epson Connect Service can also open your printer to the whole Internet world if you want it. It really worth creating an account and have a look at the new possibilities of the printer. After selecting this option from the printer menu, it will print instruction on how to proceed. It’s really not that hard. While you can do a lot without even using a computer with this all-in-one unit, I would still recommend using the Epson computer applications as they are giving more flexibility and options. One cool extra feature of this device is when you connect a SD card or USB flash drive in the printer, you can set it to be fully accessible from any computer in your network. Pretty cool! Regarding the printing side of this all-in-one device, I find the speed is alright for an inkjet printer with some cool features like borderless and full duplex (can print on both sides of the page) printing.
Definitely, I recommend this all-in-one colour printer. It’s affordable, does work with every device and does print stunning photo-lab quality pictures. The only thing I don’t know yet is how fast the ink will run out. This is a review for the Epson Expression XP-640 that I received free of charge to do a beta test and review.
I would recommend this to a friend!


Share this review:
+2points
2of 2voted this as helpful.

Make digital copies of treasured photographs or important documents with this Epson FastFoto photo scanner. Red-eye removal and color enhancement tools let you quickly touch up scanned images for optimal results. This Epson FastFoto photo scanner has a maximum optical resolution of 600 dpi to ensure accurate electronic reproduction.
Customer Rating
5
Not only a photo scanner
on October 27, 2016
Posted by: Fredou
Few years ago I told my mom that I should scan one day her box of family pictures for preserving them in the event of fire or other natural disaster. We have backup now everywhere for everything, but these old precious photos are the only copy that exists. If something happens, then they are gone forever. For this reason, I always wanted to have a digital backup of them, but I never found the energy and the time to scan them all with a flatbed scanner. Here comes Epson to the rescue with a new super fast and small scanner - the FastFoto FF-640. Not only is it very fast, but also very simple to use.
First let me tell you about the setup process. Getting your scanner ready takes only few minutes. You take out of the box, remove all the protective packaging and go to the website written on the quick guide for downloading the scanner software. Since I’m using a Mac computer with this scanner, I downloaded the Mac version. On that page, there are few short videos that I highly suggest you watch. They only take few minutes and you will not only know quickly how to use your new scanner, but also what to do with special photos and documents. During the setup of the software you will be prompted to plug the USB cable and the power cable. Fortunately, the power cable is not a wall wart plug, so you won’t have any difficulties to find a free socket for it. Thanks Epson for that! :) Setup up process is already finished. The software I downloaded installed few applications that I had to update. For scanning photos, the main application is FastFoto. From that application you will be able to personalize few settings, which include uploading all your photos to cloud storage. I did not have great success with Google Drive, but with Dropbox it worked perfectly. I will need to check more deeply why I could not get it working with my Google Drive. That’s the only two cloud storage that it does support for now. By default, the scanner will scan your picture at 300dpi. That’s the dpi they use when mentioning 30 pictures in 30 seconds. I was wishing I could scan at a higher dpi without losing too much speed. Fortunately, you can change that setting for higher 600 dpi and it will still be very fast. At that higher dpi, it will take about 90 seconds for 30 pictures. I’m very impressed! Finally, I took my first pile of pictures, sorted them and gave a quick dust off with one of the two included microfiber cloths. Later, I will be using the second one for cleaning the inside of the scanner. You will notice after many scanned pictures a notification from FastFoto app that it’s time to clean the inside of the scanner. It scanned my first pile of picture as fast as mentioned. Then, I continued with another pile and so on. Out of 1500 scanned pictures, I only had 1 paper jam and it was in fact my fault. Some pictures I had were very thick. For this kind of picture, you have to use the switch on the left of the scanner. When the switch is at the up position, it can scan thicker pictures and the carrier sheet. The provided carrier sheet is useful for those very small pictures, like the passport ones. Epson said to use the carrier sheet for pictures smaller than 3x5, but I scanned many smaller ones perfectly without using it. Only for the very small ones (1 inch x 1 inch) I needed the carrier sheet. Finally, don’t forget to switch back the switch to the down position when you continue to scan a pile of normal pictures. Otherwise, it might grab two pictures at the same time.
After you are done with that photo scanning task, you might think you will not be using that scanner so often as we don’t have much new paper pictures these days. Well, let me tell you that this scanner is also an excellent document scanner for everyday use. I personally use it for scanning my documents and my invoices. You know, you always keep them for warranty purpose but when comes the time you need it, it got erased. The ink they use on those invoices doesn’t last long. Well, now as soon as I have a new invoice, I scan it in PDF format with my Epson FastFoto scanner. Also, it is easier for me to find it back when needed. For that purpose, as well as for scanning any document, Epson installed two software – Epson scan and Document capture. Personally, I prefer Epson scan app because I can scan without being in front of the computer using only the scanner physical button. I could not get that with the Document capture app as I had to press the scan button inside the application. Also, it can scan both sides of the sheet in one shot. And if it’s blank, it can ignore it. Definitely, Epson thought about everything here. Super!
I have one quick useful tip for you. By default, the scanner is always set to stay on until you manually turn it off. But inside the Configuration Epson Scan app, you can change the value of this function. I changed mine to 60 minutes of inactivity. I don’t have anymore to bother turning it off when not using it.
Overall, I’m impressed by this scanner. In one evening I scanned more than 1500 pictures of different sizes and thickness. For scanning photos, you won’t find a better scanner than this one. It does exactly what it promised and it does it overall quite well. Plus, you can continue to use this scanner as a normal one for your day to day scanning. I highly recommend it. This is my review for the Epson FastFoto 640 that I received free of charge to do a beta test and review.
I would recommend this to a friend!

Share this review:
+56points
75of 94voted this as helpful.
Fredou's Review Comments
Make digital copies of treasured photographs or important documents with this Epson FastFoto photo scanner. Red-eye removal and color enhancement tools let you quickly touch up scanned images for optimal results. This Epson FastFoto photo scanner has a maximum optical resolution of 600 dpi to ensure accurate electronic reproduction.
Overall5 out of 5
5 out of 5Great scanner, not for polaroids
By Karenney
My experience with this photo scanner has been pretty positive. Not only does it scan really quickly, and enhance old pictures, but it’s smaller than the average printer/scanner. It won’t take up much desk space which is really great for a specific use product like this. I can flip the guide and output back in so it won’t get broken if I opt to store it. Even though this is a review for the Epson FastFoto 640 that I received free of charge to do a beta test and review, I can say I really liked the product for its speed, image quality, and size. Note that it doesn’t scan polaroids, so if you have a box full of them, this is not the scanner for you.
After opening the box and finding the instructions, I was set-up and ready to scan in a few minutes. The instructions were easy to follow, and everything worked as explained. Make sure you read the instructions though; I tried to scan polaroids and they jammed right away. I looked back at the instructions to see it plainly says not to scan polaroids as it could damage them. Mine weren’t damaged thankfully, and the jam was easy to clear.
The software wasn’t bad, but you have to click ‘keep scanning’ or it resets, and assumes you wanted to save new pictures back into the top-level folder, or a new folder. It was easy for me to re-arrange my folders through Windows Explorer. It also offers easy editing too. I had to rotate several pictures all at once since I put them in upside down by accident. The scanner also offers photo retouching automatically, so it will save two versions of each picture, the original and one that’s got brighter colours. I thought the retouched ones looked pretty good compared to the originals so I kept both versions. It’s a nice feature that you can opt to save both versions. The quality of this scanner is really great.
Fredou
It did work for me with think Polaroid.
October 27, 2016
Why do you say it does not support Polaroid? I scanned many Polaroid with mine without any problem. Since Polaroid are thicker, you might have to switch to the up position the grey switch located at the left. Else, it might stuck in the scanner. I hope it helps!
Fredou
0points
0of 0voted this comment as helpful.
Fredou's Questions
Fredou has not submitted any questions.
Fredou's Answers
Make digital copies of treasured photographs or important documents with this Epson FastFoto photo scanner. Red-eye removal and color enhancement tools let you quickly touch up scanned images for optimal results. This Epson FastFoto photo scanner has a maximum optical resolution of 600 dpi to ensure accurate electronic reproduction.
What is the largest and smallest size photo that can be scanned?
For largest photo size - 8.5" x 11"(or more)
Any small size ones can be scanned using the included carrier sheet. See video here on how to use the carrier sheet.
https://www.youtube.com/watch?v=eqcS6XMTB0g
Any small size ones can be scanned using the included carrier sheet. See video here on how to use the carrier sheet.
https://www.youtube.com/watch?v=eqcS6XMTB0g
7 years, 5 months ago
by
Fredou