ITJim
Top 100 Contributor
ITJim's Stats
- Review Count153
- Helpfulness Votes1,560
- First ReviewNovember 23, 2013
- Last ReviewMay 10, 2026
- Featured Reviews0
- Average Rating4.3
Reviews Comments
- Review Comment Count0
- Helpfulness Votes0
- First Review CommentNone
- Last Review CommentNone
- Featured Review Comments0
Questions
- Question Count0
- Helpfulness Votes0
- First QuestionNone
- Last QuestionNone
- Featured Questions0
- Answer Count17
- Helpfulness Votes31
- First AnswerNovember 23, 2013
- Last AnswerMay 22, 2021
- Featured Answers0
- Best Answers3
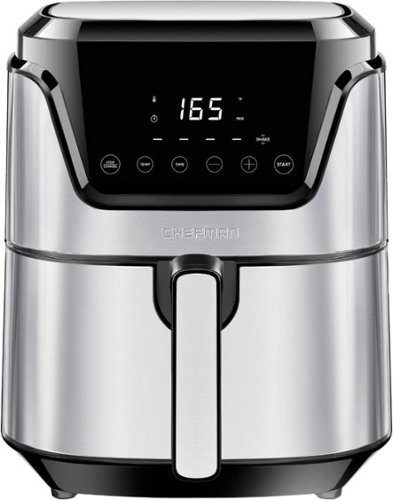
Chefman TurboFry Touch 4.5 Qt. Digital Air Fryer
Create healthier versions of your crispy, fried favorites with this 4.5-Qt Chefman TurboFry Touch Air Fryer. Cook your restaurant favorites easily with the advanced digital display, simple capacitive control, convenient LED shake reminder, and 60-minute integrated timer. Clean up even quicker with the nonstick, dishwasher-safe fry basket. Cook for the whole family with the XL capacity, with the sleek square design that stores beautifully on any countertop.
Basic air frying for the simple cook
Customer Rating

4.0
Images for this Review
(click to see full-size image)


Use:
I am a member of Best Buy’s Technical Insider Network, TIN for short. Reviewers in this invitation-only program are provided products for the purpose of writing honest, unbiased reviews.
This is my third air fryer. Second from Chefman. There are those time, uh Football Sunday, where cooking up wings, fries, and other tasty treats loses there magic if I must cook each dish one at a time.
My overall impression is that this is a basic air fryer that will allow you to make great wings, crunchy fries, and will give you a nice crunchy crust to non-wet batter covered anything you that you would normally use a deep fryer to cook up. I call this “basic” because everything about this air fryer is bare bones simple. The LED controls allow you to adjust cooking time and change the cooking temperature from 200 to 400. That is everything! The LED panel allows the changing of temperature and cooking time only when cooking is paused. Adding time while the fryer is blowing hot air is impossible.
The basket is wide but shallow compared with other air fryers I have used. There is an arrow on the bottom inside of the basket that points towards the back of the unit. This arrow corresponds with a duplicate arrow on the crisping tray. This indicates how the crisping tray should be aligned inside the basket. The crisping tray has three rubber like spacers that protect the sides of the non-stick coating on the basket when you insert or remove the crisping try. The crisping tray also has two finger holes in the center of the tray for easy removal. Finally, the basket has several air slits at the back of the basket to allow air flow. This will make it impossible to fill the basket with hot soapy water for soaking. I was not aware of this the first time I filled the basket with hot soapy water and ended up getting water all over my counter. Don’t be me.
This unit shares the same factory new chemical stink that all air fryers seem to share these days. It will take about a week to burn off. I recommend opening some windows or turning on an exhaust fan for that first week of use. The smell will eventually go away.
Cooking:
The instruction manual has more pages on what you should not do with the air fryer than what you should do. I am not joking. There are four pages, 25-line items, of safety guidelines. All particularly important. But there is not a single page, paragraph, or sentence suggesting how long, and at what temperature, you should cook frozen chicken wings or onion rings. These are common things you would use an air fryer for! There are tips on how to maximize your cooking experience. Tips such as do not use wet batters. Do not overcrowd the basket. Do not fill the basket with oil. Please do not fill your basket with oil!
There are also tips on how to cook your food evenly. There is a total of eight cooking tips. I would have preferred a short cooking guide to give me a general idea of how long, and at what temperature, to cook different kinds of common air fryer foods. Other companies usually dedicate a few pages, or a web page, to this. My advice is read your food’s packaging for convention oven tips and follow those until you find what works for you.
It took me a few tries, but I found what worked for me. I cooked up several dishes. French Fries, Waffle Fries, home-made chicken strips, home-made crispy steak strips, broccoli potato puffs, chicken wings, and ravioli with turkey meat balls. I included a few pictures of the foods I cooked.
I chose to cook the fries, waffle fries, and frozen chicken wings at 400. I checked and shook the basket every five minutes or so. I used silicon covered tongs to flip the chicken. I recommend that you get some silicon covered tongs. It will save you a lot of time and frustrating working with any air fryer basket. Flipping the food every five minutes promotes even cooking. It also allows you the opportunity to judge how well your food is cooking. The Chefman will audibly remind you to shake the basket if you allow it to cook uninterrupted for a set period. The fries, waffle fries, and chicken came out crispy. I did not add any oil to the food. The left-over oil from the frozen fries and the fat from the chicken were enough to make the food crispy.
Next, I cut up some chicken into strips, rolled in white flour, rolled in beaten egg, and then rolled in Panko mixed with some seasoning. I cook this at 350 for about 20 minutes; turning every 5. The chicken came out great. The crust was firm and crispy. It was not the nice golden brown that you get form an air fryer. But it was tasty and a heck of a lot healthier for me. I did the same with some steak strips. Same results. The downside to steak is that the coating does not stick to the finished steak like it does the chicken. Not a big deal. It still tasted good and gave a nice crunch when bitten into.
Finally, I boiled up some raviolis on my stove, lightly covered them in olive oil, and then tossed them in breadcrumbs. I put these in the air fryer along with some tiny turkey meat balls. The meat balls came out crispy. The raviolis did not come out as crispy as I thought they would. The pasta was a bit rubbery. For now, I am assuming that I have not found the best way of making this work. However, the meal was better than I expected for a first attempt. I will try this again until I have proven I can get the results I am after. It was a worthwhile lunch experiment. You can see the results in my attached photos.
Cleanup:
The Chefman is a snap to clean. At least for now. Food slides off the non-stick coating without too much fuss. Over time, however, grime will build on the basket and the crisping tray. This will make clean up slightly more challenging. This has happened with my other air fryers. Let the basket soak in hot soapy water and you are good to go for your next air frying dish. You will also need to clean the inside of the air fryer, including the heating coil, from time to time with a damp cloth. Please be sure to unplug the unit before cleaning. My recommendation is to unplug the unit when you are done cooking.
Final thoughts:
This is a basic air fryer. It is a great way to get into the world of air frying to see if this is something for you. I think the digital controls or overly simplistic. I would like to have seen some per-programmed functions such as bake, air fry, and warming. I would also would have liked to have the ability to change time and temperature while the air fryer is cooking. I think Chefman missed an opportunity by no including a cooking guide. Chefman’s competitors do this today.
The air fryer does exactly what it sets out to do. It makes good dishes without any fan fair. If you are looking for something simple to use and easy to maintain then I recommend that you give this Chefman air fryer a try. Personally, I expect to get some give this air fryer a healthy workout this football season.
Thank you for reading my review.
I would recommend this to a friend!
Mobile Submission: False
+3points
3out of 3found this review helpful.
Share this review:

uHoo - Smart Indoor Air Quality Monitor - White
Detect allergens and toxins in the air with this uHoo smart indoor air monitor. The uHoo mobile app lets you view nine air quality sensors remotely, providing personalized tips on cleaning the air around your home. This uHoo smart indoor air monitor also features advanced integration capabilities with Amazon Alexa, Google Home, or IFTTT for smooth pairing with air purifiers, dehumidifiers, lights, etc.
Great sensor suite supported by a great App!
Customer Rating

5.0
Images for this Review
(click to see full-size image)


I am a member of Best Buy’s Technical Insider Network, TIN for short. Reviewers in this invitation-only program are provided products for the purpose of writing honest, unbiased reviews.
This is a neat little device. I was not expecting much when I opened the box. The device is about the size of a soda can. There are slits in the devise for air flow. There are no fans. There are operational lights that are only lit during initial setup with your wi-fi network and the mobile app. You place this in a room, plug it in, and forget about it for a few weeks while it collects air quality metrics. The device itself may be the most boring piece of technology I own but, after two weeks of collecting metrics, it has got me thinking about the air quality in my basement.
Normally, with most IoT devices I have owned, the device represents a “great promise” of some amazing “I need this in my life” feature. And then the accompanying app is either some marketing gimmick, after thought, or simply falls of making a good product great. Uhoo does not hide the fact that their product is a paperweight. The magic is in the sensors and the app. In my opinion, they did a great job with the app. There is room for improvement that I will go later.
So, what does it do? The uHoo collects 9 air quality factors every minute: temperature, relative humidity, dust, carbon monoxide, nitrogen dioxide, VOCs, carbon dioxide, ozone, and air pressure. Current readings for all nine air quality factors can be viewed at any time from the app’s home screen. Each quality factor can be viewed individually by hour, day, or month as you scroll through the home screen. Touching the title of each quality factor puts the focus on that one quality factor; giving you access to every data point collected from today all the way back to the earliest data points. The graphs break down by Month, Day, and Minute.
Moving your finger along the graph will give you the exact reading for any given data point. The app allows for the setting of alerts, adjustment of measurement thresholds, and will offer suggestions based on insights uncovered through the metrics.
For example, at the bottom of the home page is a button labeled “Insights”. After two weeks, the insights offered two tips: Adjust my room temperature to make it more comfortable and adjust the room temperature or add a dehumidifier to reduce the chances of mold growth. I agree that I probably could have figured those two out on my own. However, the detector is measuring more than just temperature and humidity.
You will find attached multiple charts for Carbon Dioxide with this review. I have a monthly chart, a few day charts in different orientations, and an hourly chart. Each give me similar, but slightly, different kinds of information. If you look at the charts, you will notice that the Carbon Dioxide seems to climb, then falls off sharply, and then steadily goes up again. A single graph over a day is not a pattern. But, if I keep seeing the same, or similar pattern over time, then I must ask myself what is happening in my basement to cause the Carbon Dioxide to fluctuate like it does. I was able to correlate the increase in CO2 to the frequency of showers. I have a boiler system. Showers force my furnace to kick on to maintain the water temperature for the shower. The CO2 rises slightly when around the same time furnace kicks on to heat the water. I will concede that a correlation is not causation. And I will need more closely track when showers are taken. Then, much harder, track when and for how long, the furnace runs. The key take-away is that it is getting me to think about my home in ways I had not considered before.
So, who cares! Furnace runs, burns fuel, and sucks up the oxygen in the room to keep the flame running. Anyone who graduated first grade knows that fire needs oxygen. Well, I spend time in my basement for things other than watching my furnace run. The basement is sealed during cold days and days where the humidity is high. The furnace burns oxygen. I burn oxygen. I eventually feel groggy after spending a few hours in my basement. Part of the issue may be the lack of fresh oxygen entering the environment. I used to think the issue was fatigue. Or carbon monoxide. Well, now I have some metrics that may a different story. Metrics can be actionable. Perhaps I add some plants to the environment to keep up the oxygen. This reduces the competition between my furnace and my lungs for the limited oxygen supply. And I have a device that can give me some tangible metrics to support changes to my environment that would otherwise have gone unnoticed. I also know carbon monoxide is not my problem. A cheap detector can tell me the same thing. But you only know that a cheap detector is working when it goes off. Now I can see what is actually going on over time. What else am I going to find as I study the additional air quality factors and notice other correlations.
As great as the app is, there is room for improvement that I hope uHoo chooses to implement. I would like to able to review multiple metrics simultaneously so I can identify other patterns. For example, and I am just making this up, is there a correlation between humidity and VOC levels? As is, I can only look at one graph at a time. There is no website, that I am aware of, that will allow to me further manipulate the data to tell a more complete story of the air quality in my room. Even an export feature to Excel would be helpful. I would also like to view metrics over a custom defined period of time. By default, the app will only allow a full month displayed as the largest unit of time. I can view all of August on September 4th but not the last two weeks of August including September 1 through 5 which are part of the final week of August. I am interested in seeing a year’s, or multi-years, worth of data. It is all about how metrics are gathered, used, and interpreted. When was the last time you bought a product that gave you the possibility of applying big data analytics to your own home? Normally, you have to pay someone lots of money to do it for you.
I did not test this unit with the smart home apps like Alexa, Google Assist, IFTTT, Mediola, or Conrad Connect. The only device I have is Alexa. And the last thing I need is Amazon sending me marketing material for dehumidifiers and high oxygen producing basement shrubs that doubles as wi-fi hotspot for smart cat doors.
The device itself is a boring, quiet, paperweight. Set it and forget it. The app is robust for a mobile app. It could be better if there were other ways to access and manipulate the data. I think Ohuu has a winner here.
Thank you for reading my review.
I would recommend this to a friend!
Mobile Submission: False
+7points
9out of 11found this review helpful.
Share this review:

Sennheiser - HD 450BT Wireless Noise Cancelling Over-the-Ear Headphones - White
Listen to your favorite tunes on the go with these Sennheiser HD 450BT wireless headphones. Bluetooth 5.0 technology ensures seamless pairing with compatible devices, while the compact folding design ensures easy portability. These Sennheiser HD 450BT around-the-ear headphones boast a closed-back design and active noise cancellation for the uninterrupted audio experience even in loud environments.
Simply not comfortable to wear
Customer Rating

3.0
Images for this Review
(click to see full-size image)


I am a member of Best Buy’s Technical Insider Network, TIN for short. Reviewers in this invitation-only program are provided products for the purpose of writing honest, unbiased reviews.
Summary:
The 450BT sound is crisp, clean, and bright. So bright that I had to turn down the treble and boost the base in the Sennheiser application. The ANC reduces constant ambient noise, such as a computer fan, to a little more than half. Sounds such as typing, doors closing, or cars driving by is reduced by a little but not enough to make my listening experience truly immersive. Hands free calling works well. The people I spoke with over the phone did not realize I was wearing a wireless headset that did not have a dedicated microphone boom. The controls on the right ear cup are useful, well placed, and responsive while connected too my phone over Bluetooth. Only ANC is functional when connected over the included stereo cable. The headphones are attractive and low profile. You can get away with walking with these on the street without looking like a dork. Construction is plastic, light weight, with stiff cushioning. The ear cups can accommodate any size head up to 9 inches from ear to ear. The head band is flexible and is covered with soft padding. The ear cups are smaller than on other headphones I have used at this price point. I have two issues with these headphones. First, the ear cups are too small for my ears. I am forced to push my ears into the back of the ear cups and then fold the ear cups forward to towards the front of my head to get a correct fit. Second, the ear cup padding is very stuff. I have TMJ. The padding puts enough pressure on my jaw that I cannot wear these headphones for more than an hour without discomfort. Please read on for the details.
Sound:
I started off with the K-Pop single “Pop/Stars” by K/DA, Madison Beer & (G)I-DLE. The very first thing I noticed was how weak the bass was and how bright the highs were. I immediately loaded up Sennheiser’s control app, boosted the base, and dropped the treble. This evened out the sound and brought it more in line with my personal tastes. I followed up with Momoland’s, “Boom Boom”. The base was punchy and fun. Next is a little-known track, “Train Wreck of Electro Swing” from the video game A Hat in Time. This piece if electronica and base heavy. Every sound was crisp, clear, and the base was punchy. I then switched over to Mega Death’s, “Holy Wars… Punishment Due” and “In my Darkest Hour”. The 450BT’s did a great job of representing the guitars, drums, bass guitar, and the vocals. These headphones held their own at all volume levels. Finally, I threw some classical to get a feel for how lengthy homework sessions may go. For this I chose Bach’s “Concerto in D Minor for Two Violins and Orchestra BMW 1043: III.” The violins high pitched violins were distinct and present. The 450BT’s did a good job of representing the orchestra in the background. Overall, I think these headphones did a good of reproducing a rather complicated piece of music.
Setup:
Setting up the earphones was easy. The very first thig I did was make sure they charged for two hours. Holding the power button for a few seconds put the headphones into sync mode. My iPhone had no issues picking up the 450BT and adding it to the Bluetooth wireless device list. A few seconds later I was listening to my favorite iTunes. I also set these up for use with my Windows 10 laptop. The headphones did protest a bit jumping connection from the iPhone to the computer over Bluetooth. The solution was to turn the iPhone’s Bluetooth off. I have other Bluetooth enabled headphones that swap easily between devices. The 450BT is inconsistent. I never have issues with the iPhone. It is switching devices that give me issues.
Sennheiser’s Smart Control app allows for a single configuration item, the Equalizer. The 450BT allows for three adjustments: Bass, Mid, and Treble. There are two presets: Movie and Neutral. You can adjust the three sliders to your personal taste and then save that as a new preset. Personally, I think Sennheiser should have taken a little extra effort here to add a few other presets such as Rock, Jazz, and Classical. The app also reports the 450BT’s battery level and firmware version.
Controls:
First, the good. The button layout on the right ear cup will take a little practice to get used to. Everything works as advertised. The power button performs triple duty with the Bluetooth sync activation and the noise cancelation, or ANC. Then there is the volume control rocker button, forward/skip/pause switch, and the voice assistance switch. The right ear cup also houses two microphones, the stereo jack, and the USB charging port. The buttons are easily accessible, have good travel when pressed, and are responsive. Pressing any of the buttons immediately activate the corresponding feature on my phone. The same is true with my Windows 10 laptop. However, unlike my iPhone, I can only control the features available through the app I am using. For example, I cannot skip from one YouTube video to another using the skip forward/back features on the right ear cup. Finally, the only 450BT feature you can control while using the headphone jack is the ANC.
Construction:
The headphones are light weight plastic construction. Even the extension arms and ear cup holders are plastic. The ear cups are soft vinyl covering stiff foam. The head band is stiff enough to hold its shape and flexible enough to allow for larger heads. The head band expands to accommodate a space of about 9 inches from ear to ear. The ear cups are also on a swivel along the Y axis to allow for use with big hair or hats. You can get about 7 inches of clearance from the middle of the ear cup to the top of the head band in the right situation. The ear cups also swivel about 10 degrees forward and back to accommodate different head shapes. Finally, they have a little “L” and “R” molded into the decorative molding on the head band. They are hard to see unless you are looking straight at them. The controls are on the right ear cup.
Why I cannot recommend these:
The ear cups are too small. The padding is too stiff. The opening is 1-inch wide front to back and 2 ½ inches long from top to bottom. A child will probably do fine with the size and fit. Certainly not your average teenager or adult. If Sennheiser hallowed out the earcups then the comfort issues would vanish. As designed, the padding partially covers the speakers, forces the ear into an unnatural position, and puts undue pressure directly to my jaw’s joint which causes fatigue and pain. To illustrated the point, I load my ears starting from the back of my head, catch the back edge of my ears inside the ear cup, and then fold the earcups over my ears until the earcups rest flat against my head. The tips of my ears touch the speakers. I could wear these flat against my ears, however, these are marketed as over the ear and not on the ear. Also, wearing them flat is equally uncomfortable.
I gave these to my youngest. This is most likely the age group these headphones are marketed towards. She gave me similar feedback to what I wrote above. She does not want to wear these headphones. All the positives of these headphones become irrelevant if no one in my household is willing to use them.
I own other Sennheiser headphones and am very satisfied with them. The 450BT is not one of them. Human comfort needs to be front and center for headphones at this price point. And then everything else.
Thank you for reading this review.
No, I would not recommend this to a friend.
Mobile Submission: False
+60points
77out of 94found this review helpful.
Share this review:
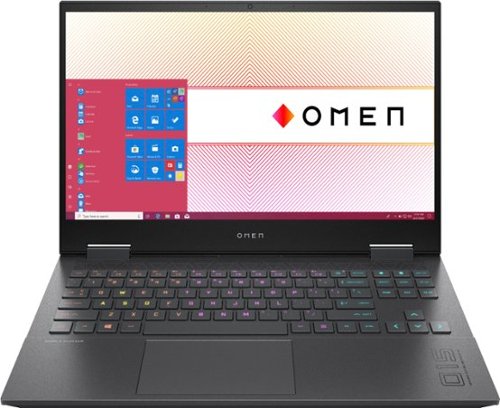
HP OMEN - 15.6" Gaming Laptop - AMD Ryzen 7 - 16GB Memory - NVIDIA GeForce GTX 1660 Ti - 1TB SSD - Mica Silver
HP OMEN Gaming Laptop: A thin and light premium gaming experience in an elevated design so you can play everyday. With an AMD Ryzen 7 processor, NVIDIA GeForce GTX 1660 Ti graphics and cooled by OmenTempest Cooling, it makes you think how it all fits into such a tiny little package."
Great mid-range gaming laptop - A real surprise!
Customer Rating
5.0
Images for this Review
(click to see full-size image)


I am a member of Best Buy’s Technical Insider Network, TIN for short. Reviewers in this invitation-only program are provided products for the purpose of writing honest, unbiased reviews.
Conclusion:
My expectations going into this review were moderate at best. I have always viewed entry to mid-tier gaming laptops to be mediocre gaming platforms with pretty case design. The best stuff is always reserved for the exotically priced laptops. In short, I am loving this Omen Laptop! I will recommend this system to anyone who is looking for a laptop capable of great gaming performance at an affordable price. It does not have all the bells and whistles. For a mid-tier gaming laptop, the Omen laptop has enough power to offer an enjoyable and stable gaming experience. I am please to say that this laptop is my first real gaming laptop. Please continue reading for the details.
Review:
This is not a review about benchmarks and system specs. This review is about my experience, challenges, and observations.
Let us start with some Pros and Cons:
Pros:
• Ryzen 7 4800H with Nvidia Graphics
• NVMe Storage solution. Yes!
• 144hz LCD screen that keeps up with higher frames rates.
• Adjustable frame rate limits to control fan noise
• Keyboard has good resistance and bounce.
• Bright, colorful keys
• Bright, colorful screen
• Fast boot and shutdown
• Quick access buttons to Omen Command Center and calculator
• All the ports I could want or need!
• Super duty cooling solution
Cons:
• Cooling solution is loud
• Four keyboard lighting zones
• Screen is not G-Sync
• Waste heat is exhausted on right hand. Not so great for heavy gaming sessions.
• The edges of the laptop are sharp. Can cause irritation to wrists during typing.
• Mouse pointer will randomly bounce around page while typing a document.
• Omen Command Center has room for improvement with customer profiles.
Gaming and performance:
The combination of AMD’s Ryzen 7 with Nvidia’s 1660 Ti is a real winner here. AMD, particularly, has moved from the jaws of pending bankruptcy to becoming a real powerhouse. Matching up AMD with Nvidia’s 1660ti is brilliant. I was surprised at how well these two handled my test games: Mechwarrior 5, Titan Fall 2, Civilization VI, Supreme Command 2, and Fortnight. I did test other games but felt these gave the best representation of what the system is capable of.
First, lets talk about the low hanging fruit. Supreme Commander 2? Really? Yes. I chose this game specifically to test the single threaded performance of the Ryzen processor. To my delight, I was able to play this game, vs the computer, against four armies with hundreds of units each. The Omen laughed at this game. Sustained 99fps under all conditions. Single Ryzen logical core at 100%. Each physical core is split into two logical cores! So, half a core gave me butter smooth performance. Way to go AMD!
In contrast, Civilization VI is a multicore, multi-threaded beast. See my screenshot of Civ, full settings, vs system rest state. This screenshot was taken while the game was at idle. Actual gameplay is smooth. It is also producing way too many FPS which cranks the cooling system into overdrive. More on the cooling system later. The average frame rate was 60 fps. I saw it go all the way up to 250fps and as far down as 40fps. I eventually limited the game to 40fps through Nvidia’s drive to reduce heat and fan noise.
Titan Fall 2, in my opinion, is one of the best first-person shooters ever. I will not debate this with you! Titan Fall 2 is a high speed, high action, super twitch first person shooter. If you run this on a machine that drops frames, suffers screen tearing, dithers, or causes other screen artifacts then you will be destroyed in multiplayer. I was blown away by how smooth this game was on the Omen. No screen artifacts, period! I am an Xbox junky with this game. I can hold my own. I dominated with this laptop! In the spirit of full disclosure, I did use my Xbox Elite controller for this game.
Which brings me to the game I do play using mouse and keyboard: Mechwarrior 5. I love giant robot games. This game moves like an FPS but only slower paced. In addition to using the WASD keys this game has controls spread all over the keyboard. I often found my fingers flying across my keyboard in the middle of combat to keep up with constantly changing situation on the battlefield. I did not experience any keyboard lag, missed keys presses, or any issues that arise from pressing multiple keys in quick succession or simultaneously. HP did a great job here with keyboard responsiveness. The GPU, on the other hand, took a little bit of work. This game is not a hyper velocity shooter. But there are plenty of opportunity to saturate the screen with fast movement, high level of environmental details, and special effects. This game is built on the Cry Engine 4. I was able to achieve frames ranging from 50fps to 100fps during game play. It can hit 250fps during the load screens.
Finally, Fortnight. I am not going to say much about Fortnight other than I had this game playing butter smooth at maximum settings. The game bounced between 60fps and 120fps averaging about 90fps. It just worked.
Cooling:
The laptop’s cooling system gets louder the harder the laptop works. This thing can move some air! Civilization VI, default settings, was full hair dryer! Using Nvidia’s software, I was able t get an acceptable balance between fan noise, cooling, and performance by setting the game to 40fps. I noticed fps skyrocket on static scenes or black screens while loading content. All this does is create heat and wastes energy. Spending a few minutes mucking around with Nvidia’s software will reward you with less heat and fan noise in almost everything but the latest AAA title.
How is the fan noise during every day, mundane tasks? It is as quiet as your typical office laptop. And, unlike my office issued work laptop, the Omen remains cool to the touch throughout the day regardless of workload of use.
Room for improvement:
First, sharp edges. I do like the case style. It looks super slick and modern. I love the hard angles, the Omen logo on the LCD bezel and the diamond on the cover, the 015 logo on the side of the palm rest, and how the palm wrest is slight elevated from the keyboard. It is all the little things that make this really work for me. However, the hard angles are bit too sharp for my wrist. I type proper with my wrists up. However, when I am not typing, my writs rest on the palm rest. This is where I scrap my wrists against the case. It is not sharp enough to cut but it is uncomfortable.
Second, the keyboard lighting. I am just nit picking here. The RGB lighting is restricted to four pre-set keyboard zones. HP makes a programmable keyboard. Why not here? I like having the ability to set a color for each key or group of related keys. HP did a great job with what they did deliver. I love that the lighting can show brightly through the keys and around the keys. I love the affect. And it looks super cool in a darkened room. I just would have preferred individually programmable keys. One final thought, and HP can add this through software, is create a setting in Omen Command Center that allows me to set a single color and brightness level to all keys simultaneously. That way I can quickly set or change full keyboard colors and assign them to different game profiles.
And finally, the touch pad. This one is plain annoying and years overdue to be addressed. Why is it that any laptop running a Synaptic touch pad includes the undocumented “cursor reposition while you type” feature? It is annoying and disruptive for the cursor to randomly reposition itself on the screen when typing, I do not know, a laptop review. I have seen this issue in various laptops from multiple manufactures for ten years or more. Can we fix this?!
Final Conclusion:
I would recommend this laptop to my best friend.
I would recommend this to a friend!
Mobile Submission: False
+35points
71out of 107found this review helpful.
Share this review:

Microsoft - Surface True Wireless In-Ear Earbuds - Glacier
Experience high-quality audio during calls or listening to music with these Microsoft Surface earbuds. The intuitive touch controls and voice command-compatibility ensure flexible operation, while the ultra-comfortable design eliminates ear fatigue during extended use. These Microsoft Surface earbuds boast an all-day battery that offers uninterrupted acoustics, and the wireless design provides easy storage and transportation.
Premium Earbuds, but not for small ears
Customer Rating
3.0
Images for this Review
(click to see full-size image)


I am a member of Best Buy’s Technical Insider Network, TIN for short. Reviewers in this invitation-only program are provided products for the purpose of writing honest, unbiased reviews.
I am one of the many office workers who find myself working from home during these unprecedented times. I use video conferencing software, like many of you, to stay in touch with my colleagues. Normally, I use either my Plantronics wireless headset or one of my gaming wired headsets. They are both heavy, bulky, and simulate Princess Leia hair buns on screen. I was excited when TIN asked me to review the Microsoft Surface Earbuds. I own other wireless earbuds from different manufactures, but none were made for an office setting. Hence, the microphones in these earbuds are not very good. However, the Surface Earbuds were made for the office! Let’s start with Pros and Cons.
Pros:
- Clear vocals from all audio sources
- Quality microphones
- Simple touch controls
- Charging Case charges earbuds between uses.
- Easy Bluetooth setup.
- Multiple sized tips to fit multiple ear sizes.
- Secure fit in ear. Will not fall out during use.
- USB-B to USB-C charging cable. The case has the USB-C connector.
- Surface Earbud app allows EQ and other useful capabilities.
- Easy access to digital assistant for Cortana and Siri. Note: I do not own any Android devices.
Cons:
- Uncomfortable after an hour of use.
- Can be difficult to auto reconnect between multiple devices.
- MS Office integration mysteriously missing
- Uncomfortable after an hour of use.
- Can be difficult to auto reconnect between multiple devices.
- MS Office integration mysteriously missing
First, I want to focus on the positive. Sound quality on the Microsoft Surface Earbuds are great. Audio through my laptop and iPhone were crystal clear. I asked for direct feedback from those on my conference calls. Their comments were very positive. One person I spoke with spends his free time in a broadcast studio doing podcasts. He said that it was about time I put a diffuser on my microphone. He was referring to my Plantronics headset. He had no idea I had changed over to the Surface Earbuds.
A friend of mine, who I called on my iPhone, stated that my voice sounds deeper than normal. Otherwise I was clear. The Surface Earbuds microphone is centered in the earpiece and positioned to rest against the inside of your ear. This has the extra benefit of cutting down on wind noise and the transmission of ambient office noise.
I normally listen to music between phone calls and meetings. My go to headset is Sennheiser headphones. I have zero expectations that the Surface Earbuds can keep up with the Sennheiser’s. The benefit of using the earbuds is that I do not need to switch out headsets if someone calls my cell, office phone, or Skype. I have to say that I was surprised at how good the Surface Earbuds sounded. I played a number of selections ranging from Vivaldi’s double concertos, Lindsay Sterling’s “Artemis”, Sturgill Simpson’s “Sound & Fury”, and Meghan Trainor’s “Title”. I was expecting the music to be constrained and bottled up. Instead, it was surprising clear and concise. Granted, the bass will not rock your world like dedicated headphones will. Good enough for an office setting. However, since the earbuds do not cover your ear canal, any outside sounds will equally compete with what you are listening too. I heard road noise from cars passing by, chirping birds, and my family’s conversations while I was trying to listen to music. Then again, I know that I can walk down the street or through an office setting able to fully interact with my environment without having to remove the earbuds. You will have to decide for yourself if the trade off has any benefits to you.
Let’s revisit bass. The default EQ for these earbuds is flat EQ. You can adjust the EQ to your liking through the Surface Audio app available for download for Windows 10, iOS, and Android. The EQ has multiple presents including Classical, POP, and Rock. You can also manual adjust the EQ to best suite your desired experience. For example, the first track on the album “Artemis,” starts with a high-pitched electric violin that slowly merges with a deeper rhythm track. The default “Flat” EQ is anemic for this piece. I solved the problem by adjust the EQ in the Surface App from “Flat” to “Pop”. The adjustment helped the earbuds deliver a much deeper and richer experience.
The ear bud touch controls work for both Windows and iOS. (I do not own an Android device.) A lite touch swiping up or down on the right earbud increases and lowers volume. Forward and back swipes on the left earbud allows you to switch music tracks. Double tap on the right earbud invokes the digital assistant for the device you are connected too. Microsoft reports that there is touch integration with Office 365. Unfortunately, Microsoft Surface controls for my version of Office, Office 365 Family, was not available. There is one Office feature that does not require a Surface product to successfully operate, dictation. Dictation mode in MS Word can be done with any microphone. Testing with the Surface Earbuds was quick and accurate as long as I ignored punctuation. I have zero experience verbally inserting punctuation into my speech. There are multiple reasons why someone would want to take the time to train themselves to use this feature. Someone who is disabled or lack touch typing capabilities may be two such use cases. If you fall into this category, then you can find the verbal punctuation commands for MS Word and PowerPoint on Microsoft’s product support page. Just do a Bing search in your favorite browser.
There is one issue with these earbuds that really impacted my experience. I found them very uncomfortable to wear. They became painful to my ear after an hour of normal listening. Less time if I engaged in any activity that caused movement within my ear such as talking, chewing, yawning, or adjusting my jaw for any reason. The earbuds come with three different size silicon tips: large, medium, and small. I chose the small tips because I have small ears. Unfortunately, due the size of my ear, the earbuds put a significant amount of pressure on the surrounding cartilage. The earbuds became less comfortable the longer I wore them. I did play around with the positioning of the earbuds in my ear. All I managed to do was find positions that allowed me to wear them for an extra 30 minutes before I had to take them out.
In conclusion, the Surface Earbuds offer a premium experience. They will not fall out of your ears if used as directed. Sounds are clear and concise. The microphones do an excellent job of picking up your voice. And the touch controls worked without any issues. The Surface Audio app serves to add that little bit of extra value that really make these stand out from other earbuds on the market. I do appreciate the fact that I do not have to jam these earbuds into my ear canal like other earbuds. I do find value in being able to hear what is happening around me in an office or public situation. Finally, if you have small ears then you will have to judge for yourself if the Surface Earbuds will meet your needs. This one issue disappoints me the most because I really wanted these to work. However, my experience dictates that I can only use these for short periods of time.
I would recommend these earbuds to a friend. But only friends with ears larger than mine.
Thank you for reading this review. I hope you found it helpful.
I would recommend this to a friend!
Mobile Submission: False
0points
1out of 2found this review helpful.
Share this review:
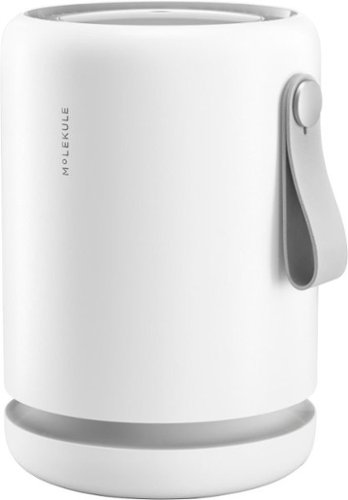
Molekule - Air Mini - FDA-Cleared Air Purifier - 250 sq. ft - White
Molekule Air Mini air purifier is FDA-cleared for medical use to destroy viruses and bacteria. This 510(k) Class II medical device features a 360-degree air intake that replaces the air in a 250-square-foot room. The device uses a patented PECO-Filter, which is coated with a proprietary catalyst and breaks down viruses & bacteria at a molecular level. It also traps 95% of particles 0.3-1 micron in size like mold & pollen allergens.
Surprised me! Great little device!
Customer Rating
5.0
I have owned and operated the Molekule for seven days. It has been running almost non-stop for those seven days in one of five rooms in my home: home office, bedroom, craft room, basement entertainment room, and teenager’s bedroom. All five rooms have either an odor problem, dust problem, mildew and mold, or a combination of air quality issues. The Mini is rated for rooms 250 sq. ft. or less. All rooms were less than 250 sq. ft.
Air Cleaning:
Teenager’s bedroom: Significant odor reduction. For those of you with teenagers, enough said.
Home Office: Food smells and body odor can build up in this enclosed space. I am in it for eight or more hours a day. The room also has dust issues. Odors were eliminated on low to low medium fan speeds. I have noticed a reduction in dust levels after running continuously for two days.
Bedroom: Bedrooms everywhere tend to build up odors. Mine is no exception. I placed the Mini on a stool in the room for about five hours. Eliminated the odor.
Craft room: This room is part of my basement. It is also the room where my cat box is located. The room usually has a musty smell with notes of cat litter. I placed the Mini in the room for 24 hours. Odor’s were greatly reduced.
Basement entertainment space: This space just gets musty smelling. I will eventually have mildew issues in this room if I do not clean or run a dehumidifier. I ran the Mini in the room for 24 hours. The musty smell was greatly reduced. Did it clean the air of mold or mildew spores? I have no way of knowing. I probably will not know what affect it had until the summer months.
Setup:
The unboxing experiencing, minus the white laminate paper wrappings, reminded me of unboxing an apple product. The Mini was well protected by a high impact cardboard top and bottom caps. All recyclable! Someone has been reading my reviews! The Mini was covered with a white fabric bag to protect it from scratches. The filter ships in a plastic bag and stored inside the Air Mini. You need to remove the filter from the bag, reinsert the filter, and then replace the lid. Unwrap the cord from the base, plug it in, and press the top center indent to turn it on. The printed instructions state that setup is complete after you download and setup the app. The app did not support the Mini at time of this review. The unit will work without the app.
Note: be sure to read the directions regarding attaching the cover. It has a specific alignment and then a twist at the end to secure it.
Finally, there is an app for the Mini. The app was not functional for the Mini at the time of this review.
Use:
As stated above, I tested this unit in five rooms over the course of seven days. However, it took almost three days for the factory fresh smell to dissipate from the unit. The instruction manual does state that it may take up to 24 to 48 hours for the smell to dissipate. You will not be able to tell if the unit is cleaning the air for up to the first 48 hours due to the that factory fresh odor.
The instructions state this unit works best when off the floor. I placed my unit on a small stool. I found that the unit works best closer to the middle of a room instead of close to a wall or in a corner. This allows the 360 in-take to draw from the whole room.
Low and low medium is quiet. Medium is about as loud as a white noise generator; maybe a little louder. This is the speed I use for my home office. Max setting sounds like a leaf blower. I would only recommend this setting if you are trying to clear a room quickly.
Looks:
The unit has a simple, elegant, modern design. It is probably the most beautiful air cleaner I have ever owned. It really looks like something Apple could have built. The outer shell is sturdy plastic with a good texture to it. The top of the unit is glossy, light gray, has a touch activated button in the middle, and exhaust fins that surround the perimeter. The bottom of the unit has a rubberized ring that prevents it from slipping. The ring also prevents the unit from moving when removing and replacing the filter housing. The very bottom of the unit, behind the rubberized ring, is a spindle with housing where the power kept. You unwrap the cable you need and leave the rest. Most other purifier’s just leave the cord to dangle. The felt handle is secured to the side of the unit with a stylish gray nob. The nob is loose enough to allow the handle to rotate to any position along the Y axis. These are all little details that add to the premium look and feel of this product.
The unit is heavy for its size. Anyone can move it using the included felt handle. It feels like a product not made of thin, cheap plastic.
The center of the unit, running the length of the filter, is a cylinder covered with UV LEDs. These lights automatically engage when the unit is turned on. This is how the filter handles those pesky spores and viruses. The light can be seen from the intake opening and exhaust fins when the room lights are dim or off. The black lighting effects are cool and unique.
Final thoughts:
A lot of thought went into make the Mini from the looks, operation, and user experience. It is simple to setup and operate. It is stylish. And, after a few days of cleaning out that awful factory smell, the Mini does a good job of filtering away air born particles and room odor. I do have a much larger, industrial like air filter I got from Home Depot a few years ago. The unit has three filters, but never once has it cleaned a room of odors or cleared the air of smoke from cooking. For about the same money, between the unit and filters, the Mini does the same or better job. It also looks better and is much more portable.
When I first got this until I seriously considered returning it. I had no way of knowing if this device was snake oil or not due to the factory odor. Kind of hard to tell if your air is clean if it stinks. The odor faded after a few days use. Now that I have used it a full week I have decided to keep it. I will use this in my home office during the week, and whatever room I am occupying during my weekends. I may consider adding the larger Molekule device for my larger living space if the mini continues to perform as well as it has.
I hope you found this review informative. Thank you for reading.
I would recommend this to a friend!
Mobile Submission: False
0points
0out of 0found this review helpful.
Share this review:
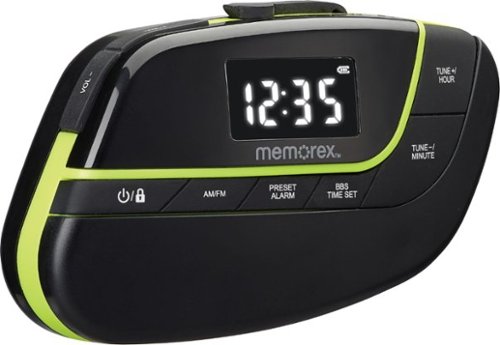
Memorex - Armband Radio - Black With Bright Green Trim
Listen to your favorite music on the go with this Memorex armband radio. The digital AM/FM radio offers access to multiple stations, while an LCD screen ensures easy navigation across different frequencies. This Memorex armband radio has a built-in bass boost system for versatile audio options and a digital clock to keep track of time.
Good but not my new workout buddy
Customer Rating

2.0
The radio is sporty looking. With batteries, the weight is comparable to a cell phone. The arm strap is sturdy, adjustable, and comfortable. At no time did I feel like the radio was going to run down my arm or fall off. The radio also feels like it would survive an impact or two if dropped on the pavement from standing height. It is easy to program. Just follow the included instructions. The included earbuds are comfortable in the ear.
The radio ships with three different earbud caps to accommodate multiple ear hole sizes. The earbuds also come with a silicon claw that helps the earbuds remain in your ears. I found the default earbud caps and claw to be comfortable. The radio is cable headphones only. No Bluetooth.
Tuning between stations is easy. Press the tuner button once to increase or decrease the channel by .1 increments. Press and hold either channel button will cause the tuner to move up or down the spectrum until it finds the next station. Presets, time, and alarm setup are just as easy as changing the channel. The included instructions outline the process for you. The radio is capable of AM and PM. It is not capable of picking up HD or digital channels.
Features I did not like. First, there is a constant hiss from the radio. It does not matter if the radio is tuned into a station, between stations, or if the volume is set to zero. The hiss is present regardless of programming material. I would have liked it if Memorex added a noise filter. Next, the volume level is just south of too loud at the lowest level. There are 16 volume levels from 0 to 15. 0 is off. The 1 setting is loud. Setting 2 is way too loud. I would like to have the volume start at a lower volume and get louder from there. I tried this with different wired headphones. It is the radio. Not the headphones.
The Memorex has a bass boost setting. The implementation is awful. The feature made the content muddy.
One final note. You must press the on/off switch to turn the radio on and off. Unlike your cell phone, or other modern smart audio devices, the content does not stop simply because you pull the headphones out of the headphone jack. You must turn off the radio via the power button or you will burn through your batteries.
Overall, for the price, this is a good beater radio. I’ll throw it in my hiking pack and use on hikes, camping trips, and during emergencies where cell reception is unavailable or limited. I can also hook these to any speaker that has a mini-stereo jack. The volume may not be as much of an issue because most portable speakers manage volume independently from the source.
Thank you for reading my review.
No, I would not recommend this to a friend.
Mobile Submission: False
+1point
1out of 1found this review helpful.
Share this review:
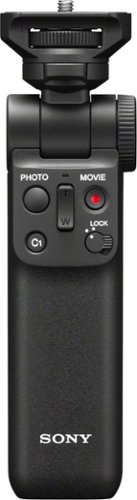
Sony - Shooting Grip with Wireless Remote Commander - Black
Take professional-grade pictures with this Sony wireless shooting grip. Bluetooth technology allows cable-free connection to compatible cameras, while the contoured design helps increase stability and comfort during use. This Sony wireless shooting grip has a flexible tilt function for positioning the camera, and the integrated legs spread to create a tripod for hands-free operation.
I love this thing!
Customer Rating
5.0
I purchased the Sony Alpha 6100 camera about a month ago. I have been having a great time with it but felt that something was missing. Last week, I took a trip. I shot about a thousand photos and a dozen or so videos. There were a few instances where I wanted to take some low light photos. One was a night shot of a cruise ship. I needed a tripod but only had a table and a cruddy $10 flexible mini tripod. There is a reason why it is spends more time in my bag then anywhere else. I found it difficult to keep the camera steady using the cheap tripod. The image turned out awful.
I knew that Sony made a shooting grip but never gave it much thought. I used my camera a lot during this trip for both stills and video. Mostly, I found myself using my Sony Alpha like most people use a Go Pro; minus the extreme sports. The more I used the camera, the more I imagined how much easier it would be to operate the camera with the matching shooting grip.
When I returned home, I decided to invest in Sony’s GP-VPT2BT Bluetooth enabled shooting grip. I loved it from the first moment I attached it to my camera. No joking. I loved how the grip felt in my hand and, in extension, how the camera felt on the shooting grip! The tripod opened with little effort. It collapses into a handle in a second.
Setup? It took about a minute to go from Box to camera. It is that easy to install. If you can turn a screw you can attached this tripod. There is a CR2032 lithium cell battery that installs into the grip. This supplies the power for the remote camera functions. The shooting grip also comes with a nylon storage bag. Bluetooth setup took about 30 seconds. Everything just works after that.
The grip is comfortable. I can easily operate the camera with a single hand. The handle allows you to snap stills, use the zoom capabilities of your lens if it is supported, start and stop video recordings, and activate the Auto focus functions. The grip also has a lock switch so that you can deactivate all of the grip’s functions. This prevents accidently activating any functions while you manipulate the camera on the grip. I was a little confused with the C1 button. It activates the Alpha’s auto focus settings. The button allowed me to activate the auto focus menu items, but I still had to use the Alpha’s directional pad to navigate to the auto focus function I wanted to use. I was expecting the zoom rocker button to double as a navigation switch for any vertical organized menus. Not in this case.
The photo grip has two mechanical buttons that allow you to unlock, position, and then lock the camera into positions along both the X and Y axis. You can do this either in tripod mode or grip mode. The buttons move easily. There are stops built into each axis that will catch the camera. For example, the X-axis controls the direction the camera is facing along the horizontal axis while it is sitting on a table. Pressing the button at the base of the camera allows the camera to swing the 360 degrees in either direction. If you release the button, then the camera will automatically lock at 45 degrees. There are a total of four stops along the X-axis. You get a similar behavior along the Y-axis. The difference is that the stops are much closer together.
The tripod legs slip out smoothly. There is enough tension in the legs to allow for a controlled extension and retraction. You will need two hands to extend the legs. The bottom of each leg is rubberized. I have had zero issues with camera motion once setup. It is a very stable design. The grip’s control pad buttons are fully accessible and easy to use in this mode. I also have full access to all the camera’s functions. I love that I can swing out the Alpha’s LCD screen to allow a more comfortable viewing angle for my shots in both tripod and shooting grip modes.
The camera grip is also very stable when walking around with my camera. I have had tripods in the past that allow the camera to move around on the camera attachment. I have also been in situations where I had to level the tripod around the camera attachment instead of the other way around. The attachment is tight against the camera body with zero play. I love this. I also love that I can hold the camera level with my chest and snap photos and videos with little to no effort. All I do is pull out the Alpha’s LCD to a comfortable viewing position and start shooting. I was excited by the Alpha’s ability to shoot 4K video but not so excited that I had to hold it up near my face to get the shots I wanted. The photo grip turns my Alpha into a stable camcorder! I find this superior over my older Sony camcorder because I do not have to fight with the annoying, uncomfortable hand strap that stabilizes my camcorder to my hand. My auto stabilizing lens makes sure my videos are shake free.
I have two gripes about this grip. First, the limited functionality of the C1 button. Why? Second, the battery. I do not understand why Sony opted for a replaceable battery over a rechargeable one. Maybe it had to do with weight, expense, or some other reason. I would have liked to see rechargeable. I do not know how long these batteries will last. I do know that replacing the CR2032 can be expensive. The good news is that the shooting grip will function as a trip and a tripod without the control panel. So, loosing power does not mean the end of your photo journey.
I love this grip. I cannot believe I picked up Sony’s Alpha without the shooting grip. I won’t make that mistake again. It is worth the extra investment to me. I just wish I picked one up before my trip.
I would recommend this to a friend!
Mobile Submission: False
-1point
0out of 1found this review helpful.
Share this review:
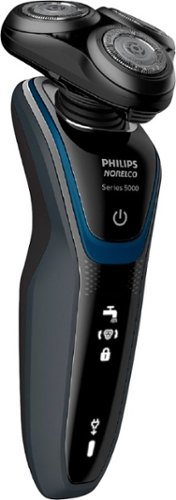
Philips Norelco - 5300 Wet/Dry Electric Shaver - Black/Navy Blue
Keep your facial hair well groomed with this Philips Norelco Shaver 5300 electric shaver. The precise blades and independent shaving heads help ensure a close shave and make navigating around facial contours easy. This Philips Norelco Shaver 5300 electric shaver features Aquatec technology for a comfortable wet or dry shave.
Great product with one drawback
Customer Rating
4.0
Images for this Review
(click to see full-size image)


My go to shaving technology for years has been razor blades such as Gillette. I have always liked the baby smooth feeling I get from a blade. However, using blades is getting expensive. Lifestyle changes have prompted me to revisit electric razors. And yes, this is an actual thing.
Overall, I like the Philips Norelco 5300 electric razor. My first electric was from a competitor that costs $20 less than the 5300. I was not satisfied with the less expensive model. The extra $20 for the 5300 is well worth the investment. However, the quality of shave is still not as good as a blade.
Feel and Operation:
Feel and Operation:
The 5300 feels good in the hand. There is a rubberized band that runs along the perimeter of the razor ensure the razor does not slip in your hand. The grip works equally well wet or dry. The three razor heads feel smooth to the face. I did not notice any pulling on my stubble as the razor heads passed along my skin. I normally feel this most under my nose, chin, and under my lower lip. I did notice a real difference in feel between wet and dry operations. I will cover this below.
Cleaning:
Cleaning:
Cleaning is super simple. Put the 5300 under the faucet, press the button release the cutting heads, and rinse. Done!
1-Day Growth shaving experience:
1-Day Growth shaving experience:
I decided to shave the moment the razor reached 100% charge. In this case, I only had 24-hour stubble. The shave was rough and irritated my skin. This is mostly due to my skin being used to a blade and not an electric shaver. Please keep this fact in mind if you are making the switch. It does take a few shaves for your skin to adjust to how you are shaving. It is not indicative of the quality of the 5300.
After the shave, my skin did not feel as smooth as a blade shave. But, that is not the end of the story.
3-Day Growth Shaving Experience – Dry Shave:
3-Day Growth Shaving Experience – Dry Shave:
This is where I really focused in on the shaving experience. I did wet and dry shaving using half my face for both. Pictures of before and after are included for your inspection. I also applied an accurate, scientific measurement that is generally accepted in many industries known as WAF or Wife Acceptance Factor. Yes, this is a real thing.
On a scale of 1 through 10, where 1 is baby smooth and 10 is porcupine, my three-day stubble was rated as a four by my wife. So, WAF factor equals 4.
I dry shaved the right side of my face. The 5300 was smooth against my skin. No pulling of my stubble regardless of where it was on my face. I also noticed there was no pulling of my skin. My skin was also less irritated compared to the 24-hour stubble shave I did previous. This is due to my skin getting used to the electric razor. It did take additional passes to get shave everything to my satisfaction. This included little hairs and rough spots that the were missed on the first or second pass. Overall, it took me three passes to shave the entire right side of my face.
WAF of 2. Remember, WAF 1 is blade shave.
3-Day Growth Shaving Experience – Wet Shave:
3-Day Growth Shaving Experience – Wet Shave:
The left side of my face was shaved using water and Barbasol shaving cream from a can. The water is applied to the skin first and then the shaving cream applied over the wet skin. The shave was baby smooth on all areas where the shaving cream was present. However, each pass of the 5300 removed the shaving cream. The 5300 pulled at the wet, shaving cream free skin making all but the first pass impossible.
This resulted in a WAF of 3. Please see included photos.
There was some shaving. The stiffer hair was shaven. The software hair was left behind. Conclusion. I will not be using the 5300 for wet shaving.
Final thoughts:
Final thoughts:
I like the 5300 as far as electric razors go. It is not as smooth as a blade shave. Then again, I don’t have to worry about nicks and cuts from an electric razor. The shave may not be as close, but it is more predictable and consistent. I used to use a blade for multiple shaves. However, each successive shave after the first increased the incident of cut skin and bleeding. Eventually, the blade was useless thus costing me money every time I had to replace. Additionally, I do some travel. It is far easier to transport an electric razor these days than a bladed instrument.
Overall, I am glad I spent the extra $20 for the 5300. The shave is close enough to a blade that my wife is happy. The shave is clean enough to pass as clean shaven at work. It is portable. Waterproof. Easy to clean. And the heads hug every contour of my face with ease. I will not be using this razor for wet shaving since I think the shave is inferior to dry shaving. Then again, my test includes a single brand of shaving cream and a single product line within that brand. Experiment and see what works for you.
I cannot give the 5300 a 5-star rating simply because my wet shaving experience was not ideal. It does give a good, consistent dry shave.
I hope you found this review helpful.
I would recommend this to a friend!
Mobile Submission: False
+61points
67out of 73found this review helpful.
Share this review:
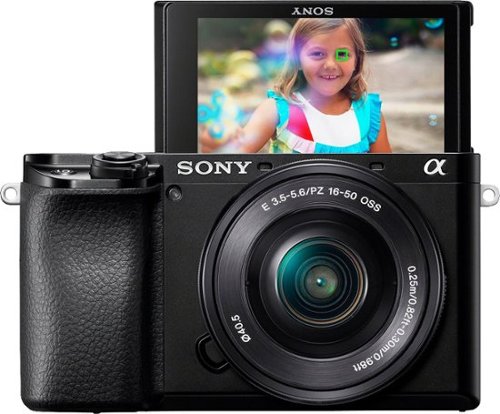
Sony - Alpha 6100 Mirrorless 4K Video Camera with E PZ 16-50mm Lens - Black
Take eye-catching photos with this Sony Alpha 6100 mirrorless digital camera with 16-50mm lens. The BIONZ X image processor coupled with the 24.2MP CMOS sensor ensures images of the highest quality. The 16-50mm lens offers a 24-75mm equivalent focal length range, making this Sony Alpha 6100 mirrorless digital camera ideal for portraits and even nighttime photography.
Awesome little camera!
Customer Rating
5.0
Images for this Review
(click to see full-size image)


Conclusion:
This is by no means a complete review of this camera and all its features. This is a feature rich camera that no single review will be able to fully appreciate.
I love this camera! It is versatile, compact, and takes excellent photos in all lighting conditions. There are hundreds of features and options built into this camera that will keep an amateur photographer like me engaged for the foreseeable future. There is a plethora of accessories that I can add to this camera to meet any needs that the stock camera does not currently fulfill. The Alpha 6100 is a flexible, feature rich platform that I am going to enjoy exploring for years.
What originally convinced me to own this camera? A friend of mine is a professional photographer. He photographs and videos professional trade shows and conferences. I noticed one day that he changed out his typical SLR and video camera for the Sony Alpha 6000. I asked him why. He told me that for half the money he could get almost the same quality as his more expensive cameras. Plus, he only needed one camera to do both video and stills. I did not need a new camera at the time. Today, my digital SLR is non-operational. I decided to jump on the Alpha 6100. I’m glad I did. I got a heck of an upgrade for the same money my old camera cost.
What do I like:
The camera is small, compact, and what I would call a dense .78lbs with the stock lens attached. The bump out on the right of the camera body is small compared to a traditional digital SLR camera. For me, this makes the camera awkward to hold. This may change with the addition of a larger lens. Stock, the camera is compact enough that my hands crowd close together. The Power Zoom on the included lens adds to my awkward handling. I have medium sized hands. Think medium sized adult winter gloves. I can see someone with large hands having a very difficult time handling this camera with the included E PZ 16-50 lens. This all being said, I find the compromise between weight and size acceptable for my needs. I can move easily between stills and videos with the touch of a single button. If I want to get fancy, then I can get GP-VPT1 shooting grip. This will allow me to point and shoot without worrying about any awkward handling positions. Sony’s site has a plethora of lenses, adapters, flashes, remote control, power options, and accessories listed for this camera. Many of these items are available on Best Buy. Sony’s site will tell you exactly what is compatible with this camera and the items part number. Better yet, I can put the camera on a tripod and remote view and shoot using Sony’s mobile app or desktop app.
One feature I liked is the Auto White Balance. Yeah, I know, auto white balance tends to be terrible for all cameras. The Alpha 6100, in my opinion, does a better job, at this price point, than most. Indoor
shots are still yellowish. Outdoor shots, however, are a different story. I took the camera on a hike along a snow-covered trail. I Left everything at full auto. The camera auto adjusted its settings for macro shots, portraits, and for different lighting conditions. The white balance was pretty good. Now, this could have been the position of the sun, the time of day, or having snow as the backdrop. Regardless, I am pleased with the results. I also took a few videos of a waterfall. The videos were clean, well balanced, and detailed. The sound was good for not having an external mic. Moving from still to video was super easy. There is a record button near where your right thumb will naturally rest while holding the camera. Press once to start recording. Press a second time to stop. It does not get any easier than that.
shots are still yellowish. Outdoor shots, however, are a different story. I took the camera on a hike along a snow-covered trail. I Left everything at full auto. The camera auto adjusted its settings for macro shots, portraits, and for different lighting conditions. The white balance was pretty good. Now, this could have been the position of the sun, the time of day, or having snow as the backdrop. Regardless, I am pleased with the results. I also took a few videos of a waterfall. The videos were clean, well balanced, and detailed. The sound was good for not having an external mic. Moving from still to video was super easy. There is a record button near where your right thumb will naturally rest while holding the camera. Press once to start recording. Press a second time to stop. It does not get any easier than that.
Auto mode has two modes: Intelligent Auto and Superior Auto. From Sony, “Intelligent Auto automatically identifies a scene’s characteristics and shoots a photo. Superior Auto beautifully shoots automatically while reducing blurring and noise.” As a test, I took two photos of my shed using each setting under natural lighting conditions. White balance threw a little grey into the shot but not much. You will want to consult with the online user’s guide for more details. I included the two shots with my review.
Another auto mode, SCN, gives you more control. This is an auto mode for all the camera’s major shooting modes such as Portrait, Sports Action, Macro, Landscape, and more. There are two ways to set the SCN’s shoot mode. First, you can take the long way around through the camera’s menu system. I found this method slow and clunky. The second way is via the Function button located above the D-pad. Press the button and then use the D-pad and built in scroll wheel to quickly chose your shoot mode.
The options here, as mentioned before, are enormous and much more than a simple Best Buy review can get into. I will say that the flexibility here is rich and appreciated for those of us who did not go to photography school. For those who did go to photography school then you will be happy to know that you can adjust any of the other modes on the camera to your heart’s content. For example, Program Auto, P on the dial, has eleven pages of options under the image setting and another 9 pages under the movie settings. Press the Function key and all the options directly related to your shot are available via a simple to navigate graphical interface. These include Drive Mode, Focus Mode, Focus Area, Exposure Comp., ISO, Metering Mode, Flash Mode, Flash Comp., White Balance, Creative Style, and Silent shooting.
The Alpha 6100 can also take panoramic photos, slow motion videos, and quick motion videos. I have no need, yet, to shoot slow motion or quick motion videos. Panorama, however, is pretty darn impressive. I took a panorama of my workspace, the camera must have taken 50 photos, and then stitched them together like it only took a single photo. The image was in focus and detailed. I did not like the default length of the panoramic shot. I wanted to stop early but the camera continued shooting until I had completed the pre-defined panoramic field. One issue I did run into with Panoramic is with anything moving in shot. For example, I took a Panoramic of a track and field facility. The people walking across the grounds during the shot had a double exposure affect. This may entirely be due to my lack of experience with panoramic photos, the camera’s software, or some setting I failed to turn on. Just be aware to take some sample shots of what you want to capture before you pull the trigger on the real shot.
The LCD screen is not a touch screen. This may seem strange in a world where cell phones have become the dominate photography tool. Sony delivers an excellent button layout to help navigate the screen. The buttons are all properly marked. The D-pad doubles as a scroll wheel. And the Scroll wheel has a selection button in the middle. There are also functions located to each compass point on the scroll wheel for easy access and navigation.
The scroll wheel is used to zoom through features, menu items, and options. You can quickly scroll through your images by rolling your thumb left or right along the scroll wheel’s track. You can also quickly zoom in, zoom out, and navigate an image that you want to take a closer look at after shooting. I thought it was a bit awkward when I first used it. After using it for a bit, I cannot image owning another camera without it. Home run for Sony!
Finally, the screen itself has multiple functions available. Pressing up on the D-pad switches between four screen layouts with differing levels of details including a preview of your image, shot features, information about your photo, and histograms. Pretty much whatever you want to know about your shot before pressing the shutter button is accessible.
The screen is attached to a mechanical arm that allows you to move the screen away from the camera body. This allows you multiple viewing angles while you shoot. The screen can also be flipped 180 degrees allowing for selfies. The Alpha 6100 automatically flips the LCD image when in selfie mode. Sony also added interactive features between the viewfinder and the view screen. There is a sensor in the eye piece that detects your eye, or something close to it, that, when triggered, automatically turns off the view screen and activates the view finder screen. All the same information is present. My old camera used to keep both on regardless of which one I was using. I always found this distracting. Thank you, Sony!
Sony made connecting your camera with your cell phone super easy. The camera will display a QR Code that your phone uses to establish a connection. Another QR Code is used to acquire the mobile app, Imaging Edge. You can control the camera from your phone, view photos, setup location information, check current news related to the app, review help files, and remote control the camera. Unfortunately, the app needs a major usability pass. For example, if I remotely capture photos then I cannot view any photos until I first shut down the app and restart the app. Some screens do not have a back button.
Another thing I cannot do from the app is set the camera’s photo function. I must spin the function wheel manually to get what I want. Then the options for that mode will be made available to me from the app. I would have preferred the ability to control all camera features and functions remotely. One word of caution. Turn the remote features off when you travel. Bluetooth is easily compromised. The good news is that there is an Airplane Mode under the Network settings in your camera’s menu. Turn this on when not using Wi-Fi or Bluetooth to protect yourself and your photos.
Another thing I cannot do from the app is set the camera’s photo function. I must spin the function wheel manually to get what I want. Then the options for that mode will be made available to me from the app. I would have preferred the ability to control all camera features and functions remotely. One word of caution. Turn the remote features off when you travel. Bluetooth is easily compromised. The good news is that there is an Airplane Mode under the Network settings in your camera’s menu. Turn this on when not using Wi-Fi or Bluetooth to protect yourself and your photos.
What I did not like:
The built-in flash is harsh. Period. I would avoid using it unless absolutely needed.
I would recommend this to a friend!
Mobile Submission: False
+6points
7out of 8found this review helpful.
Share this review:
ITJim's Questions
ITJim has not submitted any questions.

Bowers & Wilkins - B&W PI5 True Wireless Headphones with Adaptive Noise Cancellation, Bluetooth 5.0 with Qualcomm aptX - Charcoal
B&W PI5 true wire-free headphones are attractive, well-built, and they deliver a refined sound quality. Featuring Bluetooth 5.0 with Qualcomm aptX technology these earphones ensure reliable connectivity whether you are streaming from your smartphone, tablet or PC. Allows connection of up to two devices at the same time, however, only one device can be used to play or make a call at a time. Download the Bowers & Wilkins free headphone app, available for Apple and Android for further control of the sound and noise cancellation, right on your phone. The PI5 headphones feature the latest innovations in adaptive noise cancellation along with 4 built-in microphones that pick up ambient noise and cancel it with an equal, but opposite, audio signal and enhance the call quality. There are three levels of Adaptive Noise Cancellation ~ High, Low and Auto, that can be controlled either by the multi-functional button on the left earbud or via the app. Similarly, the touch-sensitive button on the right earbud allows you to enable voice assistance. The buttons also allows you to control playback and phone call functions with single (play/pause, answer call), double (skip forward, end call), or triple presses (skip backward). Another stand-out feature of these headphones is the intuitive detection sensors that put the earphones on standby or reconnect them depending upon whether they are removed or put back on. The PI5s come with a sturdy and attractive charging case for charging the earbuds when not in use. The case is equipped with two 350mAh rechargeable batteries. Each earbud has a rechargeable battery which provides up to 4 hours of wireless playback. Including the charging case, the PI5 can provide up to 12 hours of continuous playback.
Is there an App to set the equalizer?
App version 3.1.3 does not have EQ functions.
4 years, 11 months ago
by
Posted by:
ITJim

Alienware - m15 R4 15.6" FHD Gaming Laptop - Intel Core i7 - 16GB Memory - NVIDIA GeForce RTX 3070 - 512GB Solid State Drive - Dark Side of the Moon
With the 10th Gen Intel~ Core~ i7 processors enabling up to 8-cores and 16-threads of multi-threaded performance, the latest generation of Alienware m17 goes beyond its predecessor. Featuring the new NVIDIA GeForce RTX 3070 with Ultimate performance for gamers and creators. Realistic ray-traced graphics and AI-accelerated DLSS. Our latest thermal technology, Advanced Alienware Cryo-Tech, is an engineering approach where an Alienware system~s gaming performance is never compromised by means of electrical and mechanical methods while maintaining system stability during the highest performance states.
Is this a per-key RGB keyboard or a 4 zone?
Alienware - m15 R4 15.6" FHD Gaming Laptop - Intel Core i7 - 16GB Memory - NVIDIA GeForce RTX 3070 - 512GB Solid State Drive - Dark Side of the Moon
With the 10th Gen Intel~ Core~ i7 processors enabling up to 8-cores and 16-threads of multi-threaded performance, the latest generation of Alienware m17 goes beyond its predecessor. Featuring the new NVIDIA GeForce RTX 3070 with Ultimate performance for gamers and creators. Realistic ray-traced graphics and AI-accelerated DLSS. Our latest thermal technology, Advanced Alienware Cryo-Tech, is an engineering approach where an Alienware system~s gaming performance is never compromised by means of electrical and mechanical methods while maintaining system stability during the highest performance states.
Is the display having G-Sync?
For the 300Hz screen:
From Alienware's site:
"15.6" FHD (1920 x 1080) 300Hz 3ms 300-nits 100% sRGB color gamut"
https://www.dell.com/en-us/shop/cty/pdp/spd/alienware-m15-r4-laptop?~ck=mn
I do not see any indication of G-Sync on/off in the nVidia driver settings.
From Alienware's site:
"15.6" FHD (1920 x 1080) 300Hz 3ms 300-nits 100% sRGB color gamut"
https://www.dell.com/en-us/shop/cty/pdp/spd/alienware-m15-r4-laptop?~ck=mn
I do not see any indication of G-Sync on/off in the nVidia driver settings.
5 years, 1 month ago
by
Posted by:
ITJim
Alienware - m15 R4 15.6" FHD Gaming Laptop - Intel Core i7 - 16GB Memory - NVIDIA GeForce RTX 3070 - 512GB Solid State Drive - Dark Side of the Moon
With the 10th Gen Intel~ Core~ i7 processors enabling up to 8-cores and 16-threads of multi-threaded performance, the latest generation of Alienware m17 goes beyond its predecessor. Featuring the new NVIDIA GeForce RTX 3070 with Ultimate performance for gamers and creators. Realistic ray-traced graphics and AI-accelerated DLSS. Our latest thermal technology, Advanced Alienware Cryo-Tech, is an engineering approach where an Alienware system~s gaming performance is never compromised by means of electrical and mechanical methods while maintaining system stability during the highest performance states.
Is the ram upgradable?
From Alienware's user's guide:
Onboard system memory
NOTE: The memory is integrated to the system board and
cannot be upgraded after purchase.
You can find the user's guide on Alienware's support site.
Onboard system memory
NOTE: The memory is integrated to the system board and
cannot be upgraded after purchase.
You can find the user's guide on Alienware's support site.
5 years, 1 month ago
by
Posted by:
ITJim
HP OMEN - 15.6" Gaming Laptop - AMD Ryzen 7 - 16GB Memory - NVIDIA GeForce GTX 1660 Ti - 1TB SSD - Mica Silver
HP OMEN Gaming Laptop: A thin and light premium gaming experience in an elevated design so you can play everyday. With an AMD Ryzen 7 processor, NVIDIA GeForce GTX 1660 Ti graphics and cooled by OmenTempest Cooling, it makes you think how it all fits into such a tiny little package."
Can this output 144Hz over hdmi?
Yes it can. I am using the HP Omen X 25f over HDMI as an external monitor.
Just be sure to use a HDMI 2.0 or newer cable.
Just be sure to use a HDMI 2.0 or newer cable.
Images for this Answer
(click to see full-size image)

5 years, 10 months ago
by
Posted by:
ITJim
HP OMEN - 15.6" Gaming Laptop - AMD Ryzen 7 - 16GB Memory - NVIDIA GeForce GTX 1660 Ti - 1TB SSD - Mica Silver
HP OMEN Gaming Laptop: A thin and light premium gaming experience in an elevated design so you can play everyday. With an AMD Ryzen 7 processor, NVIDIA GeForce GTX 1660 Ti graphics and cooled by OmenTempest Cooling, it makes you think how it all fits into such a tiny little package."
Does it have Gsync?
This is not a Gsync monitor. At least I cannot find any information online or in the system drivers that tell me otherwise.
You can connect the laptop to a Gsync monitor and take advantage of all the features of Gsync with that monitor.
You can connect the laptop to a Gsync monitor and take advantage of all the features of Gsync with that monitor.
5 years, 10 months ago
by
Posted by:
ITJim

HP OMEN - Gaming Desktop - Intel Core i7-9700 - 16GB Memory - NVIDIA GeForce GTX 1660 Ti - 1TB Hard Drive + 256GB SSD - Shadow Black
HP OMEN Obelisk by HP Desktop: Play graphically intense games with this HP OMEN Obelisk desktop computer. You can easily store large amounts of media and other data on the 1TB hard drive and install games and programs on the 256GB SSD for fast access. This HP OMEN Obelisk desktop computer has 16GB of memory for multitasking effectively, and the Intel Core i7-9700 processor handles resource-intense programs efficiently.
How many cores are there in this pc
8 physical cores. This processor does not support 16-way multitasking.
6 years, 10 months ago
by
Posted by:
ITJim
HP OMEN - Gaming Desktop - Intel Core i7-9700 - 16GB Memory - NVIDIA GeForce GTX 1660 Ti - 1TB Hard Drive + 256GB SSD - Shadow Black
HP OMEN Obelisk by HP Desktop: Play graphically intense games with this HP OMEN Obelisk desktop computer. You can easily store large amounts of media and other data on the 1TB hard drive and install games and programs on the 256GB SSD for fast access. This HP OMEN Obelisk desktop computer has 16GB of memory for multitasking effectively, and the Intel Core i7-9700 processor handles resource-intense programs efficiently.
Is there a gtx 1660ti installed or not? What size pwr supply?
It says in the name that it is a GTX 1660ti. I can confirm that the video card is exactly as described. It is the 6gb version of the card. The Power Supply is 500Watts.
6 years, 10 months ago
by
Posted by:
ITJim
HP OMEN - Gaming Desktop - Intel Core i7-9700 - 16GB Memory - NVIDIA GeForce GTX 1660 Ti - 1TB Hard Drive + 256GB SSD - Shadow Black
HP OMEN Obelisk by HP Desktop: Play graphically intense games with this HP OMEN Obelisk desktop computer. You can easily store large amounts of media and other data on the 1TB hard drive and install games and programs on the 256GB SSD for fast access. This HP OMEN Obelisk desktop computer has 16GB of memory for multitasking effectively, and the Intel Core i7-9700 processor handles resource-intense programs efficiently.
Does this computer have a memory card reader built in?
HP OMEN - Gaming Desktop - Intel Core i7-9700 - 16GB Memory - NVIDIA GeForce GTX 1660 Ti - 1TB Hard Drive + 256GB SSD - Shadow Black
HP OMEN Obelisk by HP Desktop: Play graphically intense games with this HP OMEN Obelisk desktop computer. You can easily store large amounts of media and other data on the 1TB hard drive and install games and programs on the 256GB SSD for fast access. This HP OMEN Obelisk desktop computer has 16GB of memory for multitasking effectively, and the Intel Core i7-9700 processor handles resource-intense programs efficiently.
What is the operating system for the pc, and does it come with a virus protection app
Windows 10 standard. It ships with 30 days of McAfee.
6 years, 10 months ago
by
Posted by:
ITJim