CeCe
CeCe's Stats
Reviews
- Review Count0
- Helpfulness Votes0
- First ReviewNone
- Last ReviewNone
- Featured Reviews0
- Average Rating0
Reviews Comments
- Review Comment Count0
- Helpfulness Votes0
- First Review CommentNone
- Last Review CommentNone
- Featured Review Comments0
Questions
- Question Count0
- Helpfulness Votes0
- First QuestionNone
- Last QuestionNone
- Featured Questions0
- Answer Count48
- Helpfulness Votes36
- First AnswerJuly 2, 2014
- Last AnswerSeptember 24, 2014
- Featured Answers0
- Best Answers5
CeCe's Reviews
CeCe has not submitted any reviews.
CeCe's Questions
CeCe has not submitted any questions.

HP - LaserJet Pro P1102w Wireless Black-and-White Printer - Black
HP LaserJet Pro P1102w Printer: You can efficiently complete large jobs using this printer, which lets you print on envelopes, labels, cardstock, transparencies and postcards to suit your business, personal or crafting needs. Just connect to your network via the printer's built-in Wi-Fi to get started.
how do you make it an air print printer?
Hello, I would like to be able to answer this question for you. There are a few steps that you will need to take to set this model HP Wireless printer up for AirPrint.
AirPrint on the HP Laerjet P1102w requires connection to the wireless network and a DHCP server as prerequisites. To join the wireless network you have to install the printer onto a Windows computer via USB and use the installed "HP Wireless Configuration" utility.
A. First flash the firmware on the printer:
1. Turn the printer off
2. Holding down the "wifi" and "cancel" buttons while turning the printer on
3. Keep the "wifi" and "cancel" buttons held down for 15 secs then release
This will rest the IP address of the printer
B. Next, run the "HP Wireless Configuration" utility from the USB attached Windows workstation. This software is located on the start bar under programs --> HP --> HP Laserjet Professional P1100 Series --> Wireless Configuration.
1. Click "next" until you get to the "Wireless Discover Method" screen
2. Choose the "Advanced" radio button and then click "next"
3. Choose the wireless SSID that you would like to connect the printer to then click "next"
** Note: The wireless SSID can not contain spaces in the name as this will cause the connection to fail. These is no solution to this except to change the name of the SSID to a single word. This is a bug in the current version of the "HP Wireless Configuration" utility.
4. When prompted choose the encryption method for the wireless network and enter the wireless password then click "next".
This will install a special driver for the wireless connection to the printer, attach the printer to the wireless network as a network printer using a DHCP address and print a test page over the wireless network.
C. Once the printer has joined the wireless network the IP address can be obtained by holding down the cancel button until a configuration page is output from the printer.
D. From a Windows workstation attached to the same wireless network browse to the web interface for the wireless printer and change the configurations to suite your needs.
1. From a web browser go to http://[IP Address of Printer from Configuration Page]
2. Click on the "Networking" tab in the web interface.
3. Click on the "IPv4 Configuration" link
4. Set the Host Name and IP Address information as you desire
5. Next, click on the "Bonjour" link
6. Set the "Bonjour Name" for the Printer name.
** Note: The Bonjour name is the name that iOS users will see when selecting the printer from their devices.
7. To print from the Windows workstation wirelessly, change the TCP port for the wireless printer driver to the IP address currently set for the wireless printer. Or delete this drive if you plan to always printing via USB from the Windows workstation.
9 years, 10 months ago
by
Posted by:
CeCe
from
Best Buy Humble
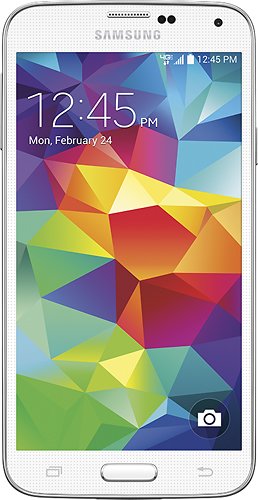
Samsung - Certified Pre-Owned Galaxy S5 4G LTE with 16GB Memory Cell Phone (Verizon)
Move with confidence with this pre-owned, certified Samsung Galaxy S5 cell phone with fingerprint scan technology and a heart rate monitor. The 5.1-inch full HD Super AMOLED touch screen display automatically adjusts to ambient light for ease of viewing. The camera on this Samsung Galaxy S5 cell phone is a powerful 16MP with autofocus and selective focus features.>Each device comes like new, with all the original packaging and accessoriesAll adjustments and repairs are made at a Samsung certified facility, backet by our 12-month limited warranty.
Does Verizon charge activation & upgrade fees when the phone is purchased from Best Buy?
Yes, when purchasing a contract phone through Best Buy, you will still need to pay the activation and/or upgrade fees that the provider has set.
9 years, 10 months ago
by
Posted by:
CeCe
from
Best Buy Humble
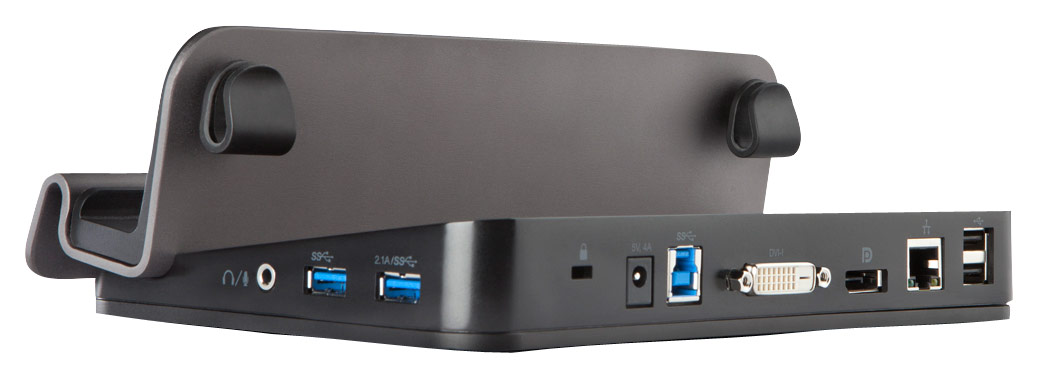
Belkin - Dual-Video Dock for Select Tablets - Gray
Compatible with select tablets with a Windows 8 operating system and a USB 3.0 port, this Belkin B2B043QTTC00 dock features DVI-I and DisplayPort 1.1 inputs for easy connection to up to 2 displays. The Ethernet port simplifies wired network connection.
Does this work with HP Omni 10 tablet?
The Belkin-Dual-Video Dock for Select Tablets should work with the HP Omni 10 Tablet as the tablet has a Windows 8.1 Operating System and an Intel Atom processor which are both needed for the Video Dock to work. Here, is the link for both showing what is needed for the Belkin-Dual-Video Dock for Select Tablets to work and what the HP Omni 10 Tablet has.
Belkin-Dual-Video Dock - http://www.bestbuy.com/site/belkin-...
HP Omni 10 Tablet - http://www.bestbuy.com/site/hp-omni...
Belkin-Dual-Video Dock - http://www.bestbuy.com/site/belkin-...
HP Omni 10 Tablet - http://www.bestbuy.com/site/hp-omni...
9 years, 10 months ago
by
Posted by:
CeCe
from
Best Buy Humble
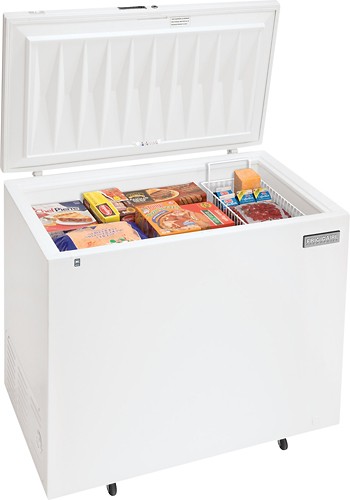
Frigidaire - Commercial 7.2 Cu. Ft. Chest Freezer - White
Stock up on frozen favorites with this chest freezer that features a 7.2 cu. ft. capacity to accommodate your storage needs. A wire basket with dividers helps keep food organized.
Does this run off 110 or 220 electrical current?
This particular model Frigidaire-Commercial 7.2 Cu. Ft. Chest Freezer runs on 120V.
9 years, 10 months ago
by
Posted by:
CeCe
from
Best Buy Humble
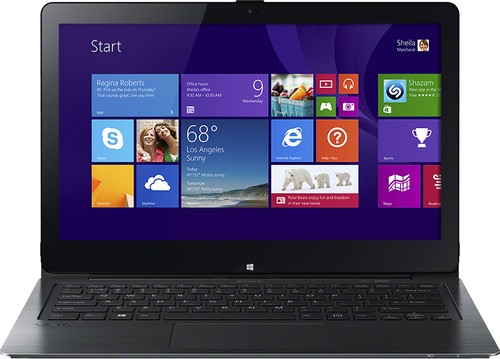
Sony - Geek Squad Certified Refurbished VAIO Flip 13A 2-in-1 13.3" Touch-Screen Laptop - 8GB Memory - Black
Geek Squad® Certified Refurbished products are thoroughly, painstakingly and lovingly tested, so you can be sure that your device will work right, right away. Learn more about Geek Squad® Certified Refurbished products.Sony VAIO Flip 13A GCRF- SVF13N13CXB Convertible 2-in-1 Laptop: View and edit your pictures and videos with clarity on the stunning Full HD multitouch screen. Then flip it around to use this versatile laptop as a tablet for browsing the Internet and playing online games.Learn more about the New Windows ›
Return policy on refurbished products
Hi, what is the return policy for Geek Squad® Certified Refurbished products? Can a product be returned to the store if needed
Refurbished items can be returned to the store if necessary. You have 15 days from the date of purchase or receipt to return for a full refund.
9 years, 10 months ago
by
Posted by:
CeCe
from
Best Buy Humble
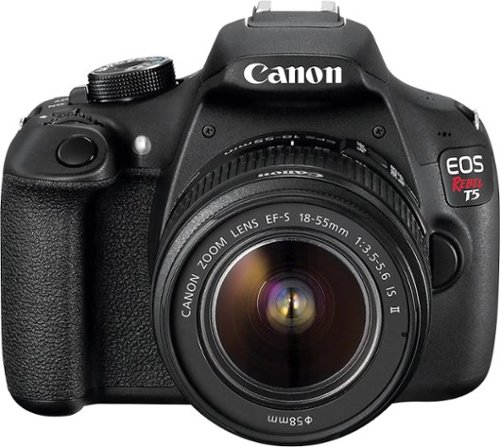
Canon - EOS Rebel T5 DSLR Camera with 18-55mm IS Lens - Black
Canon EOS Rebel T5 DSLR Camera with 18–55mm IS lens: Turn important moments into professional-quality photos with this DSLR camera, which comes with a 18–55mm f/3.5-5.6 IS II lens to help you get started. The camera intuitively detects shooting conditions using Scene Intelligent Auto mode, so you can capture events as they unfold, even at night.Memory card sold separately.
Battery Price Match
Hello YouName,
Today im trying to buy a extra battery for my canon Eos T5 and i see that it is Price: $34.95 & FREE Shipping on amazon my cousin bought the same thing from you for 30$ can you give me a price match?
Link for amazon:
http://www.amazon.com/Canon-5108B002-Battery-Pack-LP-E10/dp/B004MSMCSO
Today im trying to buy a extra battery for my canon Eos T5 and i see that it is Price: $34.95 & FREE Shipping on amazon my cousin bought the same thing from you for 30$ can you give me a price match?
Link for amazon:
http://www.amazon.com/Canon-5108B002-Battery-Pack-LP-E10/dp/B004MSMCSO
Best Buy will price match with Amazon.com, however, the free shipping will only apply to items over the amount of $35. Price matching this item with Amazon will bring the price down below $35 and shipping fees will be applied.
9 years, 10 months ago
by
Posted by:
CeCe
from
Humble

Sony - Geek Squad Certified Refurbished 11.6" 2-in-1 Touch-Screen Laptop Intel Pentium 4GB Memory 128GB SSD - Black
Geek Squad® Certified Refurbished products are thoroughly, painstakingly and lovingly tested, so you can be sure that your device will work right, right away. Learn more about Geek Squad® Certified Refurbished products.Sony VAIO Tap 11 GCRF- SVT11213CXB Convertible 2-in-1 Laptop: Get more options at your fingertips with this Sony VAIO convertible laptop. The magnetic, detachable keyboard allows you to use your device in tablet or PC mode, and a high-definition touch screen lets you easily browse the Web, watch videos and flip through photos on a stunning display.Learn more about the New Windows ›
keyboard
Does keyboard have number pad
This model, Sony-Geek Squad Certified Refurbished VAIO Tap 11 11.6" 2in1 Touch-Screen Laptop does have an integrated number pad.
9 years, 10 months ago
by
Posted by:
CeCe
from
Humble

Asus - Refurbished Nexus 7 7 inch Tablet with 32GB Memory - Black
View your favorite media in crystal-clear detail on this Asus Nexus 7 90OK-S0MI11040U tablet's 7" multitouch display, which features WXGA (1280 x 800) resolution to showcase rich, vivid visuals. Built-in Wi-Fi enables easy on-the-go Web access.This product has been refurbished. Learn more.
Is this the 2012 or 2013 version Nexus 7?
The Asus-Refurbished Nexus 7 7" Tablet 32GB was released in 2012.
9 years, 10 months ago
by
Posted by:
CeCe
from
Humble