BobinVA's stats
- Review count158
- Helpfulness votes452
- First reviewDecember 19, 2014
- Last reviewJune 10, 2026
- Featured reviews0
- Average rating4.1
Reviews comments
- Review comment count0
- Helpfulness votes0
- First review commentNone
- Last review commentNone
- Featured review comments0
Questions
- Question count0
- Helpfulness votes0
- First questionNone
- Last questionNone
- Featured questions0
- Answer count28
- Helpfulness votes23
- First answerAugust 12, 2016
- Last answerJanuary 22, 2022
- Featured answers0
- Best answers2
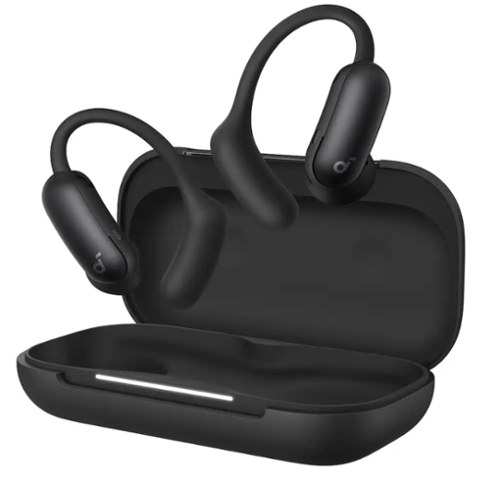
Why choose between open-ear comfort and powerful noise cancellation when you can have both? The Soundcore by Anker AeroFit 2 Pro wireless earbuds feature an innovative dual-form design that transforms with a simple ear hook adjustment, giving you open-ear freedom during workouts and commutes, then switching to active noise cancellation mode when you need deep focus or privacy in noisy environments. This revolutionary versatility means one device adapts seamlessly to every part of your day ~ morning runs, office meetings, evening wind-downs ~ without the discomfort or compromise. The open-ear form keeps your ears breathable and aware of your surroundings while skin-friendly liquid silicone hooks provide a soft, pressure-free fit that feels like nothing at all, even during extended wear. When it's time to block out the chaos, flip to ANC mode and experience effective noise reduction that creates your personal listening space on busy streets or crowded public transit. The A3875Z11 model doesn't sacrifice sound quality for flexibility: immerse yourself in studio-grade audio powered by 11.8mm composite drivers, Hi-Res certification, and LDAC technology, enhanced by dynamic head tracking that delivers a vivid, theater-like spatial experience that moves with you. Stay connected with confidence thanks to 4 microphones and AI-boosted call technology that ensures your voice cuts through background noise with precision and clarity. Engineered to fit approximately 90% of ear shapes, the AeroFit 2 Pro dual-form wireless earbuds come with a 30-day money-back guarantee, so you can experience this game-changing design risk-free and discover how one device can truly do it all.
Customer Rating

4
An exciting new entry in the open-ear market
on June 10, 2026
Posted by: BobinVA
Open-ear earbuds have become my favorite style of earbuds, and I use them all throughout the day every day. Recent models strike just the right balance between sound quality, comfort, and situational awareness. I have models that approach the open-ear concept in different ways, such as bone conduction or “air conduction”, but they all share the same problem: leaving the ear canals open will allow ambient sound to drown out what you’re listening to in certain situations.
Traditional open-ear devices place their drivers (whether bone conduction or tiny speakers) away from the ear canal. This makes it impossible for manufacturers to deploy any kind of active noise cancellation (ANC) in an open-ear design. Not anymore. Anker’s new Aerofit 2 Pro dual-form earbuds offer both open-ear and ANC forms to (hopefully) be the best of both worlds.
Comfort and fit: Anker touts these as being able to fit over 90% of the population with an ear diameter over 5/8”. I didn’t measure mine, but they were quite comfortable. The AeroFit 2 Pro feature an ear hook with the battery located behind the ear. They’re covered in a soft silicone, and the result is a very comfortable earbud. For active usage, such as running, the hook-style earbuds are very secure, and these were no exception. Compared to other hook-style earbuds that I have, these were actually more comfortable. That’s because of the design of the part containing the drivers—there are no hard edges to rub up against any part of the ear. With other models, I always ended up with a sore spot where the driver unit touched my ear, but that didn’t happen with the Aerofit 2 Pro. If earbuds aren’t comfortable, you won’t wear them—these are very comfortable.
Sound quality: this is where Anker is trying to do something new. Open-ear earbuds are my favorite because I love staying connected to the world around me, but they are lacking when I want to immerse myself in my music. The Aerofit 2 Pro attempt to bridge that gap, allowing you to stay aware when you need to, but to be able to tune out the world when you want to.
Anker has come up with an innovative design for the Aerofit 2 Pro. They feature a 5-position switch that allows you to choose 2 levels of open-ear listening and 2 levels of ANC listening, with a neutral position that maintains whatever mode you’re using, to prevent a sudden, jarring transition. In open-ear mode, the Aerofit 2 Pro are comparable to other “air conduction” earbuds (they are not bone conduction). The sound is clean, but just like any open-ear earbuds, you won’t be wowed by the bass response. Moving to either of the ANC modes turns on ANC, and the difference is notable. As you might expect, having them in the ear canal produces a fuller, richer, more bass-heavy sound. Does the ANC compare to traditional in-ear monitors with ANC? No, not really, since they don’t include ear gels that can seal inside the ear canal. The shape of these is similar to those popular white earbuds, so they’re not designed to push deeply into the ear canal. I think this design is more comfortable for long-term wearing, but it does result in allowing more ambient sound to enter your ear than you might like. So, while ANC mode definitely shuts out more external sound than open-ear mode, don’t expect silence. Anker is pretty upfront about this, but it’s important to know that going in. ANC mode allows you to listen in noisier environments, but they will not be shutting out the outside world.
Miscellaneous: Anker made a wise choice to include physical buttons on the Aerofit 2 Pro. Why? Because these are designed to be touched often, switching between modes as often as necessary, and that would likely result in lots of unwanted button presses if the buttons were touch-sensitive. The buttons support single, double and triple-presses with functions that are user-assignable. It gives really good control using only the buttons, including volume changes, which is rare.
Anker’s app provides lots of options. There are multiple EQ options, including the ability to set your own custom EQ, which was my favorite. There’s also an EQ option that boosts volume, and this is useful for audiobooks and podcasts.
Verdict: In the open-ear market, Anker has introduced an exciting new option. Compared to similar offerings from the market leader, the Aerofit 2 Pro not only held their own, but excelled in comfort and were slightly better in sound quality as well. The ability to dynamically get more isolated sound is a feature found nowhere else. You’ll need to understand what you’re getting, however: a really good set of open-ear earbuds with some ANC capability. The ANC definitely helps, but the design still allows ambient sound to enter the ear canal, making them less than fully isolating.
Most earbuds in this category have gotten expensive, and the same applies here. Anker has already offered sales, so look for a good sale, and you’ll be very happy. I think I’m going to replace my previous earhook open-ear earbuds with these.
I would recommend this to a friend!
Share this review:
0points
0of 0voted this as helpful.
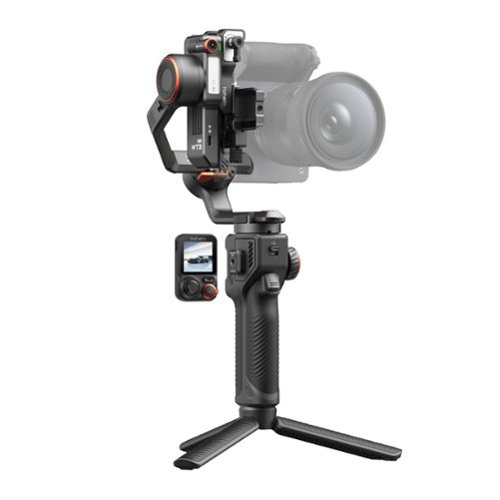
Hohem iSteady MT3 Pro is the most advanced AI camera stabilizer. It tracks humans, pets, vehicles and any subject you want, and it comes with a detachable remote for more flexible control. From camera mounting, balancing, to switching to vertical shooting, everything is quick and easy. The kit version includes the Spot Mini Motor and twist handle for professional, efficient filming.
Customer Rating
4
A serious gimbal for serious cameras
on May 12, 2026
Posted by: BobinVA
I love my camera, a discontinued long-zoom bridge camera with a maximum optical focal length of 600mm, but trying to get smooth hand-held motion videos was next to impossible. No matter how hard I tried, my videos always had that “home video” look that typifies most family videos, and those are hard to watch.
The Hohem MT3 Pro (and its sibling, the MT3) seek to rectify that situation. The Pro version handles payloads of up to 5.5 pounds, more than enough for my DSLR. Here’s my experience with this gimbal…
Unboxing is pretty impressive. The gimbal comes in a classy black box with plenty of custom foam padding. The gimbal itself is made from high-quality black aluminum with orange accents, giving it a high-end look. A screw-in tripod is included to allow you to set the gimbal on a flat surface if you don’t want to hold it continuously. There’s a quick-start guide included, but if you want a detailed user guide, Hohem supplies those via its web site and/or app. The app adds a number of features, but thankfully it isn’t required to get the full use out of the gimbal.
This was my first gimbal, so I wasn’t sure what to expect. The first thing you need to do is to attach your camera and balance the gimbal. The MT3 Pro utilizes an Arca-swiss mounting system, which is the same as what is used on many tripods and monopods, allowing you to quickly switch between those and the MT3. Although my camera certainly isn’t the heaviest (about 2.5 lbs), it’s still considerably weighty, requiring the mounting plate to be securely attached. The plate uses a hand-tightened screw, and it had to be as tight as I could get it or the camera would turn while in use. I mainly shoot horizontally, so that wasn’t a big deal, but when I wanted to go vertical, I had to make sure it was tight. I’ve seen other online commenting about this same thing, so I’m not sure if it’s my camera’s mounting screw or not. A clip-style lock like the ones used throughout the gimbal would have been better.
Having never balanced a gimbal before, I wasn’t sure what I was doing. The Hohem video walked me through it, but it was confusing to understand what I needed to do to balance the tilt axis. It wasn’t until I found another video online that I was able to understand what I needed to do. Each axis can be independently locked, but they must be unlocked when you turn the gimbal on. While the metal is coated in Teflon, I still found it difficult to move the mount where the camera attached. That one also includes a fine-tuning knob on the lower quick-release plate. This makes it very easy to do small adjustments, and I wish they had incorporated something like this for the other axes. Eventually I got the hang of it and the camera remained stationary, meaning I was ready to turn it on. Turning on the power actives the motors, which is where the magic happens. It’s important to calibrate the gimbal before using it, and this can be done using the small screen on the included remote.
Speaking of the remote, the MT3 Pro includes a detachable remote control, which can be used to control the gimbal when you’re not holding it. This is a pretty awesome part of the package, as it allows you to be in your own photos/videos without having to ask someone else to hold your camera. It features a joystick, shutter button, and zoom lever. The joystick allows you to control the gimbal itself, which is great for getting in the shot yourself and getting it just right. For compatible cameras, you can use the zoom lever to zoom in and out, then press the shutter. The remote allows you modify a large number of settings and choose whichever tracking mode you need. Turning on AI shows a live preview of (almost) what the camera sees. Within the live preview, simply draw a box around the person or animal you want to track, press the trigger button, and the gimbal will keep your camera fixed on that object. This works remarkably well.
Using the MT3 Pro is like peeling an onion. At the most basic level, it’s simple: it keeps the camera smooth and steady while you follow a subject or move around a subject, cancelling out the shakiness that you’d normally get with hand-held shooting. There’s so much more to this gimbal, but really mastering it will take time and practice. It has a number of hidden features such as the ability to create a smooth spiral shot, the kind of thing you won’t need much, but when you do, you’ll be glad to have this gimbal. The MT3 Pro also includes a fill light that can vary its brightness as well as its color output. This comes in handy when you’re shooting in low light, especially since adding a light on the camera itself will unbalance the camera, causing you to take time to rebalance. There are a number of features that can be accessed by pressing buttons, either on the gimbal or the remote, and while this is convenient, it’s not easy to remember what to do when you need it, if you don’t do it often.
Using the MT3 Pro is like peeling an onion. At the most basic level, it’s simple: it keeps the camera smooth and steady while you follow a subject or move around a subject, cancelling out the shakiness that you’d normally get with hand-held shooting. There’s so much more to this gimbal, but really mastering it will take time and practice. It has a number of hidden features such as the ability to create a smooth spiral shot, the kind of thing you won’t need much, but when you do, you’ll be glad to have this gimbal. The MT3 Pro also includes a fill light that can vary its brightness as well as its color output. This comes in handy when you’re shooting in low light, especially since adding a light on the camera itself will unbalance the camera, causing you to take time to rebalance. There are a number of features that can be accessed by pressing buttons, either on the gimbal or the remote, and while this is convenient, it’s not easy to remember what to do when you need it, if you don’t do it often.
I used the MT3 Pro gimbal with 2 different cameras and my phone. The phone grip is easy to use, but it does work better when the phone doesn’t have a case on it. The gimbal handled my DSLR (as mentioned above), as well as a mirrorless camera. Switching between them was easy, and only required a rebalancing/calibration, which gets easier the more you do it. I did find that using it with my heavier camera could have benefited from the additional handle that is available in pro kit, or by itself. I did not get the pro kit, but I’m going to buy the handle to make it easier to handle the additional weight and to do things like the “briefcase shot”.
One complaint I have is that sometimes the gimbal will beep but not show any error messages. I had this happen a few times, and if it keeps beeping, it will eventually power itself down and turn off. I think this can happen when it’s out of balance and the motors are working too hard, but I’m not sure. I wish that it would display warning messages to tell me what’s wrong, but I never saw anything like that.
Though I’m just a beginner in the world of gimbals, I’m excited about the new possibilities this will open up for me. Fantastic build quality, professional looks and lots of features make this the one to beat. With a capacity of up to 5.5 pounds, it’ll likely handle your camera. If you are only going to shoot with your phone, you probably don’t need this one and can save some money on one of Hohem’s other models targeting phones. I haven’t tried any competitors, but I can’t imagine a more full-featured gimbal in this price range.
I would recommend this to a friend!
Share this review:
0points
0of 0voted this as helpful.

Upgrade your mobile gaming setup with the GameSir G8 Plus MFi Type-C Mobile Controller ~ the official Apple-certified controller built to deliver true console-level performance on your iPhone, iPad, and Android devices. Designed for gamers who demand precision, speed, and comfort, this controller replaces unreliable Bluetooth connections with a stable, low-latency Type-C wired link, giving you instant response time in every match. Featuring Hall Effect joysticks and analog triggers, the G8 Plus offers drift-free accuracy and long-lasting durability, making it perfect for competitive shooters, racing titles, RPGs, and cloud-gaming platforms. Two remappable back buttons let you trigger advanced moves faster, while the ergonomic, textured grip ensures all-day comfort during intense gaming sessions. The adjustable stretch design securely fits most smartphones and compact tablets (125~215 mm), and pass-through charging keeps your device powered while you play ~ so the action never has to stop. With customizable faceplates and interchangeable thumbsticks, you can tailor the controller to your personal style and gameplay preferences. If you~re tired of touchscreen controls and want a premium, console-style experience on mobile, the GameSir G8 Plus MFi is the perfect upgrade.
Customer Rating
4
Everything I wanted in a mobile controller
on May 3, 2026
Posted by: BobinVA
My review will come from a different perspective than you may find elsewhere—I’m a fairly casual gamer who is a first-time controller user. I don’t have the perspective of a long-time gamer evaluating this controller in comparison to many others, so I’ll share my “newbie” views of getting up to speed with this controller. If you’re shopping for a controller for the first time, I hope this will be helpful to you.
As I’ve gotten more into gaming, especially arcade-style games on my phone, I’ve increasingly been thinking that a controller would make the experience much better. The market for phone controllers seems to be growing, so there are lots of choices, but too many of them require an ongoing subscription. Perhaps that makes sense if you want to be on the cutting edge, getting the latest features as soon as they’re available, but for me that’s a show-stopper.
Since this is my first controller, I wasn’t really sure what to expect. I thought it might be fairly cheap-feeling, but I was pleasantly surprised to find that not to be the case at all. The Gamesir G8+ MFi is a solid controller that feels great and is packed with features.
Physical options: the controller is ready to go out of the box, but there are a number of adjustments available if needed. This thing is very customizable. The 4 main buttons attach magnetically, allowing you to change their configuration to mimic the Xbox or PlayStation layout. Three extra joysticks are included, so you can use whatever you prefer. They don’t change the way the joysticks function, but they feature different surface textures and sizes, which is nice. You can also swap out the rubber bumpers that grip the phone in the case, to accommodate phones and cases of different thicknesses. Even the faceplates attach magnetically, giving the option to purchase replacements in different colors. Lastly, there’s a panel in the “floor” of the controller (under the phone) that can be removed to provide a little more space for the camera bump.
Getting started: An important thing to note about this controller is that it is a USB-C controller, not Bluetooth. It features an innovative movable USB-C connector, so you can move the connector to the proper angle to connect to the phone. Once that’s done, expand it to fit around the phone. The Gamesir logo button lights up to indicate a successful connection. It illuminates in white for iPhones, and blue for Android phones (I tested both). I do wish the controller did a better job of accommodating thicker phones/cases. I have a phone grip attached to my case that is not any thicker than the camera bump, but it is enough to prevent the left side of the phone to line up with the silicone pad on the left side. Taking the case off corrects this, but I wish I didn’t have to do that. It plays just fine with the case on, but it doesn’t feel as secure.
Gameplay: As I said above, my experience with controllers is limited, but I was pretty pleased with the G8+. It offers both left and right joysticks and a D-pad, depending on what you prefer and what your game will support, which is pretty standard. I found all the controls to be very responsive, but just like a new pair of shoes doesn’t make me faster, a good controller didn’t make me a better gamer! The controller worked well with sports games, city-builders (yep, even those), and classic arcade games, letting me explore Apple Arcade more deeply.
Versatility: The G8+ is designed to be used with a number of different devices: phones, tablets and even your PC. Connecting to a PC is accomplished via an additional USB-C connector on the bottom of the controller. This connector also provides pass-through power to your phone, meaning you never have to stop playing to recharge your phone.
Connecting to a tablet seems awkward, but it actually works. Other reviews have dinged the G8+ because of limitations on how wide it can be expanded, but this is mistaken. The included documentation doesn’t mention this, but the controller can actually be separated enough to accommodate a tablet. To do this, pull it to its widest point, then bend it slightly while pulling, and it will separate, revealing a set of 5 springs. Doing this makes you think you’re going to break it, but it’s tough enough to take it. Sure, you’ll have a set of exposed springs behind your tablet, but I think there may be covers available.
The G8+ does support rumble, but not when used with an iPhone. That’s because MFi does not support rumble, but hopefully Apple will allow this in future update to the spec.
Gamesir app: Gamesir provides an app, which is necessary for things like firmware updates. Mine immediately found a firmware update, but it took a few tries to apply it. A number of settings can only be tweaked in the app, so it’s definitely necessary. I’ve seen people say the app didn’t work for them, but I had no trouble with it, and used it to tweak things like joystick dead zones and enabling the hair triggers.
I’m very happy with the G8+, and I’m confident it will help me to enjoy playing mobile games much more than I would have otherwise. It comes at a reasonable price, does not require a subscription, doesn’t need batteries and is very well built. This is a great addition to a crowded market, and it deserves your consideration. For me, it’s a keeper!
I would recommend this to a friend!

Share this review:
0points
0of 0voted this as helpful.
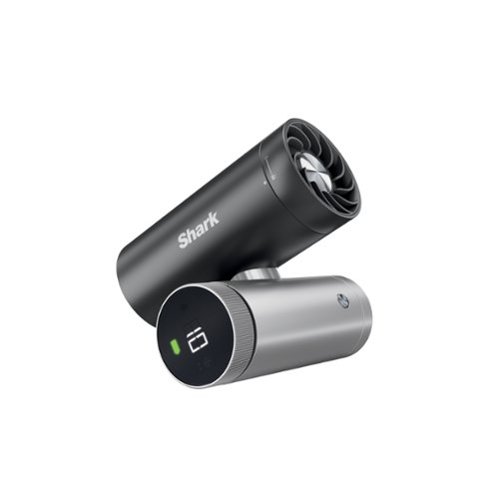
Meet Shark ChillPill, the only 3-in-1 fan, mist, and InstaChill personal cooling system. ChillPill delivers 3 customizable ways to powerfully cool indoors and outdoors. The high-speed fan delivers airflow up to 25 ft per second, while the dry-touch evaporative misting attachment provides an instant refresh. Shark~s revolutionary InstaChill Cooling Plate chills in seconds to drop your skin temperature by up to 16~F on contact.
Customer Rating
4
Powerful cooling in a small, personal device
on April 27, 2026
Posted by: BobinVA
The Shark Chill Pill enters a personal fan market that is crowded by cheap, plastic fans powered by a couple of AA batteries and featuring hi and low speeds, if you’re lucky. The Chill Pill features an innovative design, rechargeable battery and 3 distinctly different ways to cool yourself when you need it.
The design is unlike anything else on the market. Two cylinders are joined together in the middle with a twistable joint, allowing you to position it in whatever way works for you. One of the cylinders holds the rechargeable battery and features a round led screen showing battery level, fan speed and mode icons. The other cylinder holds the fan outlet at one end and a metal mesh filter at the other.
The fan features 10 speeds. Shark recommends the first 5 for indoors and the others for outdoor use. Of course, this is entirely dependent on how hot you are, but one reason for suggesting the lower speeds for indoor use is that this little device is rather loud. You might not want to use this next to someone sleeping next to you. The fan is actually bladeless, but it moves a lot of air and is very effective at providing relief from the heat. Keep in mind that this is personal fan, since it’s small size makes it effective only for one, but that’s why you’re interested in this, right?
Perhaps the most innovative feature of the Chill Pill is the cooling plate, something I haven’t seen anywhere else. Swap out the fan for the cooling plate and start it up. There are 2 levels of cooling to choose from. A smooth, shiny metal plate cools quickly and you simply press the plate to your skin to experience soothing coolness wherever you need it. This is great for providing instant relief when you need it, especially for things like headaches. This is much more convenient than using ice cubes and dealing with the melting.
The third mode of operation is dry-touch mist. This involves a small tank that uses a white wick (4 are included) to absorb water that put into the tiny tank. This then produces a mist that, together with the 10 speeds of cool air, cools you down even more. Shark calls it a “dry mist”, but you wouldn’t want to point this at your face while wearing glasses, unless you don’t mind them getting wet. However, it really is a very fine mist that seems to evaporate before it falls. I tested this by sitting the Chill Pill on a flat surface, with a dry paper towel under the area where the mist fell. Neither the towel nor the surface exhibited any moisture at all. This mode is especially useful on a hot day outside. The tank will last about 8-10 minutes of continuous use, but if you take a bottle of water with you, it’s easy to refill.
The Chill Pill is designed to be a personal cooling device, and it does a great job at that. Shark offers accessories like a clip, cross-body strap, and bike clamp, but none of these is included. In the box you get the Chill Pill, 3 caps for the different operational modes, charging cable, and drawstring bag for holding the caps. The Chill Pill allows you to get some relief from the heat without the need to carry a bulky fan or search for power. While I haven’t done enough testing to really know how long the battery lasts, I’m impressed with how much I’ve been able to use it while hardly impacting the battery. This is truly a personal device that you can take anywhere. I’m looking forward to seeing how well it can do at a hot football game in August. I think it’ll be up to the task.
The Chill Pill retails for $149. It’s very well built, just like everything Shark makes. It does what it promises to do, but this is a pretty expensive item. You do get what you pay for, and you won’t be disappointed with the Chill Pill, but you’ll need to be able to swallow the price to do so.
I would recommend this to a friend!


Share this review:
0points
0of 0voted this as helpful.

The APC Back-UPS Pro BN1050M mini-tower model is designed to power your critical electronics during blackouts and protect them from the dangers of surges, spikes, lightning, and power outages. By powering your critical electronics during blackouts, you ensure personal and professional connectivity when it matters most. Improvements in size and surge protection come at an affordable price, making the Back-UPS ProBN1050M mini-tower model a perfect solution for your power protection needs.
Customer Rating

5
Peace of mind for power outages
on January 28, 2026
Posted by: BobinVA
As a long-time user of APC’s backup battery products, I was excited to get my hands on the new Back-UPS Pro BN1050M mini-tower model. It provides all of the reliable features I’m accustomed to having, as well as one that my older model did not have: a display screen.
Getting started is easy. After unboxing, you’ll notice the big yellow sticker advising you that the battery is not yet connected. To do so, simply slide open the battery door, connect the pink wire, then close the door. As a bonus, I got to see a little spark as the wire’s metal got close to the connector. That told me that the battery already had a charge.
To start using the UPS, simply choose what to plug in to the 8 provided outlets. While all of the outlets are protected from surges, only 4 of them have battery backup. You’ll want to make sure that the things you’ll need most during a power outage are connected to the outlets with battery backup. The outlets are nicely spaced, and I had no trouble connecting all my devices.
At its core, the BN1050M is a battery and surge protector, but a smart one. In addition to protecting your devices from dangerous electricity spikes, it also regulates the power output so that it’s steady and “clean”. If the power goes out, it can provide enough power to safely shut everything down without losing anything you’ve been working on.
The built-in display shows things like how much power is being put out, charge level of the battery, and load being pulled by the connected devices. When I tested the unit by pulling the plug, it immediately notified me with a loud beep that I was on battery power. These beeps continue every 20 seconds or so to remind you. The LED shows an estimate of how much time is left before the battery runs out. Both the display and the alarm can be turned of if you like. Initially, the display showed a pretty impressive number of more than 90 minutes, but it quickly scaled down until it settled in around 35 minutes. That was based on a laptop and two 4K monitors plugged in. The estimate ended up being pretty accurate, as I did indeed get to keep working for more than 30 minutes, and I still had some power to spare. APC estimates that you can run off battery power for more than 3.5 hours if all you need is your internet router and modem. In a pinch, that could be a good way to go.
The BN1050M also includes a feature that I thought was a great idea, although I did not test it. In the box there is also a cable with an ethernet plug on one end and USB-A plug on the other. When paired with the Powerchute app on a desktop computer, it can safely shut down a desktop computer without human intervention when a power outage is detected. This would be very useful for a desktop that runs unattended throughout the day, but that’s not my use case.
Having a battery backup gives peace of mind to know that even if the power goes out, you’ll be able to safely shut down without losing your work. Even if you only use it to provide internet during an outage, your phones and other mobile devices can keep working for hours, and maybe not miss a beat. The Back-UPS Pro BN1050M is a compact unit that is thoughtfully designed and does what it’s supposed to do. You can rest easy knowing that you’ll be prepared for a temporary power outage. I know I do.
I would recommend this to a friend!
Share this review:
0points
0of 0voted this as helpful.
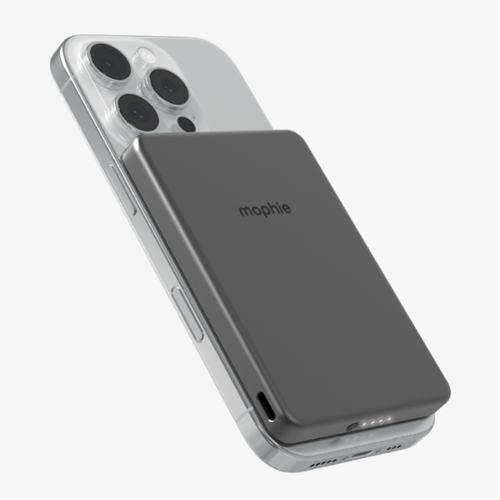
Charge your phone fast with Qi2-certified Powerstation Wireless Slim. This ultra-slim power bank has a 15W magnetic charging surface and a 20W USB-C PD port. It~s also MagSafe-compatible. Powerstation Wireless Slim contains a 5,000mAh internal battery, so it has the capacity to meet the demands of your day
Customer Rating
5
A thin and powerful battery pack
on December 17, 2025
Posted by: BobinVA
A phone with a dead battery is useless, and with everyone more reliant on their phones than ever, the battery is the most important component of the phone. If you have access to a power outlet when your battery runs low, that’s not a problem, but otherwise a fading battery meter can inspire panic.
A quick search for battery packs for phones on Best Buy yields 175 results, so how do you choose? The new mophie Powerstation Wireless Slim power bank is a 15W MagSafe battery pack that attaches to the back of your phone and charges on contact. A strong magnet holds it in place, and it’s slim enough to continue using the phone as you normally would while charging. That’s the key reason to consider this one—its slim profile allows you to easily carry it with you and use your phone while charging, not requiring you to change your workflow at all.
Using the Powerstation Slim couldn’t be easier. Simply align it with the MagSafe circle on the back of your phone and that’s it! Your phone will show the charging indicator as normal. The battery pack is rated to provide one full charge to your phone, so you’re not going to be using this as a replacement power supply for days on end, but it will definitely get you out of a bind when your phone is about to die. A battery pack this thin and light is one that will easily be with you when you need it, instead of always being left behind because it’s too big and heavy.
Charging speed is comparable to what you’d get with your phone’s wired charger. In addition to charging magnetically, there’s also a USB-C port and a charging cable for devices that don’t adhere to the Qi2 magnetic charging standard. You can even use the USB-C port while a phone is charging magnetically, allowing you to charge 2 devices at once! I didn’t try this feature, so I’m not sure what would be the impact on charging time or capacity.
While I was recharging the battery pack, I wondered how I could tell when it was fully charged. There’s no display window showing the charge level, but then I discovered a small button on the end of the battery pack and 4 small LED lights showing the charge level in 25% increments.
The mophie Powerstation Wireless Slim battery pack does its job well, and comes in a form factor that makes it easy to take with you wherever you go. It’s slim enough to use while charging, meaning you don’t have to wait until your phone is charged up before using it. It is extremely well built, which makes it look good even while attached to your phone. It’s a little more expensive than other similar mophie products, but its slimness, ease of use, and multiple charging options make it the one to beat.
I would recommend this to a friend!
Share this review:
0points
0of 0voted this as helpful.

Customer Rating
5
Great bang for your upgrade buck
on December 4, 2025
Posted by: BobinVA
My desktop gaming machine has been running with only 16GB of memory since I bought it, so it was time for an upgrade. In looking at 32GB DDR5 memory options, this kit from Crucial is a little more expensive, but I think it’s worth it. I’ve bought lots of memory upgrades from Crucial over the years, and I’ve never had a problem. They make it easy, starting with identifying the right chips for your computer, to guiding you through the installation. The Crucial site confirmed that this DDR5 Pro OC memory kit was compatible with my PC, so off I went.
I’ve never had memory sticks that included heat spreaders, so the appearance of these sticks was markedly different from anything I’ve installed before. They come in either a black or white finish, either one of which looks great. That didn’t matter much to me, since my PC’s case is opaque and doesn’t allow the insides to be visible. Installation was straightforward and easy—just push them into the slots and click into place. Upon bootup, the bios recognized the new memory with no issues.
While most people might buy this memory specifically for gaming, it improves overall performance of the PC. Everything feels faster and windows open slightly faster, making the computer feel crisper. To put some numbers to it, the Geekbench single core speed improved by 5%, while the multi-core speed improved by 11%, with an improvement to the overall transfer rate of 17%. These may not feel like huge jumps, but Windows feels faster.
While most people might buy this memory specifically for gaming, it improves overall performance of the PC. Everything feels faster and windows open slightly faster, making the computer feel crisper. To put some numbers to it, the Geekbench single core speed improved by 5%, while the multi-core speed improved by 11%, with an improvement to the overall transfer rate of 17%. These may not feel like huge jumps, but Windows feels faster.
For games, everything just feels smoother. From NBA 2K to graphically rich games like Chess Ultra, I was very pleased with the performance improvement. I included Chess Ultra because it’s a graphics hog that doesn’t perform well in lower RAM environments. With the upgraded RAM, it worked smooth as silk. Other games such as Civilization VI and Europa Universalis IV were also smoother with the extra headroom.
There are other options available, but I really believe that Crucial offers the best overall value. Yes, it costs a little more, but I think it’s worth it for these reasons:
• Solid construction.
• Inclusion of the stylish and functional heat spreader to help with heat management when overclocking.
• Crucial’s reputation and backing
• Solid construction.
• Inclusion of the stylish and functional heat spreader to help with heat management when overclocking.
• Crucial’s reputation and backing
Speaking of overclocking, this kit offers speeds of up to 6400 MT/s. Although the Crucial site told me this was compatible with my Dell XPS 8960 (which it is), it didn’t point out that I may not be able to overclock it. Overclocking requires support for Intel’s XMP overclocking technology. I upgraded my BIOS to see if I could take advantage of that, but unfortunately it was not available, most likely because my CPU does not support it. Nonetheless, I’m able to get speeds of almost 5600 MT/s, which is still not bad, and considerably better than what I had before.
I highly recommend the Crucial DDR5 Pro OC memory, especially if you’ve got a PC that’s still sporting good hardware but just needs a little more headroom. You’ll be glad you did.
I would recommend this to a friend!
Share this review:
0points
0of 0voted this as helpful.
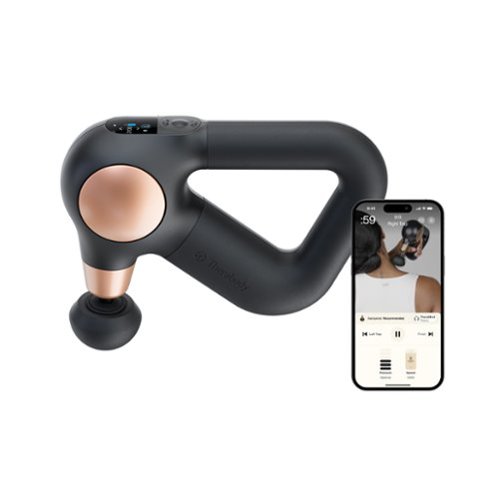
Theragun Sense is the only Theragun designed for stress relief ~ now more intuitive than ever. Combining scientifically proven percussive therapy with built-in guided routines, it helps relieve daily tension, pain, stress and sleep issues with ease. The device features an enhanced LCD screen that shows exactly where to massage, for how long, and with how much pressure. Choose from 4 expert-designed routines preloaded on the device, or customize your experience by saving up to 5 of your favorite routines from the Therabody app. Live pressure feedback helps you to apply the right intensity every time. Simplified controls let you adjust speed across 5 levels and fine-tune pressure to match your needs ~ whether you~re looking for a relaxing touch, moderate for built-up stress, or deep tension release. The patented triangle grip makes it easy to reach hard-to-access areas without straining your hands or wrists. Lightweight and whisper-quiet, Theragun Sense takes the guesswork out of your treatment for maximum relaxation every time.
Customer Rating
5
Actually helps ease sore muscles and speed healing
on November 6, 2025
Posted by: BobinVA
As a runner, I’m often dealing with aches and pains and sore muscles. Because of that, I’ve been interested in massage therapy devices like the Theragun. My first foray was with a cheap battery-powered muscle roller which was good, but didn’t really reach deep into sore muscles. The Theragun Sense has been just what I’ve been looking for.
Out of the box, the Theragun Sense comes in a black zippered travel bag, along with a charging cable, dampener and standard ball. Some models also come with a thumb attachment and micro-point attachment. The unit arrived with more than half a charge, enough to jump right in.
It’s super easy to get started. The Sense features a central on/off/function button, along with up/down buttons for scrolling through options. There is a small color screen that shows battery level, percussion speed and elapsed time. Press the center button once to power up, again to start the percussion. Use the up/down buttons to increase or decrease the speed. While using the Sense, the screen also shows the level of pressure that you’re applying.
The triangle-shaped handle allows you to adjust your grip to whatever seems best. This simple shape provides great flexibility for positioning your grip. I love how easy it is to get just the right hand position.
The Sense does a great job of massaging sore muscles. As it turned out, I tweaked my hamstring the day mine arrived, so I got to put it to use right away. The dampener turned out to be better for very sore muscles. Over the course of a couple days, using stretching and the Theragun Sense, I was able to keep running without fully injuring my hamstring. I really believe the Sense helped me to heal faster.
A few days after getting the Sense, I began to have annoying pains in my lower back that radiated down my leg. I put the Sense on the job, deeply massaging the affected area. Yes, it was painful, but after a massage session I felt so much better, and it carried over to the next day. I’m a believer!
The Therabody app really helps to make the Theragun Sense shine. It features pre-set routines for recovering from all sorts of exercises, such as running, yoga, cycling, weightlifting, and more. Connecting the app to my other exercise apps makes for a comprehensive system. For example, after returning from a run, I’m prompted to start my running recovery routine. The app guides you through each body part until you’re done, including video guides to show you how it’s done. I found this to be very helpful. It’s nice to have an app that does more than just give real-time stats on the device itself—it’s genuinely useful! It also features several built-in routines on the device itself, such as sleep prep, back pain and more. With these, you get diagrams to guide placement of the massage ball along with timers to keep you moving. This is nice for when you don’t have the app handy.
The Therabody app really helps to make the Theragun Sense shine. It features pre-set routines for recovering from all sorts of exercises, such as running, yoga, cycling, weightlifting, and more. Connecting the app to my other exercise apps makes for a comprehensive system. For example, after returning from a run, I’m prompted to start my running recovery routine. The app guides you through each body part until you’re done, including video guides to show you how it’s done. I found this to be very helpful. It’s nice to have an app that does more than just give real-time stats on the device itself—it’s genuinely useful! It also features several built-in routines on the device itself, such as sleep prep, back pain and more. With these, you get diagrams to guide placement of the massage ball along with timers to keep you moving. This is nice for when you don’t have the app handy.
I’m very happy with the Theragun Sense. It’s not as intense as their flagship model, but that’s exactly why I got this one. It provides a nice massage while not being overpowering. The build quality is outstanding, and I expect it to provide many years of faithful service. Yes, there are cheaper alternatives out there, but with massagers, you get what you pay for. I’m glad I got this one, and you will be, too.
I would recommend this to a friend!
Share this review:
0points
0of 0voted this as helpful.
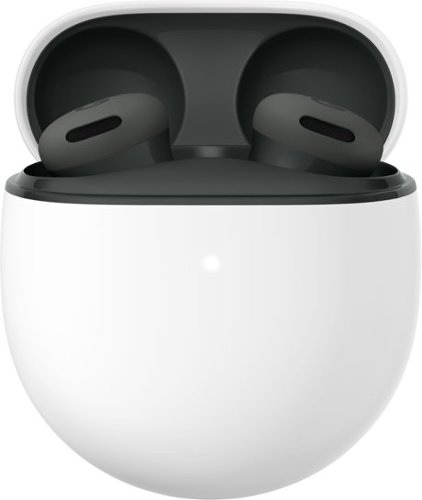
Inspired by the industry-leading design of Pixel Buds Pro 2, Pixel Buds 2a deliver lightweight comfort, crisp audio, Active Noise Cancellation with Silent Seal 1.5, and an all-day battery with the charging case.1 Plus, with the twist-to-adjust stabilizer, just twist the buds to get a more secure fit. All this and more, for less.~
Customer Rating
4
Performance above their weight class, great price
on October 15, 2025
Posted by: BobinVA
I’ve had a lot of different earbuds from a lot of different manufacturers, but never ones designed specifically for smooth integration with my Pixel phone. The release of the Pixel Buds 2A brings most of the advantages of the Pixel Buds Pro at a wallet-friendly price.
The initial setup is amazingly simple. Unbox the buds, open the flip-top of the charging case, and press the button on the back of the case. A few seconds later, a pop-up appears on the phone telling you that the buds have connected to the phone and are now associated with your account. That was literally the easiest earbud setup I’ve ever experienced! What would normally take a few steps to open settings, go to Bluetooth settings, etc. is now handled by that single button press. This is how it should be!
Once connected, you can tweak the settings for the buds in the Pixel Buds app. This is where you can set the behavior of long presses, turn on ANC, and choose the levels on the 5-band equalizer. The app is intuitive and makes it easy to find what you need, including links to videos with further instructions.
Google touts its new “twist to fit” feature of the Pixel Buds 2A. It’s basically a rounded fin on the back of the ear bud. Twisting the bud counterclockwise allows the fin to nestle into the back of your ear, making for a more secure fit. Twisting clockwise will create a looser fit and presumably not seal as tightly in the ear canal. Personally, I prefer the tighter fit all the time. Part of the reason for my preference is that these are very comfortable to wear. The app also includes an ear seal fit check to ensure that you’re using the optimal ear tips and are wearing them properly.
After choosing my EQ settings, I was ready for some music. The sound is clear and has a somewhat neutral signature. What I mean by that is that the bass is solid but not muddy and the highs are clear but not overly crisp. In other words, the sound signature is probably designed to appeal to most people. After listening to several different musical genres, I was very pleased with the sound these buds produced.
Active noise cancellation works quite well, and it’s easy to toggle it on and off with a long press on your choice of earbuds. The other one can be set up to start your phone’s digital assistant. In addition to ANC, there is also a transparency mode, where the sounds around you are slightly amplified to overcome the fact that you’ve got something in your ears. This version sounds more real than what I’ve experienced on lots of other buds. Lastly, you can turn off all noise processing and just get the natural sounds that you get with buds in your ears.
Call quality was surprisingly good. Unlike many other earbuds, callers could not tell I was using the buds. The sound on my end was just as good. Many buds focus on music quality at the expense of call quality, but I’m happy to report that the Pixel Buds 2A do not. That’s refreshing, especially at this price point.
Speaking of price point, it’s also refreshing that Google is offering such a quality product at a reasonable price. I’ve been bothered by the recent trend of ever-higher prices for ear buds, so I hope this strikes a blow for more reasonable pricing. I don’t have the Pixel Buds Pro, but reviews I’ve read say that 2A buds provide most of the same performance for a lot less money. These are solid earbuds that won’t break the bank.
A nice touch was the addition of a “find my buds” feature. This allows you to have the case start chirping, even if it’s closed. Not only that, but the app can also pinpoint the location of the case on a map. I expect that kind of tech to be on my phone, but it was impressive to find it on earbuds, especially at this price point.
Lastly, the Buds 2A also support multipoint pairing, which I think is a must these days. This allows you to pair the buds with both your phone and laptop. Once that’s done, the buds will automatically switch to whichever device is putting out sound. It also prioritizes calls, so that if you’re listening to something on your laptop when a call comes in to your phone, it will prioritize the call and switch automatically to it. This is very convenient.
Overall, I think the Pixel Buds 2A are an incredible value with performance beyond what you’d expect. These don’t feel like a step down from the Pro, so you can feel good about choosing these.
I would recommend this to a friend!
Share this review:
0points
0of 0voted this as helpful.
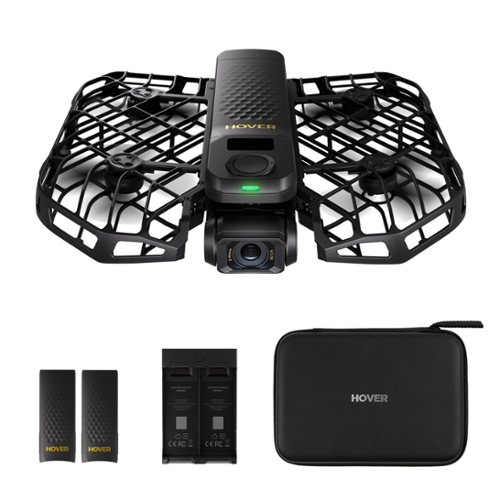
The X1 PROMAX is an 8K flying action camera, capturing stunning visuals in 8K at 30fps and 4K at 120fps. Its compact, foldable design makes it easy to carry, while the simple palm takeoff, OmniTerrain adaptability, and collision detection ensure safe, seamless operation. Equipped with premium stabilization, the X1 PROMAX delivers exceptional clarity and performance in all conditions, perfect for capturing breathtaking shots wherever adventure takes you.
Customer Rating
4
Easy to use & lots of features, but with a caveat
on September 24, 2025
Posted by: BobinVA
Note: this is a lengthy review, so here’s the summary:
• Small, light drone with high-resolution camera.
• Easy to use, even without a controller or phone app.
• Multiple modes make it easy to get the videos you want. This is a selfie drone that even beginners can use right out of the box.
• App provides lots of options and manual control.
• I like and can recommend this drone, but with a caveat at the end of the review.
This is my first drone, so I wasn’t quite sure what to expect. I’ve always seen them used to take videos of a house or property, to get an aerial perspective. You can do that with the X1 ProMax, but that’s not it’s main purpose.
The X1 ProMax is the latest offering from ZeroZero Robotics, a Chinese company trying to take on the leading drone manufacturers. Unboxing the ProMax, you get the sense that these guys are here to play. The drone comes nicely and securely packed in a very nice black box with magnetic closure and foam padding inside. From the beginning, this thing screams quality.
The drone itself is folded and held securely by a magnetic clasp. The quad fan blades are entirely enclosed in a tough, flexible cage that protects them from damage. The material used for the cage is so strong that there is a piece of it included in the box, along with a note challenging you to see if you can tear or break it. You can’t.
Who is the target audience for this drone? I got the Combo pack, which includes the drone with one battery pre-installed, a dual battery charger, two extra batteries, a charging cable, and a zipper case. Notice I didn’t say it comes with a controller. That’s because, although the ProMax is a camera drone, it is first and foremost a selfie drone, designed to make it easy to get videos of your outdoor adventures.
The ProMax is very small and light, intended to make it easy to go with you anywhere. It’s so small, in fact, that it can take off and land from the palm of your hand. The ProMax currently features 15 tracking modes:
• Hover
• Zoom Out
• Follow
• Orbit
• Bird’s Eye
• Spiral
• Manual Control
• Snapshot
• Dolly Track
• Ski Mode
• Cycling Mode
• 360 degree spin
• Dolly Zoom
• Indoor Follow
• Side Track
• Hover
• Zoom Out
• Follow
• Orbit
• Bird’s Eye
• Spiral
• Manual Control
• Snapshot
• Dolly Track
• Ski Mode
• Cycling Mode
• 360 degree spin
• Dolly Zoom
• Indoor Follow
• Side Track
Each of these modes features a number of settings that you can change to tailor it to your liking, but the main thing to know is that this drone is designed to make it easy to get the results you want. You don’t even need a controller or phone to get the drone to follow you on a run or bike ride, to orbit around you, shoot up high for a bird’s eye view, or just hover in front of you. You can even use indoor tracking mode to have it follow you while you give a tour of a building. All of these modes, and even a few of the settings, can be selected right from the drone itself, using its single button and left/right selectors. Short-pressing the button will cause it to take off from your palm, and for many of the modes all you need to do is approach it and put your outstretched palm under it to cause it to land in your palm.
I was able to try out all of the modes except for ski mode, and all of them are very easy to utilize. I set the drone to track me on an electric scooter, using both “follow” mode as well as cycling mode. Neither mode had any trouble keeping up with me, even when I exceeded 15 mph. I’m not a mountain biker, so I didn’t put it through its paces in the woods, but it had no trouble keeping up with me in our neighborhood or in my backyard, getting through the trees we have there. It also had no problem following me around inside the house, which would make it useful for recording property touring videos. With so many ways of capturing videos, I’m looking forward to finding new ways to capture photos and videos that were previously impossible.
In addition to all the preset modes, you can also fly manually, using the phone as the controller. I expected to be forced to flights that stayed within about 30 feet or so, given the limits of Bluetooth, but it uses its own wifi connection for manual flights, which allowed the drone to fly pretty far away. I flew it just over 100 yards and it was still under my control. That’s really impressive, and I’m not sure how they did that!
The X1 ProMax’s camera is pretty impressive, capable of recording 8K video at up to 30 frames per second, 4K HDR video at up to 30 fps, 4K video at up to 60 fps, and 2.7K HDR video at up to 60 fps. It can also create smooth 4X slow-motion videos, and you can take still photos at either 12 MP or 48 MP. When I first started using it, I was disappointed by the video quality, but then I learned that you need to export the videos using the highest video settings if you want high resolution video results. Audio recording is handled by the app on your phone. It does a good job of filtering out the sound of the propellers, but synching the audio with the movement of your lips must be done in video editing software after the fact. I don’t know how other drones handle this, but it’s clearly not a focus for this one. I’m not terribly surprised, since the phone is not in the same physical location as the drone, but hopefully the engineers can eventually find a way to make this better.
Battery life is perhaps the area where you might be most disappointed. You can get 8-12 minutes from a single battery, so it can’t accompany you from the bottom to the top of the mountain without swapping out the batteries. The combo pack I got came with 2 extras, so you might be able to get close to 45 minutes total by using all 3 batteries. The combo pack includes a dual battery charger. While it does come with a charging cable, it does not include a charging block. This doesn’t seem like an oversight until you figure out that the batteries will only charge at full speed if you have a 65W adapter. Unless you have a laptop charger that charges using a USB-C connector, you probably don’t have a 65W charger. This means that the dual charger will prioritize the battery closest to full before it charges the second battery, rather than charging both at the same time. While not a big deal (the batteries still charge) it would have been nice to include the necessary equipment, and at this price point, that should have been done.
And now for the caveat: remember that manual flight I described, where it stayed under my control for such an impressive distance? It didn’t end well. For manual flights, you can either instruct the drone to land wherever it is, or you can touch a button to tell it to return to the starting point. Since I had not previously used the return feature, I wanted to try that, so I did. Inexplicably, the drone started ascending much, much higher than I was flying it, putting it at the level of some tree branches that were overhanging the road. That immediately scared me, but I hoped that obstacle avoidance would kick in and avoid the branches. Nope. It flew right into the branches, got tangled up and crashed to the ground below. Also remember that “untearable” material used for the propeller cages? Yeah, that broke too. Nonetheless, it was still in pretty good shape, so I turned it back on to see if it would fly. It started up as normal but wouldn’t fly because it sensed that it wasn’t unfolded, even if it was. I ensured that there was no debris anywhere, but still couldn’t get it to fly.
I really can’t understand why this crash happened. Why would it rise to such a height, and why couldn’t it detect any obstacles? Shouldn’t that be considered part of basic operation? Since this happened not because I flew it into a risky situation but under automated control, perhaps it’s also something that can be improved via a firmware update.
Working with Zero Zero Robotics was great. They were sorry to hear of my mishap and took care of me right away. I hope to be back in business soon, but I won’t be using the “return” feature unless I’m in a wide-open field with plenty of room for weird flight patterns.
This is a compact drone that can go anywhere and capture all of your special outdoor adventures, just be careful if you want to use the “return” feature.
I would recommend this to a friend!
Share this review:
+2points
2of 2voted this as helpful.
BobinVA's Review Comments
BobinVA has not submitted comments on any reviews.
BobinVA's Questions
BobinVA has not submitted any questions.

Create, learn, work, and play like never before. Featuring an immersive 9.7-inch Multi-Touch Retina display,~ powerful A10 Fusion chip, and now supports Apple Pencil,~ there's nothing else quite like iPad.
Can I buy this without service to a wireless carrier for the same price?
The WiFi only model for $329 does not include cellular service with a wireless carrier, and is the cheapest price available (other than sales).
8 years ago
by
BobinVA
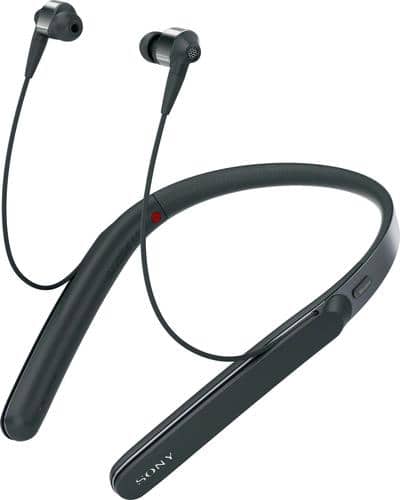
Enjoy up to 10 hours of wireless audio with these Sony noise-canceling headphones. They produce rich sound by playing at audio frequencies of 3-40,000Hz and have a closed-back design that blocks outside noise for a better listening experience. These Sony noise-canceling headphones sit comfortably behind the neck and work with or without the 1m wire.
Can you mute while on a call. I want to take some conference calls on my way to work and need to mute myself. Is there a way to mute while on the call from the headphone. I know i can always mute from the phone. Thanks.
Yes, you can mute by pushing the volume up and down buttons simultaneously, but that's a little tricky, so it might be easier to mute from the phone.
8 years, 4 months ago
by
BobinVA
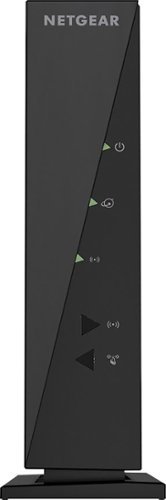
Keep your Wi-Fi connection strong anywhere in the house with this NETGEAR router. Monitor your network with the NETGEAR genie app, keep track of your kids with parental controls, and use multiple devices simultaneously for downloading, gaming and more
Is there a monthly charge for this netgear wireless router? Or does it just need an outlet and from there your off and running?
No monthly charge, you just need a modem to provide a signal, and you'll be good to go!
8 years, 8 months ago
by
BobinVA
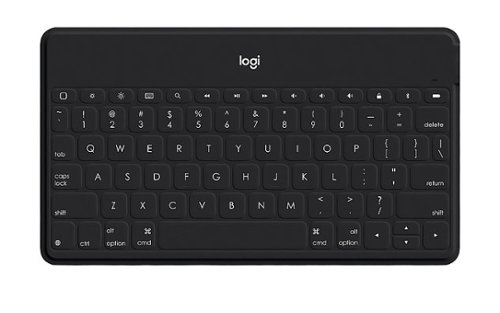
Type on your terms with Keys-To-Go, the super-slim, super-light Bluetooth keyboard for iPhone, iPad and Apple TV that fits anywhere and goes everywhere. The durable, spill-proof Keys-To-Go helps you escape the cramped on-screen keyboard and turn any space into a workspace whether you~re in the backyard, the kitchen, or the park. Keys-To-Go has comfortable, soft keys that type silently so you and people around you can focus without distractions. Plus, a full row of iOS shortcut keys provide one-tap access to your most-used functions including volume and media controls.
Is this compatible with an iPad pro
Yes, but don't expect it to take the place of the Apple Smart Keyboard. This is a great keyboard, but it will connect via blue tooth, not using the new smart connector.
8 years, 9 months ago
by
BobinVA
Type on your terms with Keys-To-Go, the super-slim, super-light Bluetooth keyboard for iPhone, iPad and Apple TV that fits anywhere and goes everywhere. The durable, spill-proof Keys-To-Go helps you escape the cramped on-screen keyboard and turn any space into a workspace whether you~re in the backyard, the kitchen, or the park. Keys-To-Go has comfortable, soft keys that type silently so you and people around you can focus without distractions. Plus, a full row of iOS shortcut keys provide one-tap access to your most-used functions including volume and media controls.
Will this work with the new IPad 5th generation (2017)?
It'll work with any blue tooth enabled computer.
8 years, 9 months ago
by
BobinVA
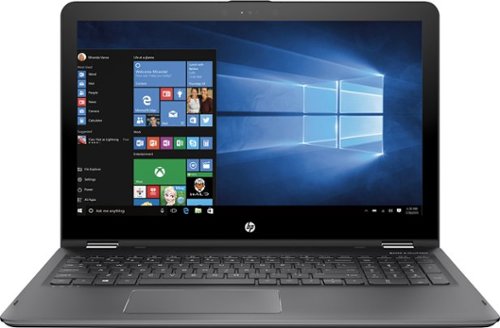
View files or videos in custom positions with this HP Envy x360 laptop. The hinge lets you lay the computer flat, fold it for use as a tablet or prop the screen at angles to enhance your viewing experience. When you aren't streaming videos on this HP Envy x360 laptop, convert it to a traditional position for standard keyboarding action.
How do you turn on the keyboard backlite ?
View files or videos in custom positions with this HP Envy x360 laptop. The hinge lets you lay the computer flat, fold it for use as a tablet or prop the screen at angles to enhance your viewing experience. When you aren't streaming videos on this HP Envy x360 laptop, convert it to a traditional position for standard keyboarding action.
does this computer come with windows 10 or.........
Yes, it's Windows 10, the November, 2015 build.
9 years, 10 months ago
by
BobinVA
View files or videos in custom positions with this HP Envy x360 laptop. The hinge lets you lay the computer flat, fold it for use as a tablet or prop the screen at angles to enhance your viewing experience. When you aren't streaming videos on this HP Envy x360 laptop, convert it to a traditional position for standard keyboarding action.
have msata ssd socket inside ?
I'm not sure about what's inside, as this laptop really isn't built to make it easy to open up. It's quite thin, so I doubt there's an extra slot in there. Sorry that I don't know for sure.
9 years, 10 months ago
by
BobinVA