Share AncientGeek's profile
AncientGeek
AncientGeek's stats
- Review count46
- Helpfulness votes396
- First reviewMay 19, 2016
- Last reviewNovember 1, 2022
- Featured reviews0
- Average rating4.6
Reviews comments
- Review comment count0
- Helpfulness votes0
- First review commentNone
- Last review commentNone
- Featured review comments0
Questions
- Question count0
- Helpfulness votes0
- First questionNone
- Last questionNone
- Featured questions0
- Answer count19
- Helpfulness votes66
- First answerJune 5, 2017
- Last answerOctober 8, 2021
- Featured answers0
- Best answers4

With the Coravin Model Five Wine Preservation System, choose the wines you desire, without compromise. Model Five is the Coravin standard, featuring a classic design and innovative SmartClamps™, making it sturdy and easy to go on/off from bottle to bottle. Simply insert, tip, and pour as much wine as you desire—then save the rest of the bottle for weeks, months, or even years! Includes 3 Coravin Pure Capsules and 1 Coravin Screw Cap.
Posted by: AncientGeek
from Sunapee, NH
Coravin Model Five Wine Preservation System
I have wanted something like the Coravin Model Five Wine Preservation System for several years now, but don’t remember seeing this system in my prior searches. I like wine, but I often might want a glass when my wife does not. I don’t like opening a bottle to have one glass of wine because I’m concerned I might not finish the bottle before the flavor is diminished by exposure to the air. Even the next day, it is never quite the same. So when I saw the Coravin system pop up as a Best Buy TIN selection, I knew I was a good candidate for testing it.
The Coravin is easy to operate and appears to work really well. Out of the box, all I had to do for setup was to remove some labels and insert one of the Argon 65 gas capsules into the capsule holder on the Coravin. Next, I removed the foil from the top of one of my full wine bottles. With the bottle on the counter I placed the Coravin on the top and pushed the needle through the cork. It was very easy. After that I raised the bottom of the wine bottle higher than the spout, held it over my glass and pressed the button once. Pressing the button releases some of the Argon gas from the capsule into the bottle through the needle. Releasing the button appears to close the path from the Argon capsule to the needle and open the path from the needle to the spout. As a result, the pressure created in the bottle by the Argon gas capsule, pushes the wine through the needle and out of the spout into my glass. Coravin recommends pressing and releasing the button fairly quickly and repeating this as needed until you have filled your glass to the desired level. The number of presses depends entirely on the size of your glass and your personal definition of “one glass of wine”.
To stop the wine from flowing you can wait for it to stop by itself or you can just lower the bottom of the wine bottle until it is lower than the spout. At that point, the gas pressure in the bottle will expel any remaining wine in the needle and spout with a brief hiss and then stop. This method seems preferable to me, since it purges the needle and spout of any remaining wine.
Next I removed the device from the bottle. As a test, I turned the bottle upside down and there was no leak. Not even the drop of wine that Coravin says is very common to see. Just a clean cork that looked untouched. Since no oxygen entered the bottle, the wine in the bottle should stay fresh as if the bottle was never touched, other than the missing foil. I marked the bottle with the date I tapped it, just for my own tracking and put it back in the wine fridge. This is very nice. I can have one glass today and if I don’t get back to that bottle for several days or even weeks, it should still taste like I just opened the bottle.
Update: Five days after having my first glass from this bottle using the Coravin device, I removed the cork. My wife and I each had a glass. The wine definitely tasted like it was a fresh bottle that had never been touched until we actually opened it. This is great. I can now have a glass of wine without committing to drink the entire bottle quickly. It also means my wife and I can have a glass of wine from two different bottles to match our personal preference on any occasion.
Coravin recommends cleaning and drying the device immediately after use to avoid allowing wine to dry on and in the device. They include instructions for this in their user manual. It is very straightforward.
Coravin also includes a screw on cap which allows you to use this system with wines that come with screw off caps. You remove the original cap and immediately replace it with the Coravin cap. Then use the system as you would with a corked bottle. Of course this style of cap does expose the wine to the open air briefly while you trade caps, but it limits the exposure to the neck of the bottle and is certainly far less exposure than you’d get by pouring a glass and replacing the original cap onto the bottle with an additional “glass full” of air in it.
Coravin offers several accessories, replacement needles and Argon capsules to enhance and keep the system working over the years.
Of course this convenience and preservation isn’t free. The Model 5 I received lists for $299.95. Other models range in cost from $199.95 to $799.95. The cost of the Argon capsules varies (cheaper by the dozen) between about $8.30 and $9 depending on how many you buy. Coravin says a single Argon capsule will last for “up to 15 glasses of wine”. This depends on how efficient you are with the gas, of course, when pouring and purging the needle...as well as the number of ounces you consider to be a “glass” of wine. The standard definition is five ounces, but many of us are more generous, so the number of “glasses” we get from a capsule may be fewer, but the ounces dispensed should be similar. Fifteen standard glasses would be about three bottles of wine. I’d guess we might get four or more bottles from a single capsule since we don’t use the system for the last glass of wine in each bottle. You need to pop the cork for that last glass or you will leave wine in the bottle.
So the cost of preserving the flavor of your wine when you only want one glass at a time, is probably close to a $1 a glass not counting the cost of the Coravin tool itself. I don’t know how long the needles last or the device itself, so the cost could approach $2 depending on the longevity of the other components of the system and the subsequent amortization of those periodic investments. I think it is worth it for me. I won’t use this for every glass of wine I drink. It is only for those occasions when I want a glass or two and want to preserve the rest of the bottle for another time in the future. I recommend this system for people in similar situations.
Mobile Submission: False
I would recommend this to a friend!
Share this review:
0points
0of 0voted this as helpful.
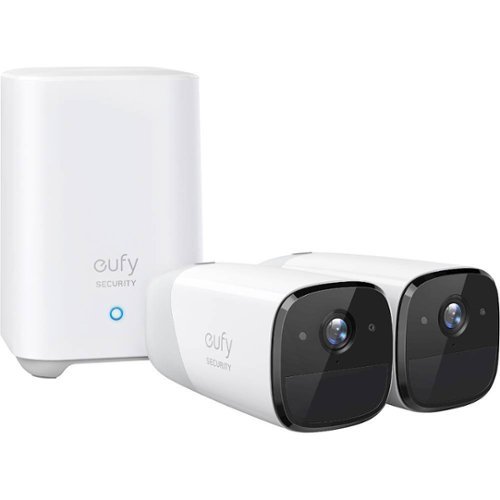
eufy eufyCam 2, 2-Camera Surveillance System: See everything that happens around your home in 1080p HD with this eufy eufyCam 2 kit. Quick and easy to set up, two wireless cameras and a home base provide all that you need to get started, while smart integration ensures you can easily connect to other smart devices. This eufy eufyCam 2 kit provides 365 days of use from a single charge for continuous observation.
Customer Rating

4
A solid quality product. Getting even better.
on November 15, 2019
Posted by: AncientGeek
from Sunapee, NH
Eufy Cam2
Full disclosure: I was given a two camera EufyCam 2 system in exchange for a timely, and honest review.
This is a long review, so if you just want my summary, scroll to the bottom.
First, the two-camera kit comes in a very compact box. It is well presented and the contents are well protected by the packaging.
The sleeve on the outside clearly emphasizes battery life, which Eufy claims could be up to 365 days. I know from my fairly extensive experience, that this will depend greatly on the amount of “action” these cameras see each day and therefore how much the record each day. I won’t be able to comment much on battery life given the timeframe I have for writing this review versus the claimed battery life. The top of the box reinforces the battery life message by saying “Recharge your EufyCam one year from today”.
I opened the box to see the little blue folder holding the quick start guide and a little reset key that looks a lot like a rounded version of the SIM holder key for an iPhone. The Quick Start Guide is pretty much what you would expect. It starts with “What’s included” and walks us through the setup.
I took a good look at all of the hardware. The fit and finish is excellent. The Homebase 2 and EufyCam 2 devices have a very nice, quality look and feel. I compared the size of the Homebase 2 to my Arlo Pro and Pro 3 base stations. The Homebase 2 is smaller overall than both of the Arlo base stations. It is square and tall, but not big overall. See photo. So far so good. I like it. The cameras are long and tubular in shape, but OK...just a different approach to batteries.
The 1st installation step is to plug the Homebase 2 into your router or other LAN port on your home network. Then power up the Homebase 2. I placed mine in a 2nd floor bedroom where I have no other wireless equipment. Then I came back downstairs to get my cameras ready. The next step is to download the Eufy app and create an account. I did this first, so I was looking at my EufyCam 2 cameras when I thought I heard someone talking loudly upstairs. I immediately realized, the Homebase 2 talks to us. Ugh. Like Guardzilla as I recall. I grabbed the cameras and went back upstairs to configure them. The Homebase indicated it needed to do a software update, so I let it do that and then continued.
I pulled out the first camera and started the process of adding a device. I tried to add the camera and the app told me I needed to add a Homebase first. Good coaching. I added and Homebase 2 to the app using the camera on my iPad to scan the QR code on the bottom of the Homebase 2. It took a few tries to get the distance and lighting correct. It would have been nicer to be directed to scan this code before I connected the Homebase 2 to a network, so I could have easily positioned it in the light. I was successful, but this seems like an opportunity for improvement. Scan the QR code...then go place it and connect it.
After the Homebase 2 was installed, I think “she” spoke again loudly announcing my success. It was last night and I am recalling from memory. I should have taken very detailed notes. I then moved on to adding the first camera. This is well guided and involves keeping the camera about 3’ from the Homebase 2. The first time I tried, it failed, but gave me good instructions about what to do before retrying. I power cycled the Homebase 2 and when that was complete, the process for adding a camera progressed beyond the previous failure point. The camera pairing process is done via an audio signal that is fairly loud, but not as “wake up the dead” loud as the previous voice announcements. This time it was successful and the camera paired just fine. I repeated the process for the second camera.
Overall, I liked the level of detail, quality of presentation and flow of the set up process. What I did not like was the voice prompts and audio pairing. I don’t like to disturb other people with my technology. I keep my volume set to off, of all of my iPads and laptops unless I’m specifically listening to something and I use low volume or earbuds when I do turn up the volume. So I find the audio prompts really annoying and a one star detractor. If the prompts were a user choice, that would be fine, but having a very loud and IMHO annoying sound forced upon me, is not acceptable.
Another rather odd part was that after pairing the cameras, I was directed to fully charge the cameras before mounting them. It would seem like this should be the first step even though I know consumers are generally impatient and want to get going with the installation. The cameras were only about 55% charged when they arrived, so directing us to fully charge them before setting them up would seem prudent. It also struck me as being inconsistent (though not technically) with the message on the top of the box “Recharge your EufyCam one year from today”. You still have to “charge” it today.
The camera mounts look decent. The kit came with two indoor and two outdoor mounts. The indoor mounts are metal half-domes, similar to the Arlo, Pro, Pro 2 mounts. The outdoor mounts are small 1/4”-20 thread connections on a locking ball mount. Also the instruction for mounting include a video. The camera positioning view seems to give me a static image. I have to refresh the image as I move the camera to an optimal position.
Charging the cameras from about 55% to full, took a few hours using a 12 watt iPad adapter. I should have thought to use my 48 watt (I think) Anker IQ charger. The provided charging cable has a USB-A connector on the adapter end, so I could not use a USB-3 PD charger unless I used a different cable. After charging overnight, the first camera was offline the next morning. I poked around the app a bit and discovered guidance on what to do. I just pressed the sync button momentarily and it flashed a blue light. After a refresh in the app, the camera was back online. I believe the second camera also did this.
After charging both cameras, I placed the cameras around the room and played with the settings. Under security we have the choice of modes: Home, Away, Disarmed, Schedule and Custom. Each mode determines how each camera will react “when motion is detected”. The action choices are: record video, push notification, camera alarm, base alarm. I did not see an option for email notifications. The default mode for Disarm has all actions disabled as you would expect. The Home mode was set to record video and send a push notification. The Away mode was set to also trigger the camera alarm. I made the mistake of setting the mode to Away before checking these actions and I was quickly blasted with a piercing siren. Ok, my mistake! I don’t use any alarms on any of my surveillance systems. My experience is that these systems see a ton of motion that doesn’t warrant an alarm at my locations. I could see using the alarm if I was monitoring an interior space where no one should be, when the cameras are in Away mode, but outside, I think this would be problematic. My preference would be for eufy to disable alarms by default and offer them as a choice, so people to accidentally suffer the startling and piercing alarm by accident like I did.
I created a Custom mode named “Night” to see how that worked and it was easy. I then created a schedule and that was also straightforward. I like that I was able to set up a block of time from 10:00 PM to 6:00 AM with one operation. Arlo requires schedules passing by midnight to be set up as two time blocks on either side of midnight, rather than one contiguous block of time. This is nice and represents a thoughtful design process that considered user needs above programming convenience.
Notably absent from the mode choices is geofencing. Eufy has Home and Away modes, but I appear to have to manually change the mode rather than the system automatically detecting my entry and exit from my location. This seems a bit odd, since the app installation included a query as to whether I wanted to allow eufy to use my location. Perhaps this is indicative that geofencing is under development and will be available in the future. I am not privy to their plans.
After disabling the siren settings from my two cameras, just in case I put them in Away mode again, I left them to capture some motion events. This is a good spot to discuss one thing I don’t like about the eufy app. I use my iPad as my got-to device. 99% of the time, I’m on my iPad. The eufy app does not appear to have an iPad version or mode, so I’m stuck looking at a tiny sideways user interface. I have to rotate my iPad to portrait orientation (or read sideways) and all of the iPad screen real estate is wasted. The UI looks fine on my iPhone, but I really want an iPad UI as well. There is a browser based UI for people who use Eufy cloud storage, but I didn’t use it, so I can’t review it.
When I had several events recorded, I viewed the footage. The video quality is excellent even in (infrared) night mode. I like the “watermark” time and date stamp on the videos. This is so important when saving video for future use by authorities or even personally. Eufy, like other camera manufacturers doesn’t properly set the video metadata time and date stamp to the recording time and date. The metadata shows the date and time the recording was downloaded. This is a royal pain, IMHO. If I take a photo with my camera and download the photo (or a video) a week later, the date and time metadata correctly reflect the date and time the photo or video we’re actually taken (or at least whatever was set on my camera at the time it was taken).
Mobile Submission: False
I would recommend this to a friend!

Share this review:
+5points
9of 13voted this as helpful.

The Shark Pet Plus Cordless Stick Vacuum combines powerful suction and a self-cleaning brushroll with PowerFins to clean floors and carpets with no hair wrap. Lightweight design and a removable hand vacuum allow cleaning from floor to ceiling.
Posted by: AncientGeek
from Richmond, VT
Shark Rocket Pet Pro Cordless Vacuum
Full disclosure: I was given a Shark Rocket Pet Pro Cordless Vacuum in exchange for a timely and honest review. List price $299.99
The vacuum arrived in excellent shape, the retail box was actually packed inside two overwrap cartons which seemed like overkill, but it was certainly good protection.
Unpacking and setup was very simple. The Quick Start Guide states the battery is not shipped with a full charge and instructs us to charge it fully before the first use. I’d say the battery was about 40-50% charged. I believe it completed the charge to 100% in 30-40 minutes from this original level. The battery can be charged when it is attached to the vacuum or when it is detached.
There are six parts in the box. The power head, the lithium ion battery charger (120 Volts ONLY), the extension wand, a crevice tool, a “pet multi-tool” which is a small brush like and an upholstery tool.
Once charged, my wife and I tested it out on carpet, hardwood floors and a rugged entryway floor mat. Suction is pretty good for a battery vacuum like this and the combination of the rotary head and the suction were very effective at picking up dirt and hair. We were both impressed with how well it picked up dirt off the entry rug. This rug presents and fair challenge for our built-in vacuum, so it is a worthy adversary for any vacuum.
The vacuum is very easy to handle and very maneuverable. The power head attaches either to the extension wand or directly to the attachments. With the power head installed, a twist of the wrist steers the power head in either direction. It is quick to clean around chair legs and under tables.
We picked up quite a bit of dust, dirt and hair even without owning a pet. The dust cup empties easily with the press of a button. It is nice that their is an allergy filter to trap fine particles as well.
It will be very helpful to have this vacuum available for those times when we have a specific area we want to clean, but don’t wish to pull out the 35’ central vacuum hose. I suspect this will be used a lot!
I can’t find any accessories for this yet, but it is certainly constructed such that you could have one battery on charge, while using the vacuum with a second battery. This could be handy for someone who would like to keep one battery topped off, while using another.
The power head has some nice rubber feet on the bottom for setting it on a shelf. One welcome addition would be a hook hole upon which to hang the power head. Currently the only options are to lean it against something (like a wall) or to remove the wand and set the power head on a flat service.
We have not had the vacuum long enough to comment on how it holds up over time, but it has a quality feel which leads me to expect it to work well for years.
Mobile Submission: False
I would recommend this to a friend!

Share this review:
+10points
16of 22voted this as helpful.

Get quick access to favorite drinks with this GE beverage center. The spacious interior holds up to 109 cans or 31 bottles of wine, while the glass door and LED lighting make browsing contents simple. This GE beverage center features five oak shelves for added durability and a natural aesthetic.
Posted by: AncientGeek
from Richmond, VT
GE - 125 Can / 31 Bottle Beverage and Wine Center - Stainless steel
Full disclosure: I was given this product in return for a honest and timely review.
Unpacking was very easy. The refrigerator was undamaged. After removing a few pieces of tape and the manuals, I plugged it in and set my desired temperature. I checked back in an hour or two and it was at 55° where I had set it. My garage was quite warm, so it was true test of the cooling.
This is a nice looking and functional beverage refrigerator. The fridge has five wooden shelves. The bottom shelf is only half depth because the compressor is located behind it in the back. The next shelf up is also half-depth, but it is roughly even with the top of the bump out for the compressor, so you can use it as a full shelf, but with a bump in middle that tilts a wine bottle forward. The shelves are at different heights and are not adjustable. 12 oz beverage cans can stand up on most, but not all shelves. The variety of shelf heights mean you can accommodate several different size bottles and cans, but you will need to plan which shelves you use based on the capability of each shelf.
I plan to use it as a wine refrigerator, though it only has one temperature zone. I have a SubZero wine fridge at a vacation home and was amazed at how similar the two looked. GE did a nice job with aesthetics.
I’ve only had the fridge about 10 days, so I can’t comment on durability over time. However, it looks good and appears to operate as expected.
Mobile Submission: False
I would recommend this to a friend!

Share this review:
0points
0of 0voted this as helpful.
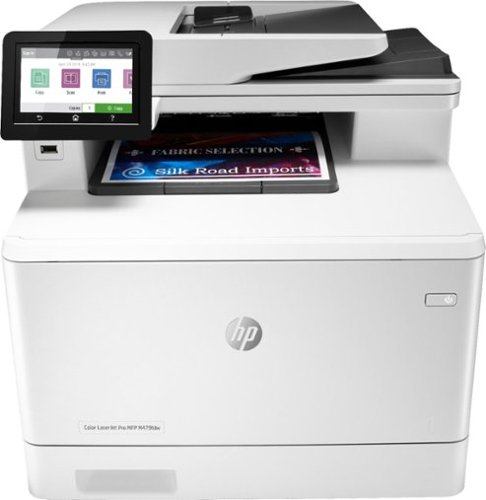
Winning in business means working smarter. This HP Color LaserJet Pro M479fdw printer is designed to let you focus your time where it's most effective - growing your business and staying ahead of the competition.Prints up to 27 ISO ppm*, up to 27 ISO ppm* in color
Posted by: AncientGeek
from Richmond, VT
HP Color LaserJest Pro MFP M479fdw
Full disclosure: I received the HP Color LaserJest Pro MFP M479fdw as part of a program where I receive products in exchange for an honest and timely review.
The printer came in a good size box that was fairly heavy. Some people may require or desire help with lifting it.
The instructions recommend laying the box on its side after opening the top, so the printer can be pulled (slid) out via the conveniently provided tape in the stop.
The foam packing was broken in several places, but there was no apparent damage to the printer.
The printer display, doors and trays were all well secured for shipment. The tape was thoughtfully folded over on one end making it easy to remove.
The printer comes with a power cord, USB cable and telephone cord, but no network cable. I suppose since most people will connect the printer to their wireless network, HP didn’t think a network cable was needed in the box. I have a good collection of network patch cords of various lengths, so that wasn’t a problem for me.
I also own an M477fdw that I purchased two years ago, so I am able to do a nice side by side comparison. Visually, they are nearly identical. The only difference I could see with casual observation was that there is a little graphic on the left side of the M477 showing two concentric circles with what looks like perhaps an RFID tag touching on the corner. The M479 does not have this graphic.
After unpacking, removing the tape and plugging in the power and my network cable, I powered up the printer. It went through a brief first prep cycle of some sort and then displayed the setup menu on the screen. I selected English and USA from the first two menus. The 3rd menu displayed the correct date automatically, but the wrong time on the next screen. I correct the time and moved on.
The next screen asked me to select a printer setup environment. Self-Managed or IT-Managed. I selected Self-Managed since this will be installed in my home and I don’t have a management platform installed in my home IT environment. This then resulted in the display letting me know that LaserJet Update had been set to “On”..presumably for automatics software/firmware updates. The next screen was the last, telling me to finish the setup online and to get the latest software updates at 123.hp.com/laserjet
After this, the printer completed a calibration and turned off. I touched the display and it came back on.
The menus are similar, but clearly different on the M479. It is brighter with more color and a new ribbon at the top. The power saver seems more aggressive also, since it turns off quickly as I stop to type my setup notes.
I looked though the menus to see my network setup and to turn off “direct print”, since I don’t use it and don’t want to see yet another SSID on my WiFi list. Next I printed an email message from my iPhone. I just selected print and then chose the new printer from the choice of the two MFPs I have here. The printer awakened and printed a nice crisp color copy of the email message. Then I grabbed my iPad and printed a copy of the note I used to type this product review. It behaved the same. Printing was very fast even for double sided printing. One reason I prefer laser printers is the lack of needed wait time when doing double sided printing. Laser toner doesn’t require time to dry before flipping the page to print the other side. That’s a huge time saver for long double sided documents.
Fax setup appears good. I set up my fax number, header information, auto-answer, telephone line type (several options including traditional phone (POTS) lines and VoIP). I don’t have a phone line in my home office yet and I didn’t need to send a fax, so I did not test faxing. I found a setting for two sided fax printing, so incoming faxes can be printed on both sides of the paper.
Next I inserted a page in the Automatic Document Feeder to try scanning. I was directed to do some setup via a web page or via the HP app. I used a Windows PC for this and quickly added the printer and scanned the page. I then moved to my MacBook Pro, added the printer and scanned a number of documents from the ADF. This all worked great. Scanning was fast, high quality and the pages were well aligned. I have not yet configured “scan to email” on this printer, but I have done that on my 477 and found it works ok. I assume it will be similar on this printer. You can also set up scanning to a network folder.
A datapoint that I have from my two year experience with the 477 model of this printer is that I am still using the original toner cartridges in that printer. Unlike inkjet printers which need to go through cleaning cycles or get replaced periodically due to lack of use, the laser printer appears to just keep going and going even with relatively light usage and that was one of the reasons I purchased a laser printer two years ago.
There is a lot more functionality built into the MFP M479fdw than I’ll ever use, but there is likely something there for everyone.
I’m really happy with it so far and I would recommend this printer to other people with similar needs. It is nice looking, fast, high quality and functional. I look forward to using it for many years to come.
Mobile Submission: False
I would recommend this to a friend!


Share this review:
+14points
21of 28voted this as helpful.

Link multiple devices to your laptop with this Belkin USB Type-C multiport hub. Pass-through charging up to 60W quickly powers up portable electronics, while the Gigabit Ethernet port offers secure, fast Internet connectivity. This Belkin USB Type-C multiport hub has a 5 Gbps data transfer rate for prompt read and write speeds for thumb drives, smartphones and tablets.
Posted by: AncientGeek
from Richmond, VT
Belkin 6 Function Hub
Full Disclosure: I was sent a Belkin USB-C Travel Multimedia Dock + Charge in exchange for a timely and honest review.
I own and use a lot of “dongles”. Moving to USB-C devices resulted in my purchase of yet another Ziplock bag full of dongles to connect my USB-A, HDMI, RJ45 & SD Cards to my MacBook Pro, iPad Pro and PC Laptops. When I saw these multipart docks come on the market, I was interested, but had not yet shelled out for one, since I already had the baggie full of dongles that I need. When the opportunity to get one through this evaluation program arose, I decided the time was right to try one out. I’m glad I did!
First the unit has a nice fit and finish. I has one each: RJ45, HDMI, USB-C PD & SD Ports/Slot and two USB-A ports. The USB-C cable that connects the unit to your laptop or tablet is fixed on one end, which means the USB-C port on the dock is free for connecting and charging another USB-C device.
I plugged the adapter into one of my MacBook Pro USB-C ports and then inserted an SD card from my document scanner. The card went in smoothly, the folder for the card appeared in Finder, I was able to work with the card and eject it as usual. It worked fine.
My second test was to insert a USB-A connector to try one of those out. In this case I was testing an update of my Garmin DashCam. I immediately had a problem with this. When I went to install the USB-A plug, it would not mate properly. I looked at the sockets and the plug and realized the socket is installed upside down compared to all the other USB-A sockets I have used. I quickly did a search and found there is indeed a spec for socket orientation so that users can use the USB logo on the cable as a guide for which end of the USB cable should be on the top when the cable is inserted. It appears that Belkin has designed and built this device with the USB-A ports installed upside down. I flipped the cable and plugged it in. I was able to install the updat to my DashCam with no difficulty, so this work fine functionally, but the orientation problem is a significant error on Belkin’s part. This should never made it past the first design review, let alone a beta test. It certainly should not have made it into production with this glaring error. -1 Star (sort of like a math error on a calculus problem that was otherwise well worked through)
As an off shoot of the USB-A port orientation error, I decided to check to see if RJ45 and HDMI ports have specs for orientation. Wikipedia says the standard for RJ45 jacks is with the locking tab down, but I noticed my various devices have them oriented with the locking tab on the top or on the bottom depending on the device manufacturer. I had always heard (and read again) that having the locking tab on the bottom had the advantage of keeping the dust from settling on the pins over time, since they are on the top as a result. However, in the design of this mobile multimedia dock, having the release catch on the top seems more user friendly. Also, since this is a mobile device, it is less likely to sit around in the open air gathering dust. I found no specification for HDMI orientation, but did note that Belkin doesn’t specify explicitly which HDMI version this supports. Since is says it supports 4k at 30Hz, it seems like this is not quite HDMI 2.0, but close…or perhaps a minimal acceptable version of 2.0.
I next tested the PD port by installing a USB-C to Lightning cable and charging my iPhone XS. The charge indicator reflected it had power and iTune prompted me to trust the MacBook Pro for the data connection. I was able to see all of the appropriate information about my iPhone in iTunes. So that worked well for both charging and data.
I then turned off WiFi on my MacBook Pro and connected the RJ45 jack to a port in my network switch with a CAT-5 cable. It worked quickly and my speed test showed that I was getting the full performance from my xfinity broadband which is around 260 MB download and 12 MB upload.
Next I connected a Rocketfish (Best Buy) 4K HDMI cable to the HDMI port and plugged the other end into an open port on my Sony home theater AV receiver. I selected the port as my input and after a second or two, I was looking at a very crisp 84” MacOS screen. I was very impressed with how sharp the screen appeared. This had me reflecting back to the days of 640x480 dpi screens which we thought were great at the time. How times have changed over the last 40 years. Now I’m trying to think of a good reason to use this setup. If I was still doing a lot of presentations, I’d have to buy my own 4K projector to bring with me to show off the resolution.
I then inserted an SD card from my camera and plugged the device into my 11” iPad Pro. The Photos app started up and displayed the photos on the card, ready for me to import. I imported the test photos I had taken for this purpose and deleted them off the card after the import. It worked flawlessly.
While I was playing with the iPad, I decided to test the RJ45 and HDMI ports as well. I don’t recall for sure, if I have ever tried using an iPad directly connected to the network via RJ45 rather than WiFi. I decided to try it. I turned off WiFI, connected the dock and connected my CAT-5 cable to it an the network switch. In Settings, on my iPad a new setting showing “Ethernet” appeared. I did a speed test and I got the same full speed test results that I received on my MacBook Pro. Cool!
After that success, I connected my HDMI cable to the dock and to my AV receiver again. The iPad screen showed up on my projector screen, sharp and bright as it was with my MacBook Pro. Next I decided to try streaming video to the projector screen. I tried the Netflix app. All of the navigation appeared on the screen, but when I played a movie, the screen went blank. I tried Amazon Prime and Apple Movies….and PBS and AcornTV. The latter two worked. The others did not. I assume this could be due to the modern resolution and formats provided by those top tier apps. It could be that the limitation of the HDMI port on the multimedia dock to 30 Hz, causes a problem with certain streaming apps. I looked at the app settings to see if there was anything there that might help , but I didn’t see anything applicable. I did not try disconnecting the Ethernet cable and moving back to WiFi in case that was somehow the problem. It seems most likely the HDMI processor, has some compatibility issue with the video signal delivered by the apps, since it only happens when I hit play. This also seemed to lock up the HDMI processor on one end or the other, since the image on the screen persisted even after I force-closed the app. I had to disconnect the HDMI connector and reconnect it to get it to refresh the image on the screen. This made me wonder how this compares to the Apple branded HDMI dongle, so I tested that and found the Apple HDMI adapter worked exactly the same way. I tested that adapter on a flat panel HD TV in addition to the 4K AV Receiver and 4K projector. It again performed identically to the way it performed when attached to the 4K AV Receiver. I didn’t try the Belkin dock in that same configuration. It seemed unlikely it would be different based on my prior experience with the AV Receiver. Perhaps this is some intentional limitation on the iPad itself.
Other than the orientation of the USB-A connectors and the HDMI Port performance with video from certain popular apps, I found this multimedia dock to be a nice replacement for the four “dongles” it replaces. Functionally it appears to be equivalent, but requires fewer ports on my MacBook Pro when using more than one port type at a time and is less cumbersome to tote around. The only down-side, I can think of is the fact that the USB-C cable that connects the dock to the laptop or tablet, is permanently attached to the dock. If that cable gets damaged, I can’t just buy a new cable to replace it. I’ll have to be careful (which I always am) not to damage that cable.
Overall, I like this dock and I would recommend it to anyone considering something like this versus individual dongles.
Mobile Submission: False
I would recommend this to a friend!

Share this review:
+5points
13of 21voted this as helpful.

Enjoy timeless vinyl in modern quality with this Sony wireless turntable. Bluetooth connectivity pushes high-quality audio to wireless speakers and headphones, while a built-in phono audio output ensures wired devices can be connected as well. A minimalist design simplifies use of this Sony wireless turntable to a single button press, and two operating speeds allow for customizable playback.
Customer Rating

5
A nice replacement for my 46 year direct drive TT
on April 10, 2019
Posted by: AncientGeek
from Richmond, VT
Full disclosure: I received the Sony PS-LS301BT in exchange for an honest review.
I purchased my previous Thorens turntable in the spring of 1973. It served me well for many years, but age and several moves had rendered it in need of repair. When I had the opportunity to try the LX310BT, I jumped on it. I like and use Sony products, so it was a great fit.
The product is very well packed, secured and suspected by molded styrofoam end pieces in the box. No overwrap shipping box was used and there was no damage to the contents.
The box includes useful assembly instructions with no errors that I can recall. Be careful to keep the styrofoam until you have completed the assembly, because some parts are securely taped into spaces in that foam. Assembly took just a few minutes. The dust cover hinges had to be removed from one of those spaces in the styrofoam and installed on the dustcover. The platter has to be installed on the player base as is the case for all quality turntables, since they have a shock absorbing suspension in the base that wouldn’t do well in shipping with the platter bouncing around. This installation also requires careful installation of the drive belt onto the drive pulley. The belt is installed on the bottom of the platter when it arrives and there is a handy piece of red plastic around the belt and secured with tape to the platter, the instructions for this are good and as long as you are careful. This is an easy operation. The foam platter cushion is packaged separately and is installed on the platter next. The instructions recommended keeping the protective cover over the cartridge needle during assembly. That is prudent advice and I made sure I left that on until I was ready to turn it on for the first time. After assembly, I placed the turntable in its rightful position near my amp and connected the RCA cables to my Aux input. I’m using my surround sound receiver these days and that receiver doesn’t have a phono input. Fortunately the LX310BT has a switch on the back which allows us to choose the output type so we can use either a traditional phono input or an auxiliary input without needed an external preamp like my Thorens required for this setup. The power cord for the turntable is a small power adapter and DC cord rather than a straight AC cord, so I had to use one of my 12” power cords that I keep on hand for connecting power adapters to a UPS or power strip. Adapters always seem to be too fat or in the wrong orientation to fit in those tight spaces.
The turntable is nice looking and well made, though it is all plastic and very light compared to my ancient Thorens which had a wooden base. There are three buttons on the right side: Start, Stop and Up/Down. After digging out a vintage LP from my moving boxes, I placed it on the platter, removed the protective cover from the needle and pressed Start. The tone arm raised and moved over to the LP automatically and lowered down very gently. My Thorens has a tone arm lifter which has a damped action when lowering, but I have to manually move the arm, so this was handy. However, I realized that to use my Disc Washer brush, I would need to raise the tone arm after it was in position while I cleaned the LP. Since my Thorens is manual, I could turn it on and get the platter rotating while keeping the tone arm off the platter. No real problem, of course.
Finally, it was time to hear the music. It was great to listen to my old LPs. I was pretty fussy with them, so they are all in great shape. I can’t wait to listen to more of them. My only complaint had nothing to do the the turntable. I recently gave my old Marantz 1060 amp and Imperial 7 speakers to my oldest son. My speakers on my surround sound receiver just didn’t pump out the sound the same way. I played with the audio settings on my receiver for a while and then moved the RCA cords to the inputs on my Sonos Connect. That moved the audio output to my Sonos system where I will most likely keep it. I may pick up another Play 5 speaker since that speaker does a very nice job of reproducing the rich sounds I remember from my old Marantz system with the added flexibility of playing my LPs on a variety of speakers in my house.
I realized I didn’t have a Bluetooth speaker at this house, so I was only able to test the standard RCA connections. I’m eager to see how well the Bluetooth and USB functions work, but that had to wait for a future time.
Mobile Submission: False
I would recommend this to a friend!


Share this review:
+3points
6of 9voted this as helpful.
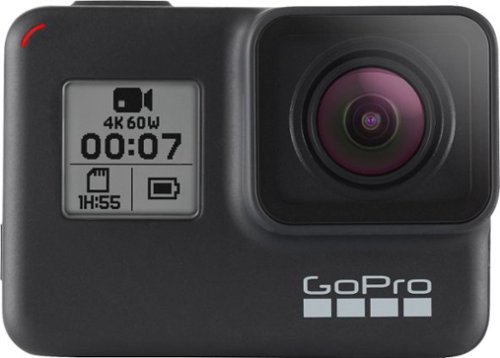
Film underwater scenes in 4K with this 12-megapixel GoPro HERO7 action camera. Its HyperSmooth stabilization feature lets you capture shake-free videos, and it withstands submersion up to 33 feet without a waterproof case. Stream captured videos from this rugged GoPro HERO7 action camera on Facebook Live via the companion app.
Posted by: AncientGeek
from Richmond, VT
GoPro 7 Black
Full disclosure: I received a GoPro 7 in exchange for an honest and timely review.
So far, I love my new GoPro 7 Black. I purchased a GoPro4 Silver several years ago and this is a very nice upgrade for me. I have not evaluated the 5 or 6, so I don’t know when many of the differences were originally introduced, but there are clearly some nice improvements.
Like my 4 Silver, the 7 Black has both front and rear displays which I find indispensable. The front display is a small B&W display for settings which will rotate automatically when the camera is rotated 90 degrees. The 7 has only two buttons compared to three on my 4 Silver. I always found the three button model to be a bit confusing, so eliminating one button was a good thing from my perspective.
My 4 Silver required the clear housing to make it waterproof/weatherproof. The 7 Black no longer needs this housing. It has a frame that is open in the front and back, but snaps on in a similar fashion to the original housing. The lens on the 7 appears to integrate the rectangular lens cover from the original housing, into the camera itself. I like having direct access to the touch screen at all times.
I haven’t tried using the camera underwater yet, so I can’t speak to the degree of waterproofing provided by the new design. I assume it is as specified. The gaskets on the battery and connection doors are pretty small and I suspect it would be wise to inspect these prior to entering the water to make sure they are not damaged or dirty.
The batteries are similar but different between my 4 Silver and the 7 Black. I have three batteries and a dual battery charger for my 4 Silver. Since they won’t work on my 7 Black, I have ordered the charger (which comes with a battery) and a 3rd battery to match the items in my 4 Silver kit. Though I was disappointed that I needed to buy both new batteries and a new charger, I understand that new technologies and requirements often place a greater demand on power. Upon researching this, it appears the battery design changed for the Hero 5 and beyond, so my 4 Silver was the last model to use the older battery design.
Of course the 7 has great 4K video, time-lapse, time released shutter (0, 3s or 10s) and many choices in resolution for both video and still photos. There are also three choices for the Field of View on the lens for video...Linear, Wide & Superview and two for photos...Linear or Wide...no Superview choice there. I find all video modes to be crisp and clear. Really nice video in all modes and, of course, 4K is the current pinnacle.
The 7 Black offers voice control which is pretty handy. I can say “GoPro start recording” and “GoPro stop recording” or “GoPro take a photo” (“take a picture” also works). I have not fully explored the voice commands yet to see what else I can do via voice commands.
A hallmark of GoPro cameras has been image stabilization and the 7 Black has improved on that. I am impressed with the smooth video I get from the 7 Black when walking or riding in a car while recording video. It is very smooth.
Audio is very good. I would think the elimination of the clear housing improved the audio, but I haven’t done a good side by side test with my 4 Silver to prove that. However, the audio on the 7 Black is very good for an action camera.
There is a feature called “short clips” that allows me to take videos of 15 or 30 seconds in length. While the video is recording, a red progress bar makes its way around the perimeter of the display so I can easily see the length of the video I have recorded and what is left to go. I think this will be handy. I often watch the timer on my videos intentionally to keep them to a manageable file size. Now I can just watch the progress bar and recording will stop automatically even if I don’t watch.
The GPS allows data to be tracked while recording. Speed, GPS location and G-Force are among the items you can track and display on your video, if desired. It is amazing.
The GoPro app works well for connecting with the camera and downloading photos and videos. It can take quite a while to download long videos, so I usually transfer large files using a cable I like the 7 Black use of USB-C. Also, it seems like the battery is heavily taxed when transferring videos via WiFi. I watched 25% disappear quickly while doing a wireless transfer. The same files took 2 min 21 secs to transfer via USB and the camera charged the battery a few percentage points while doing the transfer.
If you don’t have an action camera or have an older GoPro, I recommend you take a look at the GoPro 7 Black. It is a great action camera and a nice upgrade over older models for sure.
Mobile Submission: False
I would recommend this to a friend!


Share this review:
+28points
42of 56voted this as helpful.
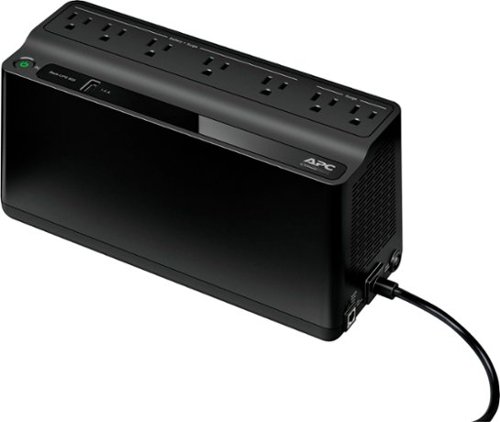
The Back-UPS battery backup offers guaranteed power and surge protection for wireless networks, computers, gaming consoles and other electronics in your home or business. Models supply battery backup during outages and unsafe voltage fluctuations, as well as provide protection from damaging surges and spikes. They're available in 'tower' or 'floor' styles, and together with a variety of standard features, they are the perfect choice to protect your data and keep you connected
Posted by: AncientGeek
from Richmond, VT
Full disclosure: I received a BE600M1 in exchange for a timely and honest review.
I have been using APC UPS products for literally decades. (And I use the word literally the correct way). I have always trusted and liked APC power products. I bought a lot of them professionally as well when I was a CIO for 20 years. I was very excited out this new line of UPS first introduced by APC several years ago. I wanted a lighter weight product with a longer run time for specific applications where I had small network devices that were not backed up by a generator. The original model I purchased was white and only had two prong outlets. It was good, but the latest versions of this product are GREAT. These have three prong outlets. I can set the alarms in three different ways, including silent! Also, the power sensitivity can be set without a computer, so the UPS can be more “forgiving” of imperfect power.
The unit can be mounted on a wall if needed. I often do this in closets.
Though the outlets are spaced, sometimes the power adapters for devices have “bricks” that are oriented the wrong way or they interfere with wall mounting, so you may need to buy some of those little 12” power cords to plug some adapter in without the constraints of the outlet spacing.
I use these in network closets, behind TVs to protect various TV, computer, security and audio components and to keep my equipment running until my generator starts up.
Overall, I find these very useful.
Mobile Submission: False
I would recommend this to a friend!
Share this review:
0points
0of 0voted this as helpful.
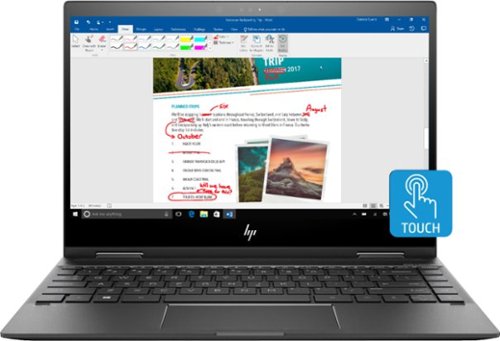
Work and play on this 13-inch convertible HP Envy notebook. It has a 360-degree hinge that takes it from laptop to tablet in moments, and 8GB of memory and an AMD Ryzen 5 processor keep it functioning smoothly. Corning Gorilla Glass ensures the screen of this HP Envy notebook remains free from scratches and dings.Learn more.
Posted by: AncientGeek
from Richmond, VT
Full disclosure: I was given an ENVY x360 in exchange for a timely and honest review.
I really like this notebook. It is almost exactly the same size as my 13" 2017 MacBook Pro. Very trim and light. It has an exceptional screen. Very crisp, bright, colorful and clear. The keyboard has nice action and his well backlit.
Cortana helps with the setup, if you like voice assistance. I prefer silence and muted "her" after her introduction, but it can be helpful for those who don't need silence during the setup and like audible assistance. I set up the facial recognition and have come to like that a lot. I use it on my iPhone X all the time and find it very helpful.
The system is very responsive and wakes up quickly. It has one USB-C connector and two USB A connectors as well as a headphone jack.
At one point I needed the notebook to be flat while I stood above it to do some work. I like the fact that I can fold the screen flat and then recalled that this screen flips all the way around to convert the notebook into a tablet. When you do that it both changes the screen rotation and asks if you want to switch to tablet mode. I answered yes and the display changed to tablet mode while the keyboard became inactive. That was very nice. I could see this being handy. I constantly use my iPad and like using a tablet for many activities. I also found that I like using the touchscreen even when I'm in notebook mode. There are just times when touching the screen is easier and more intuitive than moving the pointer and using the touchpad.
I would definitely recommend this to a friend. It is a high quality and handy convertible notebook.
Mobile Submission: False
I would recommend this to a friend!
Share this review:
0points
1of 2voted this as helpful.
AncientGeek's Review Comments
AncientGeek has not submitted comments on any reviews.
AncientGeek's Questions
AncientGeek has not submitted any questions.

Capture quality vlogs with this black GoPro HERO10 camera. The removable rechargeable 1720 mAh battery offers long shooting periods, while the rugged, waterproof design allows flexible use on different terrains. This GoPro HERO10 camera features a 1.4-inch screen for framing shots seamlessly, and the 23MP sensor captures 5.3K videos effortlessly.
I got the GoPro Hero 10 camera. Can I use it outdoors without my iPhone, and how do I save videos that I record on it with my SanDisk in it? Can I record a 25 minute long video with it?
Yes. You can use the camera (indoors, outdoors and underwater) completely from the buttons and touch screen interface. No phone or remote control is required. Those other devices just add flexibility.
There are options for saving the video. If you have the app, you can transfer the images via wifi or USB. You should also be able to use an adapter to connect the card to your Mobile device, MacBook or PC and pull the files off the card that way…via a photos app or the file manager.
I’m not certain, but I suspect you can make a video that long. Batty life is the question. I’ve never checked to see how long the batty lasts. It will depend on image quality, I’m certain. GoPro does allow the camera to be powered externally via USB-C, so if the internal battery doesn’t have enough capacity (which it may), you can power the camera from an external source.
2 years, 6 months ago
by
AncientGeek
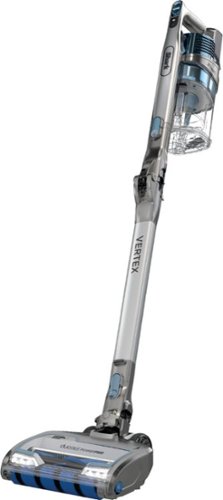
The Shark Vertex combines incredible suction power with the convenience of a lightweight cordless stick. Featuring DuoClean PowerFins technology with two brushrolls, you get deep cleaning to pick up more in every pass* and a MultiFLEX wand for flexible reach and compact storage (*vs. original DuoClean).
Can this vacuum be safely used on vinyl plank floors?
I certainly think so. The power brush head is very soft.
3 years, 5 months ago
by
AncientGeek
The Shark Vertex combines incredible suction power with the convenience of a lightweight cordless stick. Featuring DuoClean PowerFins technology with two brushrolls, you get deep cleaning to pick up more in every pass* and a MultiFLEX wand for flexible reach and compact storage (*vs. original DuoClean).
Can you order additional batteries for this?
Yes. $80 at https://www.sharkclean.com/parts-and-accessories/product-results/2900/shark-vertex-lightweight-cordless-stick-vacuum-with-duoclean-powerfins/
3 years, 5 months ago
by
AncientGeek

The Logitech K380 Multi-Device Bluetooth keyboard for Mac makes any space minimalist, modern, and multi-device by letting you type on your iPhone, iPad, MacBook, iMac more.* Connect with three devices simultaneously and switch instantly between them. The K380 Multi-Device for Mac is compact and lightweight. You can type on the device of your choice, so you can own your space—anywhere.
Can I use this with my Windows laptop even though it says it's for Mac? (I have a Dell XPS 2-in-1). If so, can I switch between Windows and Apple devices when using? Thanks!
Yes. However, the issue would be the keyboard layout. The K380 layout is optimized for Apple products. There is no “Backspace” key and several of the keys are labelled differently. (Cmd and Opt for example). If you can live with those differences, it does seem to work in the brief test I just performed on my HP notebook.
3 years, 9 months ago
by
AncientGeek
Film underwater scenes in 4K with this 12-megapixel GoPro HERO7 action camera. Its HyperSmooth stabilization feature lets you capture shake-free videos, and it withstands submersion up to 33 feet without a waterproof case. Stream captured videos from this rugged GoPro HERO7 action camera on Facebook Live via the companion app.
Are all go pro 6 accessories still compatible with the 7 ? ThankU
It appears to me that the mounts, grips and batteries would all work with the 7.
5 years, 7 months ago
by
AncientGeek
Film underwater scenes in 4K with this 12-megapixel GoPro HERO7 action camera. Its HyperSmooth stabilization feature lets you capture shake-free videos, and it withstands submersion up to 33 feet without a waterproof case. Stream captured videos from this rugged GoPro HERO7 action camera on Facebook Live via the companion app.
Does it use the same battery as the GoPro Hero 6?
I ordered a battery charger and an extra battery for the 7. The specs on the battery and charger indicate that the same battery works in the 5, 6 and 7. I have a 4, which uses the older style battery, so I had to order the new style for the 7.
5 years, 7 months ago
by
AncientGeek
Film underwater scenes in 4K with this 12-megapixel GoPro HERO7 action camera. Its HyperSmooth stabilization feature lets you capture shake-free videos, and it withstands submersion up to 33 feet without a waterproof case. Stream captured videos from this rugged GoPro HERO7 action camera on Facebook Live via the companion app.
Will all of the accessories (i.e. batteries, housings, grips, etc) that fit my hero 6 still fit the 7?
I’m not sure about the housing, it might. However, I think the batteries and grips will all work with the 7. From what I discovered, it appears the battery fits the 5,6 and 7. I have a 4 Silver which uses the older battery style. The batteries appear to have changed with the 5 and stayed the same through the 7 so far.
5 years, 7 months ago
by
AncientGeek
Film underwater scenes in 4K with this 12-megapixel GoPro HERO7 action camera. Its HyperSmooth stabilization feature lets you capture shake-free videos, and it withstands submersion up to 33 feet without a waterproof case. Stream captured videos from this rugged GoPro HERO7 action camera on Facebook Live via the companion app.
Can it be used as a dash camera
I have a Garmin Dash Camera and I’d say that a DashCam is a specialized device that isn’t easily replaced by an action camera or any other camera. A good DashCam will power on when you start your vehicle and start recording. It saves the files at regular intervals to maximize recoverability after a crash and make future review and retrieval easier. They also have G Sensors that automatically save recordings upon impact. They are really optimized for different purposes. You don’t need the aggressive image stabilization that comes with an action camera. You need good image quality, but not 4K and usually you are optimizing for storage capacity to some extent. High res action camera recordings are very large. That said, you could use voice commands and lower resolution recording with this camera and manage the files yourself. It could be made to work with some manual intervention.
5 years, 7 months ago
by
AncientGeek
The Back-UPS battery backup offers guaranteed power and surge protection for wireless networks, computers, gaming consoles and other electronics in your home or business. Models supply battery backup during outages and unsafe voltage fluctuations, as well as provide protection from damaging surges and spikes. They're available in 'tower' or 'floor' styles, and together with a variety of standard features, they are the perfect choice to protect your data and keep you connected
Is the cord that plugs into the unit replaceable? I am in need of a 15 foot length cord.
It is not “removable”, so replacing it would require opening the unit up. It would be easiest just to add whatever length extension cord you need.
5 years, 8 months ago
by
AncientGeek
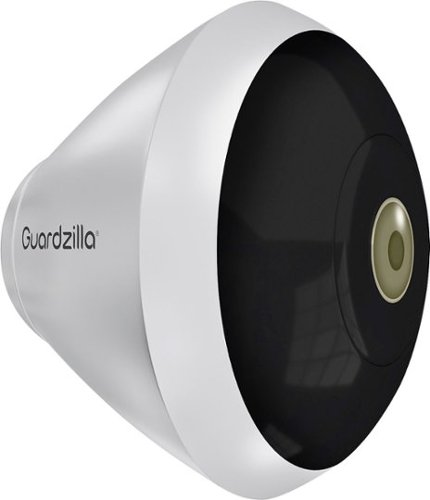
Monitor your property from your smartphone with this Wi-Fi enabled Guardzilla 360-degree outdoor camera. The 100dB siren warns off potential intruders, while night detection records in dim conditions for enhanced security after sunset. This Guardzilla 360-degree outdoor camera instantly alerts your phone when motion is detected, so you can react quickly.
Is the video resolution at 720p or 1080p?
Neither. This camera has a hemispherical image which doesn’t directly translate to the HD resolutions we see in modern rectangular video products.
5 years, 9 months ago
by
AncientGeek