TechnicallyWell's stats
- Review count143
- Helpfulness votes1,838
- First reviewDecember 6, 2009
- Last reviewApril 28, 2024
- Featured reviews0
- Average rating4.7
Reviews comments
- Review comment count0
- Helpfulness votes0
- First review commentNone
- Last review commentNone
- Featured review comments0
Questions
- Question count0
- Helpfulness votes0
- First questionNone
- Last questionNone
- Featured questions0
- Answer count21
- Helpfulness votes28
- First answerDecember 6, 2009
- Last answerNovember 27, 2021
- Featured answers0
- Best answers5
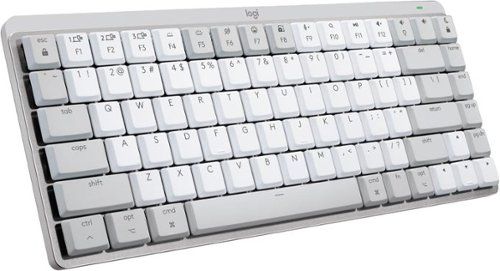
A minimalist keyboard mastered for Mac with extraordinary feel, precision, and performance. Low-profile mechanical switches deliver a satisfying and quiet typing experience. Dual colored keycaps with a key layout for Mac computers help improve precision through your peripheral vision. Plus, get a complimentary 1-month Creative Cloud subscription with your purchase of MX Mechanical Mini For Mac and create, make, and do like never before.
Customer Rating

5
Mac-specific keys, no dongle included
on September 20, 2022
Posted by: TechnicallyWell
## Design
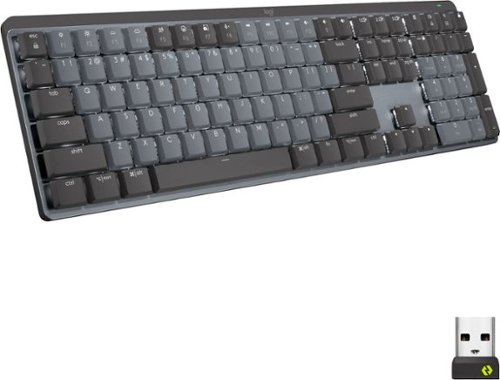
Logitech’s MX Keys keyboard is very popular, and it didn’t take long for Logitech to release the MX Keys Mini for those who wanted a more compact solution and didn’t mind the loss of the number keypad.
Now that Logitech’s MX *Mechanical* keyboards are also becoming popular, they’ve also released this “Mini” version that offers a compact, portable design and the same “clicky” feel as the full-sized version.
This particular keyboard is aimed at Mac users. It has a mostly white plastic exterior with a silver metallic accent plate located beneath the keys. It mimics the design of Apple’s keyboard well. This keyboard has some weight with it which is good for stability, but is something to keep in mind if you plan to pack this keyboard for travel or for your commute to the office.
This keyboard does have backlighting but only in the white color (same as MX Keys), so no RGB color effects. However, there are some animation lighting effects you can access by pressing the “fn” key and the “lightbulb” key (volume down), same as the full-sized Logitech Mechanical keyboard.
## Performance
Like the MX Keys, the MX Mechanical Mini for Mac keyboard is very comfortable and great to type on. Even though these are “Tactile Quiet” keys, it’s louder than MX Keys, but shouldn’t be a major distraction if you’re near your coworkers.
There are additional keys for dictation, emoji, search and muting the microphone, but some of these functions require the Logi Options+ software to work. In my opinion, the Logi Options+ software is a bit bloated and loads at each restart, so I haven’t installed it on my Mac at this time. The basic functions of the keyboard works fine without the software.
The MX Mechanical Mini keyboard connects to your Mac or your iPad via Bluetooth. It can also connect to a Logi Bolt receiver, but it’s important to note that the Logi Bolt receiver is not included with this “Mini for Mac” version of the keyboard. And also remember that Logitech devices using “Bolt” receivers do not mix with Logitech devices using “Unifying” devices.
## Battery Life
The keyboard saves battery power by only lighting up when it senses your hands approaching, but I’ve walked by the room and noticed the keyboard lighting up on its own (similar to my MX Keys keyboard). With the backlighting on, the keyboard can last up to 15 days or up to 10 months with the backlight turned off.
The keyboard is recharged with in included USB-C to USB-C cable (please note that the non-Mac version typically comes with a USB-A to USB-C cable). Data is not passed through the cable, therefore this keyboard cannot be used as a “wired” keyboard.
## Summary
The MX Mechanical Mini for Mac keyboard is very comfortable to type on, but is a little louder (and “clickier”) than the MX Keys. This version contains Mac-specific keys and white-and-silver styling, but there is also a “regular” MX Mechanical Mini version available that has key labeling for both Mac and PC. You can switch between 3 Mac, iPad or iPhone devices via Bluetooth, but this keyboard uses Logitech’s newer “Bolt” nano receiver which is not included in this “Mini for Mac” version.
I would recommend this to a friend!

Share this review:
0points
0of 0voted this as helpful.

Store your favorite gaming titles on this SanDisk SDSQXAO-256G-AN6ZG Fortnite Edition microSDXC memory card for Nintendo Switch. The 256GB storage capacity provides ample space for large video games, while the read speeds of up to 100MB/sec. and write speeds of up to 90MB/sec. ensure rapid data transfer. This SanDisk Fortnite Edition microSDXC memory card boasts high performance to effortlessly load your titles.
Customer Rating
5
Works great, easy to transfer to new card
on September 17, 2022
Posted by: TechnicallyWell
## How to transfer to a new microSD card
If you already have a microSD card in your Nintendo Switch and you want to transfer your content to this large microSD card, I found that the process was surprisingly easy. You’ll need a computer and a way to plug your microSD card into your computer (like a USB memory card reader if your computer doesn’t already have a built-in card reader).
1. Power off your Nintendo Switch (hold down the power button for 3 seconds, select "Power Options", then "Turn Off".).
2. Remove the “old” microSD card from your Switch (it’s behind the kickstand on the back of your Switch).
3. Insert the “old” microSD card into the card reader and connect to your computer.
4. The “old” microSD card should have a folder titled “Nintendo” that contains all your games and screenshots. Copy this folder to your computer (I just placed it on the desktop).
5. When it is done copying (mine took about 25 minutes), safely eject the “old” microSD card from your computer (if you’re on Windows, there should be an icon with a green icon in the taskbar by the system clock that allows you eject removable media).
6. Connect this “new” microSD card to your computer.
7. Copy the “Nintendo” folder you just saved to your computer to the “new” microSD card.
8. When it is done copying, safely eject the “new” microSD card from your computer.
9. While the Switch is still off, insert the “new” microSD card, turn on the Switch, and verify that your downloaded games and your screenshots are still there.
10. If everything is OK, you can optionally delete the “Nintendo” folder from your computer and your “old” microSD card (unless you want to keep them as a backup, which isn’t a bad idea).
11. Don’t forget to look for the small paper insert included with this microSD card to redeem your wrap in Fortnite!
If the copy fails for any reason, don’t worry as you can simply redownload your games from the Nintendo eShop to the new microSD card. Your game saves are actually stored on the Nintendo Switch’s built-in system memory even if the game itself is saved on the microSD card. The main things you risk losing with the microSD card are the screenshot photos and videos you have saved.
## Performance
I had a smaller Samsung microSD card in my Switch previously and this SanDIsk card seems to load games just as fast as my old card. I haven’t noticed any issues with the new card and now I have double the storage! This comes in handy as game files seem to keep getting bigger and bigger (I believe Fortnite is over 15GB now on the Switch). The included code for a Fortnite wrap is a nice bonus!
I would recommend this to a friend!
Share this review:
0points
0of 0voted this as helpful.
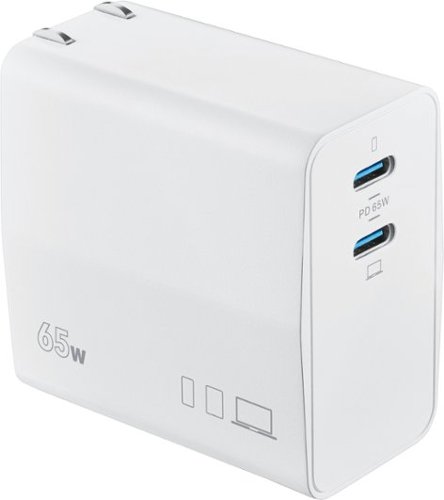
Don’t let the battery of your device die as you work throughout the day. The Insignia NS-PW365C2W22 100W Dual Port USB-C Compact Wall Charger for Business USB-C Laptops & One Device has a high, 100-watt output to quickly charge your business laptop, smartphone, tablet, and more. It has two USB-C ports so you can connect your cable (not included) and charge two devices simultaneously. Its compact and durable body with a foldable plug easily fits into a purse or pocket, ready for when you need it. A simple white design pairs well with your other accessories. Keep your laptop and phone both working as hard as you do with this dual port, easy-to-carry charger.
Posted by: TechnicallyWell
## Design
Thankfully, it appears USB-C is becoming more and more the standard for charging for everything from phones to laptops. This two port charger from Insignia features two USB-C ports on the front and foldable AC prongs which makes this charger nice for traveling or for slipping into your laptop bag.
The charger’s dimensions are 2.2 x 1.3 x 2.1 in and weighs 0.24 pounds.
## Performance
This charger does get warm in use and what some may consider “hot,” but this is normal for many laptop chargers, especially the smaller they are. It provided the correct voltage to my Dell XPS laptop and also charged my Acer R13 Chromebook which has been finicky with other USB-C chargers.
The maximum power output per port varies depending if one or both ports are in use. The charger divides the power up this way so most laptops will still get enough power to charge while diverting some power to smaller devices like a smartphone or earbuds so they can charge at the same time.
### One Port Use
If only one port is in use, you get the full 65 watts from this charger, and the following voltages and amps are supported.
5V 3A
9V 3A
15V 3A
20V 3.25A
(PPS) 3.3-21V/3.25A
5V 3A
9V 3A
15V 3A
20V 3.25A
(PPS) 3.3-21V/3.25A
### Double Port Use
If both ports are in use, then the bottom port will get 45 watts while the top port will get 20 watts.
The 20 watt port (top) will output enough for smaller devices like phones, many tablets/iPads, and earbuds/AirPods. It will output up to:
5V 3A
9v 2.22A
(PPS) 3.3-11V/2.2A
5V 3A
9v 2.22A
(PPS) 3.3-11V/2.2A
The 45 watt port (bottom) will output enough for most laptops like the MacBook Air M1 (in fact, it only comes with a 30 watt charger). Even if your laptop requires more power, it may still “slow” charge with 45 watts if it is off or in sleep mode while connected. It will output up to:
5V 3A
9V 3A
15V 3A
20V 2.25A
(PPS) 3.3-16V/3A
5V 3A
9V 3A
15V 3A
20V 2.25A
(PPS) 3.3-16V/3A
Please note that when both ports are in use, you likely will not be able to charge two laptops at the same time since 20 watts is not enough for most laptops.
## Summary
Overall, this is a handy travel charger with its foldable prongs and its ability to divide up its power to charge a phone and a laptop at the same time.
I would recommend this to a friend!
Share this review:
0points
0of 0voted this as helpful.

Meet the Ninja Foodi Smart XL Grill, the smart XL indoor grill that sears, sizzles, and air fry crisps. This 2nd generation grill has 6-in-1 functionality, now with a new sleek design. Smart Cook System helps you achieve the perfect doneness, from rare to well-done, at the touch of a button without the guesswork. With an XL capacity, grill large family meals or air fry crisp guilt-free fried favorites.
Customer Rating
5
Love the automatic temperature monitoring
on August 12, 2022
Posted by: TechnicallyWell
## Usage
The instructions are a little overwhelming for this grill, but there are two main ways to use it:
- Manual mode: This is the default when you turn the unit on and lets you set the temperature and time manually.
1. First, tap a function on the bottom (for example, “grill”)
2. Set the temperature on the left side of the display (lo, med, hi, max)
3. Set the time on the right.
4. Press start, wait for the preheat to finish, then put your meat inside.
- Thermometer mode: This feature is very cool and automatically shuts off when the inside of the meat reaches a certain temperature. Unfortunately, you can not use this on frozen meats.
1. First, connect the thermometer wire to the right side of the grill.
2. Turn on the unit, then press the silver button with the picture of the thermometer.
3. Select the function at the bottom (for example, “grill”).
4. On the right side of the display, you select the meat (for example, “beef”)
5. On the left side you select the doneness (rare, med rare, med, med well, well).
6. Press start, wait for the preheat to finish, then put your meat inside and insert the thermometer into the middle of the thickest part of the meat.
7. The display will show “Get Food” when cooking is almost done. At this point, you remove the meat from the grill and place it on a plate where it will “carry-over cook” for 3-5 minutes .
## Performance
I’ve made both hot dogs and burgers on this grill with “thermometer mode” and they come out tasting great, almost like I made them on an outside grill (although, they are lacking in that smoky flavor).
Air frying works well, too, but if you have a lot of pieces in the basket, you need to make sure to shake them up or otherwise move them around every so often while cooking so the air can hit all sides of the food.
Preheating takes about 10 minutes and can be skipped, but it is not recommended by Ninja. It’s kind of a pain that it takes so long to preheat, but I like how the burgers come out crisp on the outside and juicy on the inside when you allow it to preheat first.
I haven’t really noticed any smoke when using the unit, so Ninja seems to have done a good job of mitigating that.
## Clean up
Maintenance is fairly easy. There are 4 main parts to clean:
1. The grilling plate (or the air crisper basket if you use that instead)
2. The splatter guard (mounted in the lid)
3. The grease catcher
4. The thermometer itself
2. The splatter guard (mounted in the lid)
3. The grease catcher
4. The thermometer itself
All the pieces are non-stick and gunk comes off fairly easily. Hopefully, this lasts over time, but we know non-stick doesn’t last forever. A brush is included as well to help remove the stuck-on food pieces and grease and get between the many grooves of the grill plate.
## Design
The unit is rather large and takes up a considerable amount of counterspace. The power cord sticks out directly from the back, making it hard to push up against the wall when not in use. If you have the counterspace for it, it’s a great addition to your kitchen. However, if this is something you plan to put away and get out each time you want to use it, you may quickly tire of that given its bulky size.
There is a storage compartment in the side of the unit for the thermometer, but you need to disconnect it and wrap the wire around the storage compartment each time, which is a bit of a hassle as well. It would be easier if there was just a tube alongside the unit you could stick the thermometer in when not in use.
## Summary
Overall, this Ninja Foodi Indoor Grill performs great and helps take the guesswork out of grilling meat as the included thermometer monitors the temperature and shuts the unit off when the meat gets hot enough. The unit is somewhat large and bulky, so be sure to take the size into account when planning where you’ll put it in your kitchen.
I would recommend this to a friend!

Share this review:
+5points
5of 5voted this as helpful.

The G5 gaming laptop powered by NVIDIA GeForce RTX 30 Series GPU combines gaming, entertainment, work and more! Its powerful 11th Gen Intel Processor allows you to effortlessly handle multiple tasks at the same time. It features a 3 screen display output, built-in SD card slot, and next-gen Wi-Fi 6 technology; with a tool for every task, this laptop provides great balance between gaming, entertainment, and work capabilities. Welcome to your new go-to laptop.
Customer Rating
5
Solid performance for work and play
on August 10, 2022
Posted by: TechnicallyWell
## Design
The Gigabyte G5 laptop is somewhat large and weighs 4.5 pounds, but feels solid as the top and the trim around the keyboard are aluminum with textured plastic sides and a plastic bottom with plenty of ventilation.
The keyboard has RGB LED backlighting that you can customize the color of with the pre-installed LED Keyboard Setting app in Windows.
If you’re sick of living the “dongle life” and miss having ports directly on the computer, then this laptop will not disappoint. The Gigabyte G5 laptop has plenty of ports:
- USB 3.2 port
- another USB 3.2 port
- USB 2.0 port
- USB-C port
- SD card reader
- HDMI port
- Mini DisplayPort 1.4
- Ethernet Port
- audio combo jack
- mic jack
- USB 3.2 port
- another USB 3.2 port
- USB 2.0 port
- USB-C port
- SD card reader
- HDMI port
- Mini DisplayPort 1.4
- Ethernet Port
- audio combo jack
- mic jack
## Display
This Gigabyte G5 laptop features a 15.6” 1080p display with 144Hz refresh rate. The screen has a matte finish that helps minimize glare. The screen looks beautiful whether you’re working in Word, playing a few rounds of Fortnite, or watching an HD movie. The screen features wide viewing angles, but the backlighting will look best when facing the screen head on.
The Gigabyte G5 did not detect my external monitor when connecting through my USB-C docking station, so you’ll want to use the HDMI or Mini DisplayPort for an external monitor.
My only critique of the display would be a moderate amount of backlight bleed, which is not unusual from other gaming laptops I’ve used. However, if you plan to watch a lot of letterboxed movies on this and you’re OCD about backlight bleed, you’ll definitely notice it.
## Performance
The laptop uses an 11th generation Intel i5-11400H processor with NVIDIA GeForce RTX 3050Ti graphics. I used UserBenchmark’s tool with Gigabyte’s “Control Center” application set to “Performance”, the laptop plugged into AC power, and the NVIDIA graphics card set as the default. UserBenchmark rated this PC as follows:
- PC Status: 92% “Overall this PC is performing way above expectations (92nd percentile).”
- Processor: 93% “With a gaming score of 93%, this CPU's suitability for 3D gaming is excellent.”
- GPU: 73.5% “73.5% is a good 3D score. This GPU can handle the majority of recent games at high resolutions and ultra detail levels.”
- Boot Drive: 368% (relative performance due to insufficient samples) “This drive is suitable for heavy workstation use, it will facilitate fast boots, responsive applications and allow for fast transfers of multi-gigabyte files.”
- Memory Kit: 53.1% “8GB is enough RAM to run any version of Windows and it's sufficient for the vast majority of games.”
While playing Fortnite on the “Performance” setting, the FPS seemed to average around 70. After a self-assessment, Fortnite set itself to “High” for graphics quality. Gameplay was smooth and looked sharp and vibrant on the built-in display.
The built-in speakers are decent and even have a little bit of bass to them, but if you’re like me, you’ll likely be gaming with a headset and not relying on the built-in speakers. However, the built-in speakers are fine for watching YouTube videos or attending virtual meetings.
The laptop only has 8 GB of RAM which seems to be becoming the new minimum you’ll want in a Windows 11 PC. However, the laptop still performed very well for gaming and multitasking, but some memory heavy applications like video editors (and Google Chrome, lol) may quickly gobble up the available RAM.
Gigabyte does include some customization software (simply named “Control Center”) which allows you to adjust the fan speeds and create keyboard and mouse macros. There is also a “Quiet” setting that can be helpful for studying or working in a quiet library or coffee shop (with, of course, a hit to performance to keep the heat in check).
## Summary
Overall, whether you’re just getting into gaming or you’re a student that wants a laptop for both your studies and your study breaks, this Gigabyte G5 laptop is a solid performer for productivity and gaming alike. There are a plethora of ports available and the screen is easy on the eyes for long study and gaming sessions.
I would recommend this to a friend!


Share this review:
+1point
14of 27voted this as helpful.
Bring the party with you and spread sound with the XE200 Wireless speaker. A line shaped diffuser and X-balanced speakers provide a wide sound stage, with powerful bass and richer sound. Pair with IP67 Waterproof, dustproof and shockproof design, this speaker is made for even the strongest elements.
Customer Rating
5
Great sound, but I kind of miss the party lights
on July 18, 2022
Posted by: TechnicallyWell
## Design
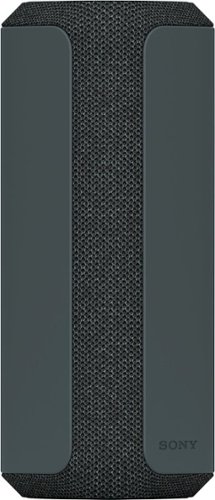
The Sony SRS-XE200 speaker has a new, unique design where it is not obvious where the actual speakers are located. Instead, Sony is using a new “line-shape diffuser” on this speaker which helps distribute the sound more evenly around the speaker. The speaker has a modern design with a mostly plastic exterior and some fabric accents behind it, that for some reason makes me think of the Cybertruck when I see it.
Aside from some small LED indicator lights, there are no “party lights” on the XE200 as compared to something like Sony’s SRS-XB32. There is a carrying strap attached to the speaker that is almost too long as it sometimes gets in the way of setting the speaker down on a flat surface.
Towards the back of the speaker, you’ll find the power button, Bluetooth button, play/pause button, volume buttons, battery status button, and (not found on many Bluetooth speaker) a dedicated mute button for the microphone. The USB-C charging port can be found under the flap on the back of the speaker.
## Performance
Coming from the Sony SRS-XB32 speaker, I did notice that the bass is not as strong on the XE200 out of the box. However, you can increase (or decrease) the bass (or mids or treble) through the equalizer in Sony’s Music Center app, but there is no dedicated “bass boost” function. Still, sound quality is great and the speaker gets loud enough to fill a medium to large-ish sized room, making it great for indoor or outdoor social gatherings.
The new Line-Shape Diffuser does indeed help distribute the sound from the speaker to not only directly in front of the speaker, but to the sides of the speaker as well. So you don’t need to be sitting exactly in front of the speaker to get the best sound.
## Features
Line-Shape Diffuser: Looking at the speaker, you’ll see a narrow fabric area on the front between larger plastic panels. If you’re like me, you would think this would limit the sound coming out of the speaker, but it instead helps spread the sound out to about 60-70 degrees on either side.
Battery Care feature: This isn’t on by default, but in Sony’s Music Center app, you can enable the Battery Care feature to limit charging to about 90%. This helps prolong the lifespan of the speaker’s battery because, like our smartphones, we should not keep lithium batteries charged to 100% all of the time. You can, of course, disable this feature if you do indeed want the battery at 100% for a long camping trip, for example.
IP67 water and dust resistance: This speaker is ideal for travel or using pool-side with its IP67 rating, so you don’t need to worry about splashes, sand, or dust (just make sure to keep the charging port closed tightly).
Echo Canceling microphone: You can also use this speaker for work calls as it has an echo canceling microphone. In testing the speaker in an empty room by recording myself, I did indeed notice that the speaker seemed to eliminate any echo from my voice as long as I was facing the front of the speaker directly.
## Battery Life
The speaker can achieve up to 16 hours of battery life on a single charge, and uses a common USB-C cable for recharging. A quick 10 minute charge can get you just over an hour of playback time when time is of the essence. As noted above, you can enable the Battery Care feature in the Sony Music Center app to help prolong the lifespan
## Summary
The Sony SRS-XE200 speaker is an ideal outdoor musical companion thanks to its great sound quality and IP67 water and dust resistance. The speaker can also be used as a speakerphone for work calls with its echo canceling microphone.
I would recommend this to a friend!
Share this review:
0points
0of 0voted this as helpful.
Introducing MX Mechanical - a full-size keyboard with extraordinary feel, precision, and performance. Low-profile mechanical typing delivers satisfying feedback in your choice of key switches – Tactile Quiet, Clicky, or Linear. MX Mechanical is crafted for ergonomic comfort, with smart illumination and easy-switch – allowing you to connect up to 3 devices and stay in your flow for hours.
Posted by: TechnicallyWell
## Design
I’m a big fan of Logitech’s MX Keys keyboard, but it has more of a “mushy” feel as it is a membrane keyboard. This Logitech MX Mechanical keyboard has a more “clicky” feel to it compared to the MX Keys and still maintains the low-profile and comfortable typing experience that Logitech’s MX keyboards are known for.
This keyboard does have backlighting but only in the white color (same as MX Keys). If you’re looking for RGB (multi) color lighting, you won’t find it here. There are several lighting effects you can access by pressing the “fn” key and the “lightbulb” key (volume down).
## Performance
Like the MX Keys, the MX Mechanical keyboard is very comfortable and a joy to type on. It’s louder than MX Keys, but shouldn’t be a major distraction, but the “clicky” is somewhat muted and shouldn’t be a huge distraction to co-workers (or family members, if working from home).
There are additional keys for dictation, emoji, search and muting the microphone, but some of these functions require the Logi Options+ software to work. The Logi Options+ is a bit bloated and slow to come up (and it loads at each reboot, grrrrr).
The MX Mechanical keyboard can connect to your computer (or tablet or smartphone) via Bluetooth or via the Logi Bolt (more on that below) USB receiver.
## Logi Bolt vs Logi Unifying Receiver
One “gotcha” I’ve since learned about: Logitech devices using “Bolt” receivers do not mix with Logitech devices using “Unifying” devices.
Previously, if you purchased a Logitech wireless mouse and keyboard over the past few years, they likely included a small “Unifying” receiver for each device, and you could use Logitech’s software to pair the mouse and keyboard to one receiver to save a USB port.
The Logitech MX Mechanical keyboard uses a Logi “Bolt” receiver which is not compatible with the popular “Unifying” receiver from the past few years. They can not be mixed and matched. If you want to pair this keyboard with a mouse on one receiver, you’ll need to pick up one of Logitech’s newer mice that also uses a “Bolt” receiver. You can then combine the keyboard and mouse to one Bolt receiver using the Logi Bolt app on a computer.
Of course, if your computer supports Bluetooth, you can pair the keyboard via Bluetooth instead of using the Logi Bolt receiver and avoid the drama altogether.
## Battery Life
The keyboard saves battery power by only lighting up when it senses your hands approaching, but I’ve walked by the room and noticed the keyboard lighting up on its own (similar to my MX Keys keyboard). Despite this, the battery seems to last up to a week or so depending on how much I use it.
The keyboard is recharged with in included USB-C cable, but data is not passed through the cable. Therefore, this keyboard cannot be used as a “wired” keyboard.
## Summary
The MX Mechanical keyboard is very comfortable to type on, but is a little louder (and “clickier”) than the MX Keys. You can switch between 3 devices, but this keyboard uses Logitech’s newer “Bolt” nano receiver (instead of the popular “Unifying” receiver used previously) and Bolt devices cannot be paired together with Unifying devices (nor vice versa) on the same receiver.
I would recommend this to a friend!


Share this review:
+4points
4of 4voted this as helpful.
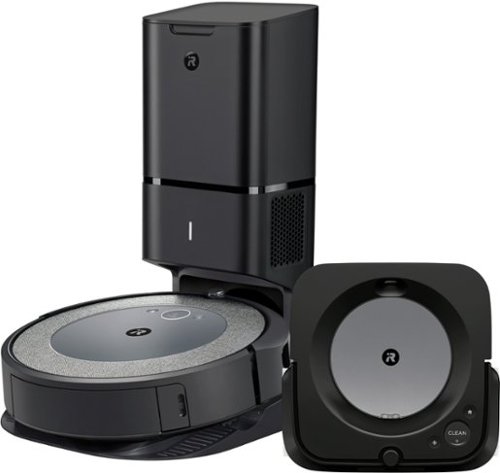
The Dream Team of Clean. With Imprint Link Technology, the Roomba i3+ EVO robot vacuum and Braava jet m6 robot mop team up to vacuum then mop automatically in perfect sequence, giving your floors a comprehensive clean with just a command to your voice assistant or in the app. With breakthrough Imprint Technology, we’re building a world where robots intelligently communicate with each other and the rest of your connected home.
Posted by: TechnicallyWell
## Setup
There is a lot of packaging to go through, breakdown, and put into the recycling bin, but at least you know that everything is protected well. Once you have all the pieces out of the box, you’ll find a quick start card to help you set up the charging base and wake up your robot. You’ll then head to the iRobot app to finish setting up your robots and connect them to WiFi. You may need to let it charge for a while (and apply any needed updates), but after 30 minutes or so, your robot should be ready to clean.
## Performance
### Roomba i3+
If you’re upgrading from a previous Roomba (or other robotic vacuum) like I am, you may be surprised to find that the i3+ includes a “mapping” feature. You can either allow the vacuum to learn while it cleans, or you can send it on a specific mapping-only quest where it doesn’t clean but instead just ping-pongs around your house, keeping track of walls and other barriers. You can then see the map inside the app and section off the rooms and name them. You’ll probably see some hilarious shaped rooms in the app as the Roomba doesn’t know furniture from a wall, but you get a general idea of what the Roomba can “see” around your home.
After you name the rooms, you can use the app to have Roomba clean only a certain room, which is handy if, for example, there is some dry cereal spilled in the kitchen and you don’t want the Roomba to clean the whole house just to get to the cereal.
The Roomba i3+ seems to have some upgraded rollers and suction power as I notice it picking up more dirt than my previous Roomba. One of my favorite features in the self-emptying dust bin! When the Roomba returns to its base it (loudly) transfers the dirt from the robot into a bag inside of the base. So the Roomba can perform multiple cleaning jobs before the dust bin needs emptying. I rarely used Alexa with my previous Roomba because while I was bent over emptying the dust bin, it was just easier to hit the “Clean” button while I’m down there. However, now that this Roomba empties itself, I might use the Alexa integration more often!
I rarely run the Roomba while I’m away from home as I like to be within earshot in case it gets tangled on a cord I forgot to pick up. However, I like that the app notifies you with a push notification if there is a problem. I also like that with the app, you can set the floors to automatically be mopped after you vacuum. It’s like the two robots are BFFs!
### Braava jet m6
Before cleaning, you’ll need to attach a cleaning pad to the bottom of the Roomba (either one of the included single-use pads, or the multi-use microfiber pad) and fill the inside tank with a mixture of the cleaning solution and water.
This is my first mopping robot and it is quite interesting to watch it work. It will move forward in a straight line about 2 feet or so, and if there are no obstructions, it will back up, spray some liquid, and then drive the cleaning pad over it, going an extra foot or so while the cleaning pad is still wet.
The Braava did a surprisingly good job maintaining the straight lines while it cleaned the floor and probably did a more thorough job mopping than I normally do. :-D It struggled more under the table and chairs, but in all fairness, I’m able to move the chairs completely out of the way to mop under the table so a human definitely has an advantage there.
The Braava also does a good job of not overstaurating a certain area and uses the little bit it sprayed on the floor to cover a wide area. You can adjust this in the settings in the app to have the Braava use more or less liquid while cleaning. I set it about in the middle and was pleased with how well it cleaned. I can even walk in the area it cleaned after about 10 minutes without getting my socks overly wet.
The Braava has a very low clearance and does not go onto carpeted areas or even the mats under the doors. This also prevents it from spraying cleaning solution down the furnace grate on the floor which I appreciate! I’m also happy I did not have to buy additional virtual barriers that I would have to move between vacuuming and mopping.
When it is done, you can throw the multi-use pad into your washing machine or hand wash it so it is ready for the next cleaning mission.
## Summary
This combo pack of the Roomba i3+ and Braava jet m6 is a great tag team system for keeping your floors clean! I appreciate the mapping features and the fact that you can set the robots to work in tandem with the Roomba vacuuming first, then automatically handing it off to the Braava to mop. The self-emptying dust bin is also an appreciated upgrade for keeping the Roomba ready to clean at any time.
I would recommend this to a friend!

Share this review:
-1point
1of 3voted this as helpful.
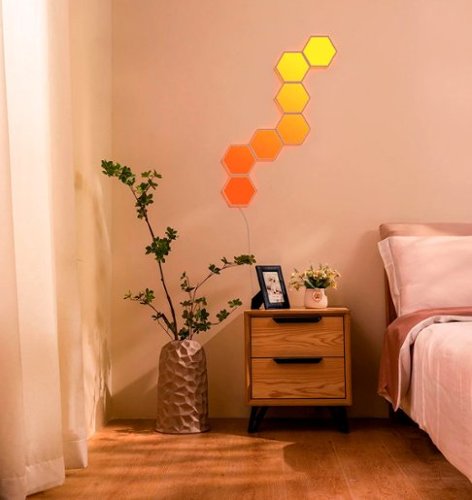
Govee Glide Hexa Light Panels are composed of 7 panels that can be assorted into various shapes. It can be controlled using your favorite voice assistants such as Alexa and Google Assistant as well as the Govee Home App. You can even customize your design, effects, colors, and more.
Customer Rating
5
A little complicated to mount, but well worth it
on May 27, 2022
Posted by: TechnicallyWell
## Setup
Comparing these with the Nano Aurora panels I’ve set up previously, the Govee Hexa panels were a little more complicated as you need to remember to insert both the cable from the previous panel and the cable to the next panel before sticking the panel to the wall. Additionally, the cables are a little longer than they need to be, so you also need to remember to fold them underneath the panel before pressing the panel against the wall.
If you do mess up as I did, you can pull just the panel off of the wall (leaving the mounting bracket with the adhesive) by carefully lifting each corner until you find the corner that easily lifts apart from the bracket. Then, you can connect the cables to the panel, then snap the panel back into the mounting bracket on the wall.
The app does a decent job of showing you which numbered port to place the cable. There are also several videos the app makes you watch so you get an understanding of how to mount the panels.
Govee conveniently includes a simple level with the package, but the level is only good for horizontal leveling. If you do a vertical design like I did (see attached photo), you'll need to use your own level with a vertical level measure.
Govee will initially connect the lights to your phone via Bluetooth, but you'll need to enter your WiFi credentials to get firmware updates and integrate with Alexa or Google Home. Unfortunately, there does not appear to be any official integration with Apple HomeKit or Samsung SmartThings at this time.
## Performance
Each individual panel can show multiple colors at once, an advantage I believe these have over the NanoLeaf Aurora panels. Govee has included a lot of "scenes" that take advantage of this and showcase the impressive animations.
The app also allows you to create your own designs, or simply set the panels to a single color if you like. Additionally, you can set timers to have the panels turn on and off automatically.
If you want the colors to come through on your computer's camera (for streamers or those working from home), I found I had to reduce the brightness of the unit down to 2% so the colors did not appear "washed out" on camera.
One downside I found was that controlling the lights with a "smart outlet" (where the power to the panel is cut off) is that the lights will "remember" the last animation that was set and resumes it, but it "forgets" the brightness settings and turns on at about 50% brightness.
## Summary
The Govee Hexa light panels are a little difficult to set up at first, but they look great and each panel can display several different colors simultaneously. The Govee app comes with many pre-designed "scenes" (animations) with a wide range of styles from "party" (fast moving and strobing) to "relaxing" (subtle fades). While integrations exist with Alexa and Google Home, Apple HomeKit does not appear to be supported as of now.
I would recommend this to a friend!

Share this review:
+1point
1of 1voted this as helpful.
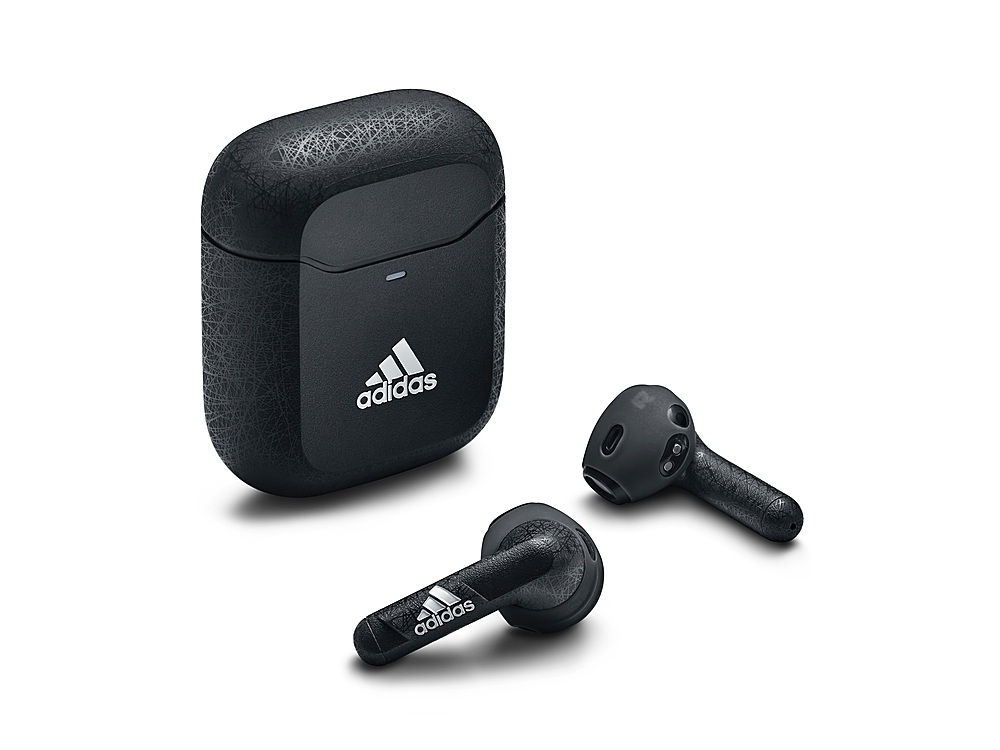
Customer Rating

4
Very good sound with anti-slip silicone sleeves
on May 18, 2022
Posted by: TechnicallyWell
## Design
It seems like everywhere you look, everyone is wearing some type of earbuds. It seems only natural that we would get branded earbuds much like we see branded shirts and pants. With these adidas earbuds, the branding is not overly done: there is a subtle white adidas logo on the left earbud only, while the right earbud has no logo at all.
The earbuds are plastic with a silicone sleeve near the top of the earbud to help keep the earbud in place. This is a good idea as one of the most common complaints with truly wireless earbuds is that they become “slippery when wet.” So once you’ve worked up a sweat, your earbuds can be more likely to slide out of your ear, but the silicone pads on the adidas Z.N.E. 01 earbuds help reduce that issue.
## Performance
Music sounds very good on these earbuds, but the bass is not quite as strong as you would find on the Apple AirPods. However, the music quality is still very good and the earbuds are enjoyable while I’m working, working out, or just going for a walk.
The open design (similar to the original AirPods) allows you to hear what’s going on around you, making them ideal for outdoor workouts. However, this particular model does not feature Active Noise Cancellation, so they’re less ideal for traveling by plane or mowing the yard.
## Features
- Auto-pause: Like the Apple AirPods, these adidas earbuds will automatically pause your music when you remove one earbud.
- One earbud use: You can use one earbud at a time by returning the unused earbud to the charging case.
- IPX4 splash- and sweat-resistance: While the AirPods (gen 1 and 2) didn’t have an official rating for water resistance, these adidas earbuds have an IPX4 rating meaning they should stand up against sweat and splashes, but they are not made for submerging in liquids. If your earbuds do get sweaty, I would make sure to wipe down the metal contacts with a clean, damp cloth and thoroughly let them dry before returning them to the charging case.
- Touch controls: Some may prefer a physical button, but the touch controls seem to work fairly well on these earbuds. A single tap will play and pause your music. Two taps will skip forward. Three taps will rewind. The controls are the same on both earbuds, so it doesn’t matter which one you tap. Unfortunately, there doesn’t appear to be a way to adjust the volume with the touch controls, so you’ll need to use the volume control on your phone.
- Phone calls: Call quality is decent on these earbuds and they do a good job of picking up my voice while minimizing background noise.
## Battery Life
The earbuds can get up to 5 hours of playback on a single charge, with the charging case providing 3 additional charges for up to 20 hours total before the case needs to be recharged. The battery level does display in iOS, however it only shows one battery level that presumably represents both earbuds combined. The charge level of the case does not show on iOS.
The case can be charged with a standard USB-C cable or wireless Qi charging. The charging case uses a single LED to indicate the charge level (red, yellow, then green) to indicate from 0-100%.
## Summary
Overall, the adidas Z.N.E. 01 earbuds are a good alternative to the Apple AirPods at a slightly lower cost. While these earbuds do miss some of the tight iOS integration features of the Apple AirPods (such as Find My location features), they still offer very good sound quality and decent battery life, along with IPX4 splash resistance.
I would recommend this to a friend!


Share this review:
+2points
2of 2voted this as helpful.
TechnicallyWell's Review Comments
TechnicallyWell has not submitted comments on any reviews.
TechnicallyWell's Questions
TechnicallyWell has not submitted any questions.
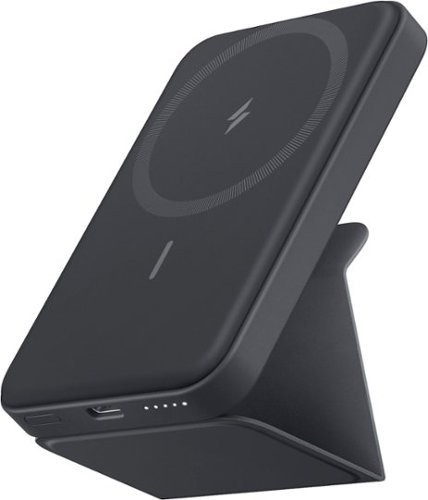
MagGo Magetic Portable 5K Battery with Bracket is both a charger and a stand, specifically for your MagSafe compatible iPhone 12 & 13. Using new technology, this can magnetically attach to the back of your phone, providing it a wireless charge along with a strong attachment. The battery also has a bracket that folds out, so that you can stand your phone up wherever you want.
Does it work for any iPhone like the iPhone 11 Pro Max or is it just for the 12 and 13
The iPhone 11 series does not have the magnetic ring in the back, so this power bank will not be magnetically attracted to the iPhone 11. However, you could sit this power bank on a desk, turn it on, and set your iPhone 8, X, or 11 on top to use it like a regular (non-magnetic) wireless charger.
2 years, 5 months ago
by
TechnicallyWell
MagGo Magetic Portable 5K Battery with Bracket is both a charger and a stand, specifically for your MagSafe compatible iPhone 12 & 13. Using new technology, this can magnetically attach to the back of your phone, providing it a wireless charge along with a strong attachment. The battery also has a bracket that folds out, so that you can stand your phone up wherever you want.
What type of usb do you need to charge this battery pack? Apple sub charger? And do you need to buy a magnetic case for this to use?
You could use the charging brick for your iPhone, but you'll need to temporarily remove the Lightning cable and use a USB-C cable to charge this power bank.
This power bank will work best if you have a magnetic case on your iPhone 12 or 13. If you use a non-magnetic case, the power bank's magnetic attraction will be weaker and it may not stay in place.
This power bank will work best if you have a magnetic case on your iPhone 12 or 13. If you use a non-magnetic case, the power bank's magnetic attraction will be weaker and it may not stay in place.
2 years, 5 months ago
by
TechnicallyWell
Unlock more possibilities than ever with the Pro designed for a Pro like you. The first consumer laptop-to-tablet PC designed on the Intel Evo platform⁹ and designed to light up the best of Windows 11, Surface Pro 8 combines the power of a laptop with the flexibility of a tablet, and every angle in between. Do great things with a larger 13” touchscreen, faster connections with Thunderbolt 4 ports, and extra speed when you need it.
How can I connect a wireless mouse and external storage to the surface pro 8, without any USB ports? Is there something you recommend using?
If you search for a "USB-C to USB adapter", you can find small dongles that will turn a USB-C port into a regular USB port. You can also search for "USB-C Hubs" as some will charge the Surface Pro 8, connect to a monitor, and provide one or two regular USB ports with just one USB-C connection.
Alternatively, you can also look for a wireless mouse that supports Bluetooth if you want to be able to connect a mouse without using a dongle.
Alternatively, you can also look for a wireless mouse that supports Bluetooth if you want to be able to connect a mouse without using a dongle.
2 years, 6 months ago
by
TechnicallyWell
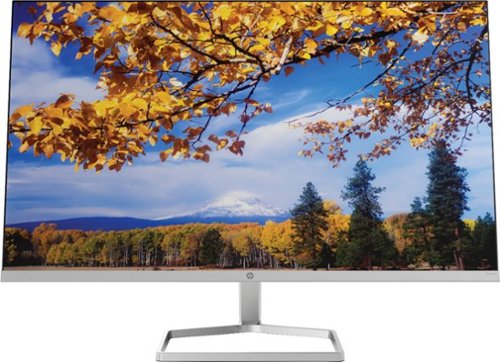
The New Definition of High Definition: This FHD monitor feels as good as it looks, packing IPS technology for 178 degrees ultra-wide viewing angles, 99% sRGB color gamut for color accuracy, and AMD FreeSync to keep your eyes up to speed with your imagination.
how do you connect the monitor to the laptop
Some Windows laptops have a regular HDMI port like you might find on a TV. If that's the case, you can use the included HDMI cable to connect your laptop to this monitor. If your computer has an older VGA port, you would need to buy an inexpensive VGA cable to connect to the monitor.
If your laptop doesn't have an HDMI or VGA port, then you'll likely need an adapter. You could call/chat/email your computer's manufacturer and ask what you would need to connect your laptop to an HDMI monitor.
If your laptop doesn't have an HDMI or VGA port, then you'll likely need an adapter. You could call/chat/email your computer's manufacturer and ask what you would need to connect your laptop to an HDMI monitor.

2 years, 11 months ago
by
TechnicallyWell
The New Definition of High Definition: This FHD monitor feels as good as it looks, packing IPS technology for 178 degrees ultra-wide viewing angles, 99% sRGB color gamut for color accuracy, and AMD FreeSync to keep your eyes up to speed with your imagination.
Would this monitor work well with a Macbook Pro?
You'll likely need an adapter to use this monitor with a MacBook as MacBooks don't typically have a regular HDMI port. Go to Apple's support page and search for the article titled "Connect to HDMI from your Mac". This article will show you the different types of ports you might find on your Mac and what you'll need to connect them to HDMI.

2 years, 11 months ago
by
TechnicallyWell
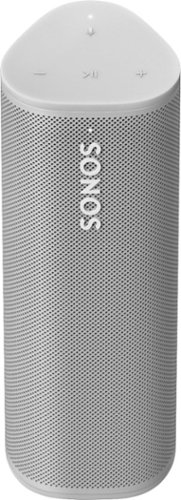
Enjoy astonishing sound with this breakthrough portable speaker. Stream music and more over WiFi at home and listen on the go with Bluetooth. Get up to 10 hours of battery life. Easily control the sound with the Sonos app, your voice, and Apple AirPlay 2. Create a whole-home sound system with multiple Sonos speakers.
Will this integrate with other Sonos speakers over wifi ?
Yes, you can make the Roam part of a "room" in the Sonos app so that it is synchronized with other Sonos speakers, like a Sonos One.
3 years ago
by
TechnicallyWell
Enjoy astonishing sound with this breakthrough portable speaker. Stream music and more over WiFi at home and listen on the go with Bluetooth. Get up to 10 hours of battery life. Easily control the sound with the Sonos app, your voice, and Apple AirPlay 2. Create a whole-home sound system with multiple Sonos speakers.
Do you carry the wireless charger?
I'm not sure I understand your question, but hopefully this information helps:
There is no wireless charger included with the unit. The Roam comes with a USB-C cable for charging. You cable has a USB-A connector at the other end, so it can be plugged into the "regular" (rectangular) USB ports you'll find on older laptops and phone chargers. It could also be used with a power bank if you wanted to be able to charge the Roam while away from a power outlet.
There is no wireless charger included with the unit. The Roam comes with a USB-C cable for charging. You cable has a USB-A connector at the other end, so it can be plugged into the "regular" (rectangular) USB ports you'll find on older laptops and phone chargers. It could also be used with a power bank if you wanted to be able to charge the Roam while away from a power outlet.
3 years ago
by
TechnicallyWell
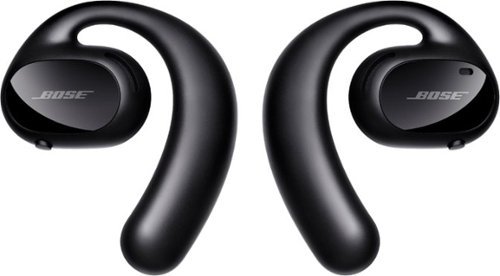
Bose Sport Open Earbuds are true wireless earbuds like you’ve never seen or heard before. What makes them truly unique is that they are the first workout headphones of their kind that combine exclusive Bose OpenAudio technology with an innovative open-ear headphone design to produce high-quality sound without covering your ears. This allows you to hear your music and the world around you for an unbelievable, full-sensory experience. The city. The surf. Your running buddy. Hear it all and your music at the same time with these entirely new, entirely open sport earbuds. Sound is what motivates, and Bose Sport Open Earbuds deliver. The exclusive Bose OpenAudio technology produces clear, consistent sound that’s more authentic and comfortable than bone conduction. In addition, acoustic spillage is minimal thanks to speaker placement that’s closer to the ear. A comfortable and secure fit is crucial when exercising. These sport earbuds were rigorously designed and tested to gently rest on your ears while staying put no matter how intense your workout. Bose Sport Open Earbuds also offer up to eight hours of play time (with daily charging), an advanced mic system for crystal-clear calls, and IPX4 sweat and weather resistance. Now you can combine the environment that invigorates you with the content that motivates you.
can one earbud be used at a time to either take/talk on phonecalls?
Looking at the manual, it appears that only the right earbud contains the microphone for phone calls. So if you want to use only one earbud, it would need to be the right earbud.

3 years, 3 months ago
by
TechnicallyWell
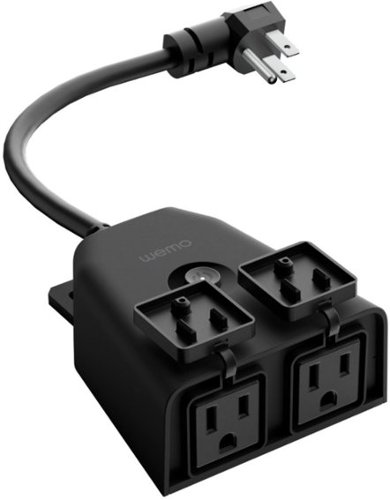
Wemo WiFi Smart Outdoor Plug gives you total smart control over your lights, holiday decorations and other outdoor devices. Featuring two splash-proof and weather-resistant outlets, you can set schedules and control two devices together from anywhere by using the app or your voice with Apple HomeKit, Amazon Alexa, or Hey Google.* It’s perfect for the patio, yard or other spaces where you’d like to manage electric outlets. You can also use Away Mode to randomly turn porch or landscape lights on and off when you’re not home. Sync lights connected to the Smart Outdoor Plug with the sunset and you’ll walk out to a backyard that’s ready for evening activities.
Does this Wemo WiFi smart plug-outdoor, connect to a mesh WiFi system. I have some Wemo smart mini plugs thatonly connect to 2 ghz routers. The Mesh system I have doesn’t distinguish between 2 and 5 ghz bands, so the Wemo mini plugs do not connect my wifi
I connected the Wemo Outdoor smart outlet to a Linksys Velop mesh system that uses the same SSID for the 2.4 and 5 GHz bands, and I have not noticed any issues with this or any of my other smart devices. It's true some devices only work on the 2.4 GHz band, but it shouldn't matter if the SSID is the same for both bands as the smart plug will only "see" the 2.4 GHz version.
3 years, 5 months ago
by
TechnicallyWell
Illuminate and view 2K video with the powerful wire-free Arlo Pro 3 Floodlight Camera. The multi-functional wire-free floodlight camera cuts through darkness with brilliant LEDs, and an integrated high resolution 2K camera allows you to clearly view live video or recorded clips directly from your phone, with an included trial of Arlo Secure. The sleek design seamlessly integrates a robust security solution into your space. See more with a wide 160-degree field of view. Hear and speak to visitors clearly, with two-way audio. Customize lighting configurations to enhance security. Trigger your built-in siren remotely or automatically to ward off unwanted visitors. Protect your home or business with Arlo.Arlo Secure includes cloud recordings of video clips at 2K or lower resolution for 30 days. Renewal of an Arlo Secure plan is required to maintain Arlo Secure features, including cloud storage.
This is for internal use only. Can i turn off floodlights? I don't want a police-type setup.
You can configure the unit to record video only and not turn on the floodlight when motion is detected. However, if you don't plan on using the floodlight, you could save some money by purchasing one of Arlo's cameras without the floodlight.
3 years, 6 months ago
by
TechnicallyWell