Sonos Customer Care
Sonos Customer Care's Stats
Reviews
- Review Count0
- Helpfulness Votes0
- First ReviewNone
- Last ReviewNone
- Featured Reviews0
- Average Rating0
Reviews Comments
- Review Comment Count0
- Helpfulness Votes0
- First Review CommentNone
- Last Review CommentNone
- Featured Review Comments0
Questions
- Question Count0
- Helpfulness Votes0
- First QuestionNone
- Last QuestionNone
- Featured Questions0
- Answer Count1555
- Helpfulness Votes912
- First AnswerSeptember 20, 2019
- Last AnswerOctober 3, 2024
- Featured Answers0
- Best Answers130
Sonos Customer Care's Reviews
Sonos Customer Care has not submitted any reviews.
Sonos Customer Care's Questions
Sonos Customer Care has not submitted any questions.
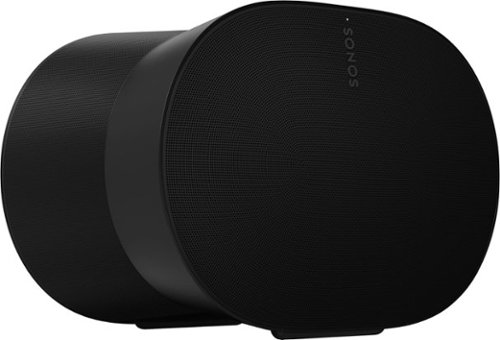
With next-level audio that hits from every direction, Era 300 doesn~t just surround you, it puts you inside your music. Connect to all your content and devices using WiFi, Bluetooth, and 3.5 mm line in. Immerse yourself in the ultimate Dolby Atmos experience when you pair two with Arc or Beam (Gen 2).
how can i play with my jvc projector
To play audio from your JVC projector through Sonos Era 300 speakers, you'll need to ensure that the projector's audio output can be connected to your Sonos system. Here's a step-by-step guide to achieve this:
1. Check Audio Output on JVC Projector
Identify Audio Output: Look at the available audio output options on your JVC projector. Common outputs include HDMI ARC, optical audio (TOSLINK), or analog audio (3.5mm or RCA).
2. Connect to Sonos System
Using Sonos Port or Sonos Amp:
Sonos Port: If your projector has an analog or optical audio output, you can connect it to a Sonos Port, which will then allow you to stream audio to your Sonos Era 300 speakers.
Sonos Amp: If you're using passive speakers or have a home theater setup, you could use a Sonos Amp to integrate with your projector. Connect the projector’s audio output to the Amp, and it will manage the audio output to your Era 300s.
3. Configure the Connection
Sonos Port Setup:
Connect the audio output of your projector to the Sonos Port using the appropriate cables (RCA or optical).
Connect the Sonos Port to your Sonos network using the Sonos app.
In the Sonos app, configure the Port to play audio from the connected input.
Sonos Amp Setup:
Connect the projector’s audio output to the Sonos Amp using the correct input (RCA or optical).
Connect the Amp to your Sonos network using the app.
Configure the Amp to route the audio to the Era 300s.
4. Adjust Settings
Sonos App: Make sure the Era 300s are selected as the playback device in the Sonos app.
Projector Settings: Ensure that the audio output settings on your JVC projector are correctly configured to send audio through the connected output.
5. Verify and Test
Play Audio: Test the setup by playing audio through the projector and ensure that the sound is coming from the Sonos Era 300 speakers.
By following these steps, you should be able to successfully route audio from your JVC projector to your Sonos Era 300 speakers.
1 year, 7 months ago
by
Posted by:
Sonos Customer Care
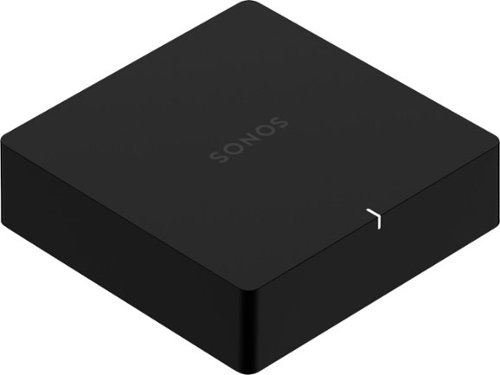
Stream audio to a stereo system with this matte black Sonos Port. The audio line-in lets you connect CD players and record players, while the line-out supports RCA or digital connections for amplified audio equipment. This Sonos Port features easy-to-use controls so you can adjust volume, bass and treble, and the Ethernet port supports high-speed connections.
Does the part number SKU6371154 Port1US1BLK also work with Sonos blue tooth speakers or do speakers have to be wired in through a stereo system?
The Sonos Port is designed to integrate traditional audio equipment with the Sonos ecosystem, but it does not work with Sonos Bluetooth speakers. Here's a breakdown:
Sonos Port Functionality:
Integration with Wired Audio Systems: The Sonos Port connects to a stereo or home theater system using RCA or digital inputs/outputs. It allows you to stream audio from these traditional systems into your Sonos system.
Streaming and Control: Once connected, you can control and stream audio to the Port from your Sonos app, which will then be played through the connected stereo system or speakers.
Bluetooth Speakers:
No Direct Bluetooth Integration: The Sonos Port does not support direct integration with Sonos Bluetooth speakers. Bluetooth connectivity is not a feature of the Port.
Sonos Bluetooth Speakers: For Bluetooth functionality, Sonos offers products like the Sonos Roam and Sonos Move, which can connect directly to your devices via Bluetooth. However, these speakers are not integrated with the Sonos Port.
If you're looking to integrate Sonos speakers that support Bluetooth, such as the Roam or Move, you would need to connect them to your Sonos system through the Sonos app. The Port would not be involved in this process.
1 year, 7 months ago
by
Posted by:
Sonos Customer Care

Deepen your enjoyment of TV, music, and more with bold bass when you pair Sub Mini with Beam, Ray, One, or One SL. Place it anywhere in the room, breeze through setup with help from the Sonos app, and experience richer, more immersive sound without any buzz or rattle..
Will these work with a Marantz Amp/reciever
Connection Setup:
Sonos Port: Connects to your Marantz receiver via RCA or digital inputs and integrates with your existing Sonos system.
Sonos Amp: Acts as an amplifier and can drive traditional speakers, including the Sub Mini, as part of a Sonos system.
Wireless Setup: The Sub Mini connects wirelessly to other Sonos speakers or devices using the Sonos app. You won’t be able to directly connect the Sub Mini to the Marantz receiver without one of these intermediary Sonos devices.
For optimal performance and integration, ensure your setup involves Sonos components that can communicate with each other through the Sonos app.
1 year, 7 months ago
by
Posted by:
Sonos Customer Care

Sonos - Arc 5.0.2 Channel Smart Soundbar with Dolby Atmos - Black
Bring all your entertainment to life with the extraordinarily realistic sound of this Sonos Arc - the premium smart soundbar for TV, movies, gaming, and more.
What is the watts RMS for the Sonos Arc soundbar?
The Sonos Arc soundbar does not officially specify its RMS (Root Mean Square) wattage. Instead, Sonos focuses on the overall performance and features of their products. The Sonos Arc is known for its Dolby Atmos support, eleven high-performance drivers, and advanced sound processing, which contribute to its high-quality audio experience.
1 year, 7 months ago
by
Posted by:
Sonos Customer Care
Sonos - Arc 5.0.2 Channel Smart Soundbar with Dolby Atmos - Black
Bring all your entertainment to life with the extraordinarily realistic sound of this Sonos Arc - the premium smart soundbar for TV, movies, gaming, and more.
How Many Watts Is The Soundbar?
The Sonos Arc soundbar does not officially specify its RMS (Root Mean Square) wattage. Instead, Sonos focuses on the overall performance and features of their products. The Sonos Arc is known for its Dolby Atmos support, eleven high-performance drivers, and advanced sound processing, which contribute to its high-quality audio experience.
1 year, 7 months ago
by
Posted by:
Sonos Customer Care
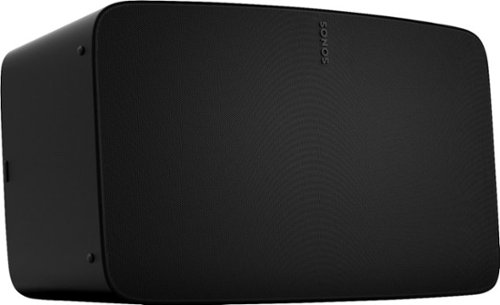
Set up this Sonos Five wireless speaker in your living room to get the party going. Three high-excursion woofers deliver deep bass you can dance to, while Trueplay technology maximizes sound to fit the acoustics of your space. Capacitive touch and Siri, Alexa and Google Assistant voice controls on this Sonos Five wireless speaker let you change tunes and adjust the volume with a tap or a word.
Is the SONOS five compatible with the SONOS sound bar?
Yes, you can use the Sonos Five as part of a surround sound setup with a Sonos soundbar for a more immersive audio experience.
Here's how it works:
Surround Sound Setup: If you have a Sonos soundbar (Arc or Beam), you can add the Sonos Five speakers to create a 5.1 surround sound system. The soundbar handles the center and front channels, while the Sonos Five speakers can be used as rear surround speakers.
Home Theater Integration: In the Sonos app, you can group the Sonos Five speakers with your soundbar to ensure they work together seamlessly for home theater audio.
Music Playback: The Sonos Five can also be used for music playback independently or as part of a multi-room audio setup with other Sonos speakers.
To set this up, you will need to use the Sonos app to configure the speakers and ensure they are connected properly.
1 year, 7 months ago
by
Posted by:
Sonos Customer Care
Sonos - Arc 5.0.2 Channel Smart Soundbar with Dolby Atmos - Black
Bring all your entertainment to life with the extraordinarily realistic sound of this Sonos Arc - the premium smart soundbar for TV, movies, gaming, and more.
How far away from the soundbar can the subwoofer sit?
For optimal performance, the subwoofer should be placed within a reasonable distance from the soundbar, typically no more than 10-15 feet (3-5 meters) away. However, Sonos subwoofers, such as the Sub Gen 3, are designed to work effectively over various distances. Here are some general guidelines:
Distance: While there is no strict maximum distance, keeping the subwoofer within the 10-15 feet range helps ensure that it maintains a strong and reliable wireless connection with the soundbar.
Positioning: Avoid placing the subwoofer in corners or against walls, as this can cause excessive bass buildup and muddy the sound. Ideally, it should be placed in a location that allows for even bass distribution throughout the room.
Placement Tips:
Avoid Obstructions: Ensure that the subwoofer is not obstructed by furniture or other objects.
Test Placement: You may need to experiment with different locations to find the spot where the bass response sounds best in your room.
Wireless Connection: Ensure that there are minimal obstructions between the subwoofer and soundbar to maintain a stable wireless connection. If you experience connection issues, consider reducing the distance or minimizing obstacles.
1 year, 7 months ago
by
Posted by:
Sonos Customer Care

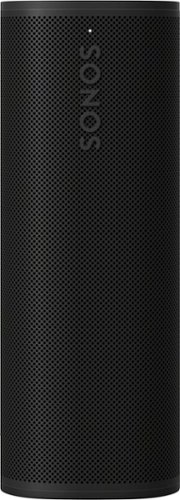
Sonos - Roam SL Portable Bluetooth Wireless Speaker - Shadow Black
Sonos Roam SL allows the user to enjoy hours of music, radio, audiobooks, and more from all your favorite services thanks to the long-lasting rechargeable battery. Listen at home with WiFi and easily control the sound with the Sonos app, and stream with Bluetooth everywhere else. Add more Sonos speakers around your home for multiroom listening. Everything works together over WiFi.
Is this compatible with Samsung SmartThings?
The Sonos Roam SL is not directly compatible with Samsung SmartThings. Sonos speakers, including the Roam SL, primarily integrate with the Sonos app for setup and control, and they do not natively support SmartThings for automation or direct control.
1 year, 7 months ago
by
Posted by:
Sonos Customer Care
Sonos - Arc 5.0.2 Channel Smart Soundbar with Dolby Atmos - Black
Bring all your entertainment to life with the extraordinarily realistic sound of this Sonos Arc - the premium smart soundbar for TV, movies, gaming, and more.
How to wall mount this thing?
Wall mounting the Sonos Arc involves a few key steps and considerations. Here’s a detailed guide to help you with the process:
1. Gather Materials:
Sonos Arc (including mounting hardware)
Wall Mount Bracket specifically designed for Sonos Arc
Drill and appropriate drill bits
Screws and anchors (usually included with the mount)
Level
Measuring Tape
2. Choose the Location:
Height: Mount the Sonos Arc so that it is aligned with your TV screen for optimal audio performance. Typically, this means mounting it just below or above the TV.
Centering: Ensure the Sonos Arc is centered relative to your TV and listening area.
3. Install the Wall Mount Bracket:
Measure and Mark: Use the measuring tape to mark where you want to place the wall mount brackets. Ensure they are level and aligned with the width of the Sonos Arc.
Drill Holes: Drill holes into the wall at the marked locations. Use appropriate wall anchors if drilling into drywall.
Attach Brackets: Secure the wall mount brackets to the wall using screws and anchors. Ensure they are firmly attached and level.
4. Mount the Sonos Arc:
Align the Arc: Carefully align the Sonos Arc with the mounted brackets.
Secure the Arc: Depending on the bracket design, you may need to slide or hook the Sonos Arc onto the brackets. Follow the specific instructions provided with your wall mount bracket.
Check Stability: Ensure the Sonos Arc is securely mounted and does not wobble.
5. Connect Cables:
HDMI ARC/eARC Cable: Connect the HDMI cable from the Sonos Arc to the HDMI ARC or eARC port on your TV. This allows the Sonos Arc to receive audio from the TV.
Power Cable: Plug the power cable into the Sonos Arc and connect it to a power outlet.
6. Final Adjustments:
Level Check: Use the level to ensure the Sonos Arc is perfectly horizontal.
Test: Power on the Sonos Arc and check that it is functioning correctly with your TV and other connected devices.
Additional Tips:
Cable Management: Consider using cable management solutions to keep cables organized and out of sight.
Professional Installation: If you are unsure about drilling or mounting, consider hiring a professional installer.
By following these steps, you can securely wall mount your Sonos Arc and enjoy an enhanced audio experience in your home.
1 year, 7 months ago
by
Posted by:
Sonos Customer Care
Astonishingly lightweight, durable, and powerful, Roam 2 makes it easy to enjoy Sonos sound everywhere life takes you. Just pair, play, and go. Enjoy up to 10 hours of size-defying clarity and bass. Fully IP67 waterproof and dustproof, Roam 2 is ready for the outdoors. Plus, it doubles as a smart speaker at home.
Can I add this to my existing system? I need to replace a play 1 that just died
Roam 2 is plug and play. However, If you are replacing a product on the S1 app this will only be compatible with the S2 app.
1 year, 7 months ago
by
Posted by:
Sonos Customer Care